 In the previous lesson we demonstrated how to send IR codes to a TV, DVD, DVR/cable box or any other device that uses an infrared remote. In order to tell the Arduino what code to send, we typed codes into the serial monitor of the Arduino IDE. While that’s great for demonstration purposes, it’s not very practical. In this continuation of the lesson, we will create a small program using Python which will create a “virtual remote”. This Python script will run on your PC, laptop or even Raspberry Pi which is connected to the Arduino. As you click on the buttons on the app, the script will send the proper codes over the serial link to the Arduino. The Arduino in turn will send the IR signals to your device. In addition to the items listed in part 3a will also need…
- a PC, laptop or even a Raspberry Pi with the Arduino connected to a USB port.
- Python 2.x programming environment installed
- PySerial add-on for Python that enables serial communication
- PyGame add-on for Python that makes it easy to use graphics, mouse, keyboard
- IRLib version 1.1 or later which includes the sample code
- IRLib version 1.1 including IRserial_remote examples and Python code
- Python language interpreter recommended 2.7.4 32 bit version
- PySerial 2.6 for any platform
- PyGame 1.9 for any platform
At the end of this tutorial we will post links to the Python, PySerial and PyGame packages. In part 3c of this tutorial we will give detailed instructions on how to install these passages on a Windows PC and a Raspberry Pi. When using Raspberry Pi it will probably already have Python and probably PyGame installed or you can find instructions on how to install them elsewhere online. We will include instructions on installing PySerial, the Arduino IDE and the IRLib packages on Raspberry Pi.
This example assumes you are using Python 2.7.x or later. Python 3 has some problems with serial communication especially in the Windows version. We also highly recommend installing the 32-bit version even if you have a 64-bit computer. We cannot guarantee this will run on 64 bits. Similarly when installing PySerial we recommend the 32-bit version.
Presuming you already have these packages installed we can proceed to customize a Python script to create virtual remote. In the previous installment we had you use the dump routine on your Arduino to capture the protocols, codes and number of bits for the functions you want to use. Our Python app can handle up to 40 functions however you can leave some of the buttons empty if you wish. But if you’re not yet done so, go back to the previous lesson and write down a whole bunch of codes you want to put in this new remote.
The Python script we will use is available in IRLib/examples/IRserial_remote/IRserial_remote.py. You also need the files “click.wav” and “remotebg.png” in the same folder. You will have to edit several lines of the script to customize it for your purposes.
A few lines into the script we will have to edit the serial port that the script we use to communicate to the Arduino. Look for these lines…
# You will have to edit this to the proper port and speed

ser = serial.Serial('COM4', 9600)
As distributed it is set to “COM4” but on a PC it might be some other COM port or on a Linux machine such as a Raspberry Pi it would be something like
ser = serial.Serial('/dev/ttyACM0', 9600)
We also need to specify what font will be used to put the labels on the buttons a few lines down like this…
# Specify a font. I'm using Arial narrow bold from my Windows

# font folder. However the default font shown below also works.

myfont =pygame.font.Font ("c:/windows/fonts/ARIALNB.TTF",30)

#myfont=pygame.font.Font(None,36)
By the way if you are not familiar with the Python language it uses a hash tag at the beginning of the line to specify it is a comment. The default is a Windows font that is Arial narrow bold that you can specify your own font of choice or used default font by substituting the word “None” as shown above. Look for the section where we define the label text each button. Here are the values as distributed.
# These are the text labels that will appear on each button

label_text=("TVp", "CBp", "P^", "Pv",

           "<<", ">", ">>", "->",

           "Rec", "=", "s", "<-",
           "Gd", "^", "Fav", "Inf",

          "<", "sel", ">", "Lis",

          "ret", "v", "Prv", "Mnu",

          "1", "2", "3", "Ch+",
"4", "5", "6", "Ch-",
"7", "8", "9", "Vol+",
"Pip", "0", "Mut", "Vol-",
)
These correspond to TV power, cable box power, Page Up, Page Down, rewind, play, fast-forward, jump to live, record, pause stop, jump back, Up Arrow, favorites, info, Left Arrow, Select, Right Arrow, Lists Recordings, Return, Down Arrow, Previous Channel, Menu, numbers 1 through 9 and 0, Channel up, Channel down, Volume up, Volume Down, Mute, and PIP. However you can make them say anything you want.
Below that we insert the actual codes. We will use the same format we used in the previous lesson when we type codes into the serial monitor. First is a single digit that describes the protocol number, followed by a hex value, followed by the number of bits. Note that when some protocols the number of bits is optional. Here are the codes I used for a Magnavox TV using the “RC5” protocol and 13 bids And a Scientific Atlantic SA 8300 DVR using the PANASONIC_OLD protocols.
IR_Codes= ("3,180c,13","5,37c107","5,36d924","5,37d904",

           "5,37291a","5,37990c","5,36293a","5,36b129",

           "5,375914","5,374117","5,365934","5,37c906",

           "5,36c127","5,36812f","5,37f101","5,36213b",
"5,37810f","5,366133","5,364137","5,36c926",
"5,366932","5,37a10b","5,36e123","5,373918",
"5,36113d","5,37111d","5,36912d","5,377111",
"5,37910d","5,365135","5,375115","5,36f121",
"5,36d125","5,37d105","5,363139","3,1810,13",
"5,37b908","5,373119","3,180d,13","3,1811,13",
)
Once you have everything edited using your codes you should then load the IRserial_remote sketch into your Arduino. You can try typing a few codes into the serial monitor to make sure it’s working but once you are sure the sketch is running properly you need to close the serial monitor and the Arduino IDE so that they do not tie up the serial port. If you do not close at least the serial monitor, your Python script may not be able to connect to the Arduino properly.
Then run the Python script IRserial_remote.py script. A window should pop up showing a virtual remote control with 40 buttons on it looking something like this…
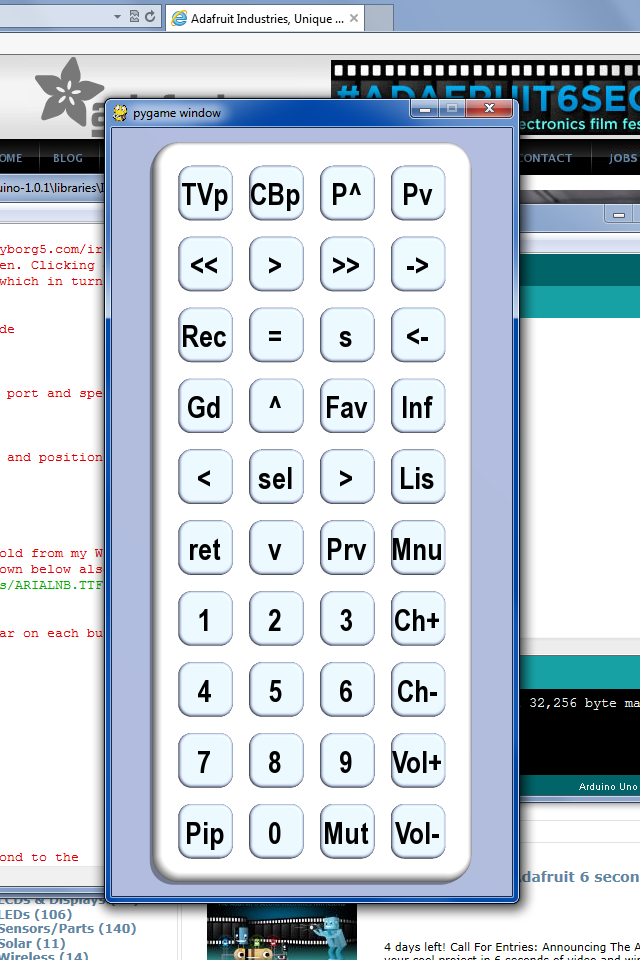
Virtual TV Remote using Python
Notice as you hover your mouse over each button, the text will turn red. If you click on the button with the mouse it will make a clicking noise and it will instruct the Arduino send the proper IR codes. If everything works properly you should be able to control your device. Here is a YouTube video demonstrating how it works.
It’s not our intent to make this a Python tutorial so we will not go through the Python script line by line to explain how it works. Also included in the examples folder under IRserial_remote is a folder called “povray” which contains the source file for the Persistence of Vision Ray Tracer POV-Ray which is a freeware rendering program which was used to create the background image for the buttons on the remote.
Here is a video which demonstrates this application. This video was shown on the weekly Adafruit Show and Tell video chat on Google+ You can click on the “As seen on Show-and-Tell” logo at the top of this post to see it on the show and tell.
As promised here are links to various downloads you may need for this tutorial
In the next installment we will show you how to install these packages in case you haven’t already done so.
Have you ever heard of the pyMCU? You could probably use one to do everything in Python without any other (Arduino) code. Not taking away from your hack at all, but it might be an interesting platform as well.