I’ve just completed building a new piece of adaptive technology that includes infrared TV remote, infrared mouse control, and Bluetooth switch control of my iPhone. It’s the combination of a project that has been in development nearly 3 years. Here’s the story of the solutions I had before I built this remote, why they no longer serve me, and how the new device solves a variety of problems. It all started with a simple wooden stick…
The History of the Stick
In many of my previous blog posts I’ve discussed how I built custom TV/cable remote controls so that I can watch TV and use my laptop computer in bed. However I’ve not discussed how I use these devices when I’m not in bed. That process has recently had to evolve significantly so I thought I would chronicle the history of my use of remote controls while sitting in my wheelchair.
Of course when I had good use of my hands, I would just pick up a remote and push the buttons like anyone else. But at some point, I don’t recall when years ago, my dad built a little aluminum bracket that mounts on the front of my wheelchair control box. We attach a regular universal learning remote to the bracket with some Velcro. I would then push the buttons using a stick in my mouth. That particular stick system has gone through evolutions of its own.
Johnny Carson used to have a comedy routine called “Dickie the stick”. It was a commercial for a toy that had 1000 uses. In fact it was just a wooden broom handle. He would say with a little imagination you could make it into anything. He would throw it across the stage and say “look it’s an airplane”. His pitch man character made it sound like it was the greatest toy ever made but it was just a stick. Actually that commercial wasn’t far off for me. For almost my whole life I’ve carried around a tool that was nothing more than a big long stick. I used it to push elevator buttons, open doors, and grab things that I couldn’t reach. Someday I’ll do a blog just about my big stick. But for this particular blog will just talk about the small wooden stick that I used for typing and pushing buttons. This particular stick has been a wonderful piece of adaptive equipment for me. As you will see it’s been a big challenge to deal with the fact that I can no longer use it (oops… that was a spoiler).
Over the years my disability has progressed. I used to have pretty good use of my hands so I could type on the computer, handle books and papers, even feed myself. I lost most of that in my early twenties. When I could no longer type on a keyboard using my hands I discovered an alternative way to type. I would prop up the computer keyboard on an easel so that the keys were facing me. I used a very long pencil or dowel rod in my right hand, put my elbow up on the armrest or control box, and I would poke at the keys. In the early days of 8-bit computers I would wire in in a couple of extra pushbuttons on the end of a long wire connected to the Shift and Control keys. I would hold those buttons in my left hand. By the time we got to MS-DOS and later Windows they had a built-in feature called “sticky keys”. Many people think that’s what you get from watching too much Internet porn but this is something different. It is a software driver that turns your Shift, Control and Alt keys into toggle keys. For example you push shift and the next key that you type will be shifted. If you push shift twice it holds the shift key down. Everything remains shifted until you hit it again to unlock it. Here is an old photo of me typing on the keyboard this way.
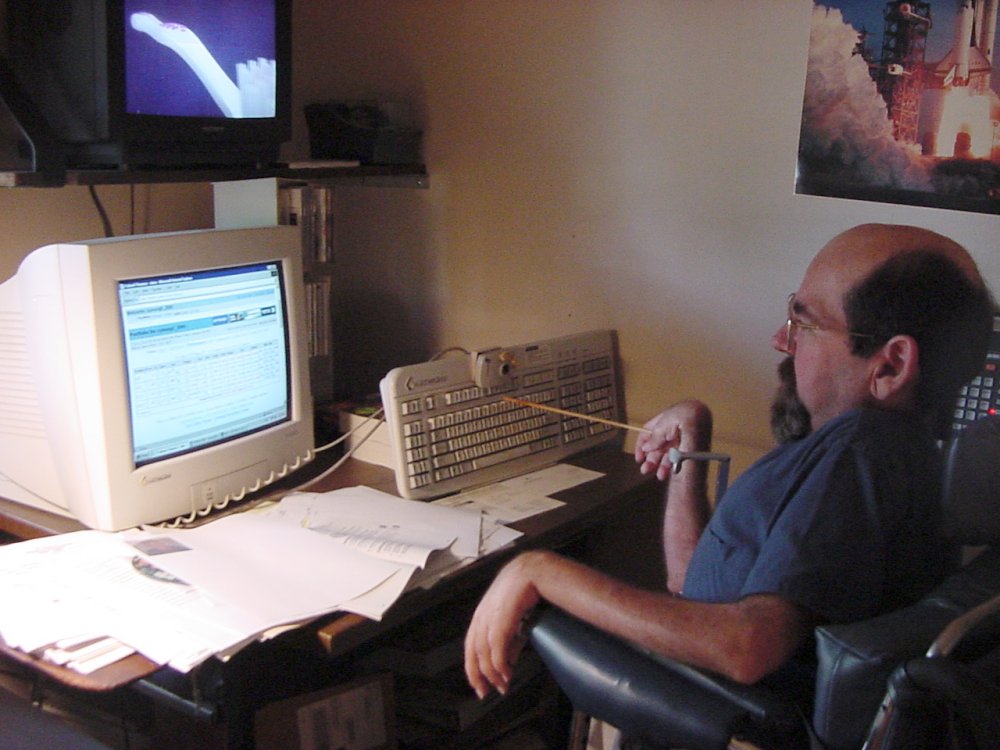
Me checking my stock portfolio using stick it keyboard on easel. Circa 2000
The photo shows a keyboard that was very near and dear to me. It was made by Gateway Computers and was called the “Gateway Any-Key 124 keyboard”. It had 2 sets of function keys, the traditional ones across the top and an identical set down the left side. It also had a special built in hardware keyboard remapping function. You could reprogram any of the 124 keys to send any remapped keypress that you wanted. It also would allow you to create macros so that one keypress would generate a string of multiple keystrokes. Because it was difficult for me to reach the arrow keys way off to the right side of the keyboard, I reprogrammed the top row of function keys into arrow keys. If I needed a function key I would use the ones down the left side of the keyboard.
You will also notice in the photo just above the keys is a mini trackball. It was the only way that I could operate the mouse. That particular model was small enough that it was handy to just mount on the keyboard with some Velcro. I could poke at it with my stick to operate it. The great thing about that particular model was that it included not only a right-click and a left-click button but it included a drag button. It was sort of like “sticky keys” for mouse buttons. You would toggle it off and on if you needed to drag. It would not right-click drag but you rarely have to do that. The problem with that particular trackball was it would wear out eventually. In the end I ended up buying three or four of them at once for about $50 each and keeping them in my closet just in case. The original Gateway keyboard had a 9 pin D serial connector. I was able to later purchase them with a round PS/2 style serial connector but they never did make one with USB. Fortunately I found some serial to USB adapter devices and was able to continue to do use this keyboard many years beyond its normal life expectancy.
When using a laptop, sometimes I was able to prop up the entire laptop on an easel so that the keys were facing me. I had to be careful when purchasing a new laptop because some of them do not allow the display to open a full 180°. Had I tried to prop up one of those, the display would’ve been facing the floor not to mention how difficult it would be to keep it on the easel. Even when I did put it up on the easel, it was very precarious. Eventually I started using the special Gateway keyboard on the laptop as well by just plugging it into the serial port or USB port with adapter later on. Because the keyboard had been discontinued and I was worried it might break, I even stocked up on those by purchasing a spare on eBay. I see here that they are still being sold on eBay. I still have a couple of them in the closet today. Maybe I should get rid of the old keyboards and make some money.

Vintage Gateway 2000 programmable 124 key keyboard available on eBay.
Enter the Dragon
At some point I supplemented all of this by using speech recognition software. I began using Dragon NaturallySpeaking when it was at version 7. I don’t remember what year that was. The current version is 14. Typically I would use my stick for most of what I did but if I had something long to type like a long email or a blog entry I would use the dictation. I didn’t realize that over a period of a couple of years I began using the Dragon more and more and would use the stick less. I recall one weekend we went to the cabin at Cordry Lake and although I had packed my laptop and extra keyboard, I had forgotten to pack the easel to stand up keyboard. So I had to just use Dragon alone the entire weekend. I was surprised to realize I didn’t really miss using the keyboard and trackball. It was soon after that that I resigned himself to using speech recognition exclusively.
Initially the stick in my hand was only used for typing. When I wasn’t at the computer typing on something, I would let go of the stick and leave it somewhere by the computer. Then one day back in the late 1980s as I was driving my wheelchair into my office, my hand slipped off of the joystick of the wheelchair and I crashed into a bookcase. Over the days that followed I begin to discover my arm had weakened to the point where I could no longer keep it steady on the joystick. After a little experimenting, I came up with a system where I would put the stick in my mouth. I would also hold that in my hand and the joystick as well. The mouth stick would steady my hand on the joystick of the wheelchair. Here is my typical driving position.
My typical driving position using the stick in my mouth to steady my hand on the wheelchair joystick. June 2015.
Can’t Touch This
Eventually I expanded my remote bracket on the wheelchair to make room for an iPod touch. If you’re not familiar with it, the iPod touch is sort of like an iPhone without the phone part. It plays music, video, games, and does Wi-Fi Internet access. I started out with the iPod touch model 1 shortly after it came out. The problem was the stick that I was using was a wooden dowel rod with a glob of silicone rubber on the tip so that it would not slip. Even if I turn the stick around and use the wood end, the iPod uses a capacitive touch system. The wooden stick would not activate it. I needed something metallic. After much experimenting I discovered that the metallic piece had to be a reasonable diameter rather than a sharp point. For example we tried just touching a key or a metal knitting needle but that didn’t work. It had to be flat and make flat contact with the screen. That was a problem because as you reach to the top or the bottom of the screen, the stick makes contact at a different angle. So we had to come up with something flexible.
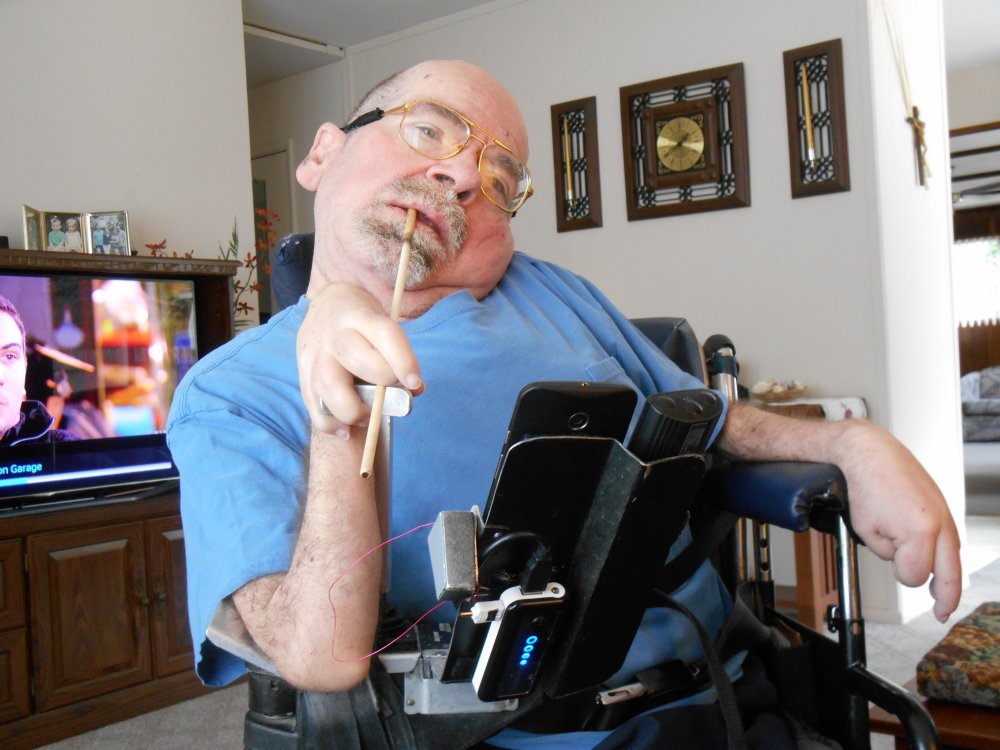
We finally came up with a piece of foam rubber with a hole in it so that you could put the stick into it. On the front of it we glued a small flat piece of metal. I would’ve thought that would be sufficient but it still wasn’t enough electrical capacitance. We attached a very thin ground wire to the metal tip and it worked fine. Having a wire attached to it also had other positive effects. For one if I dropped it, it didn’t go anywhere because it was tethered to the bracket. Also I can hold on to the wire in my right hand to steady the stick as I drag across the touch screen. Here is a photo of me using the stick to operate an android phone that later replaced the iPod touch. If you look closely you can see the thin red ground wire that I’m holding my hand.
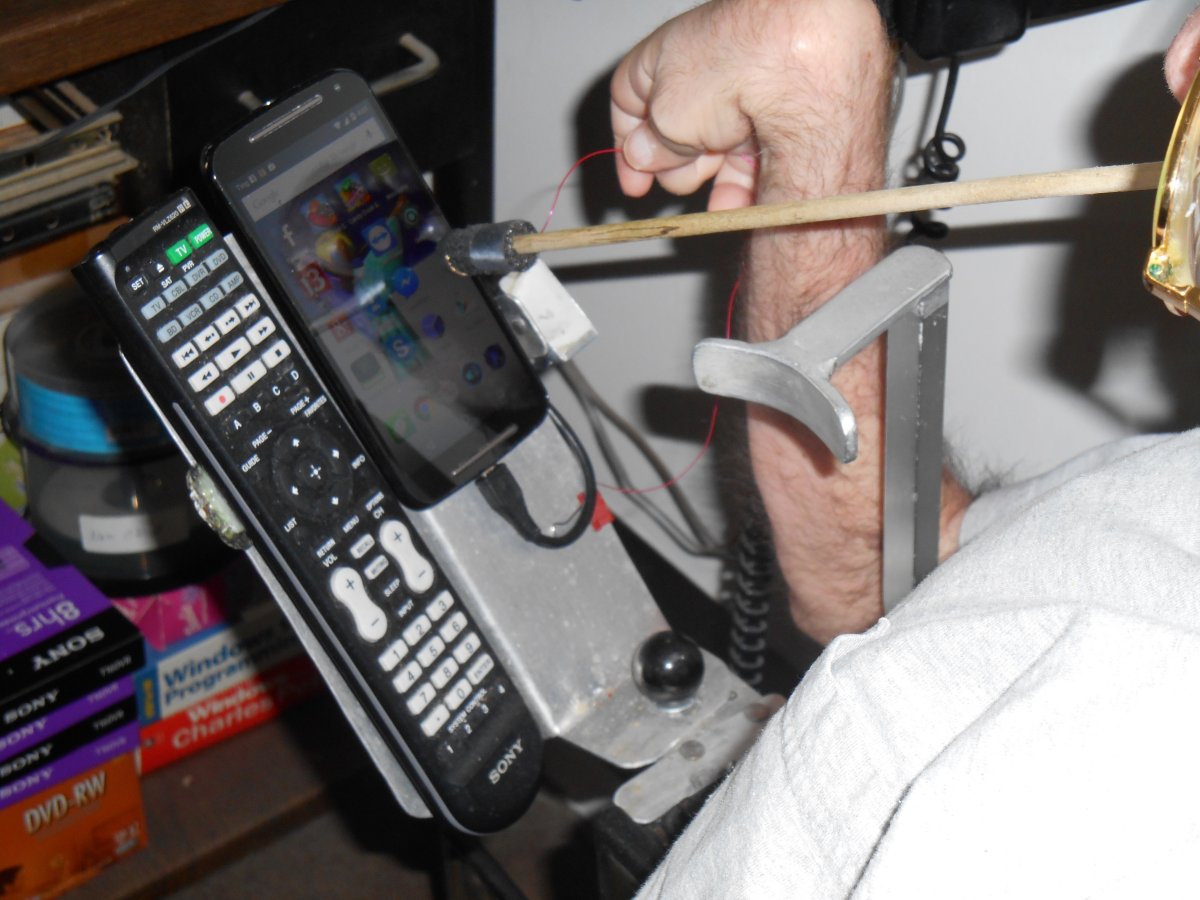
Operating a smartphone and TV remote using a stick in my mouth.
We built a little receptacle on the side of the mounting bracket to hold the tip when I wasn’t using it as seen in this photo.
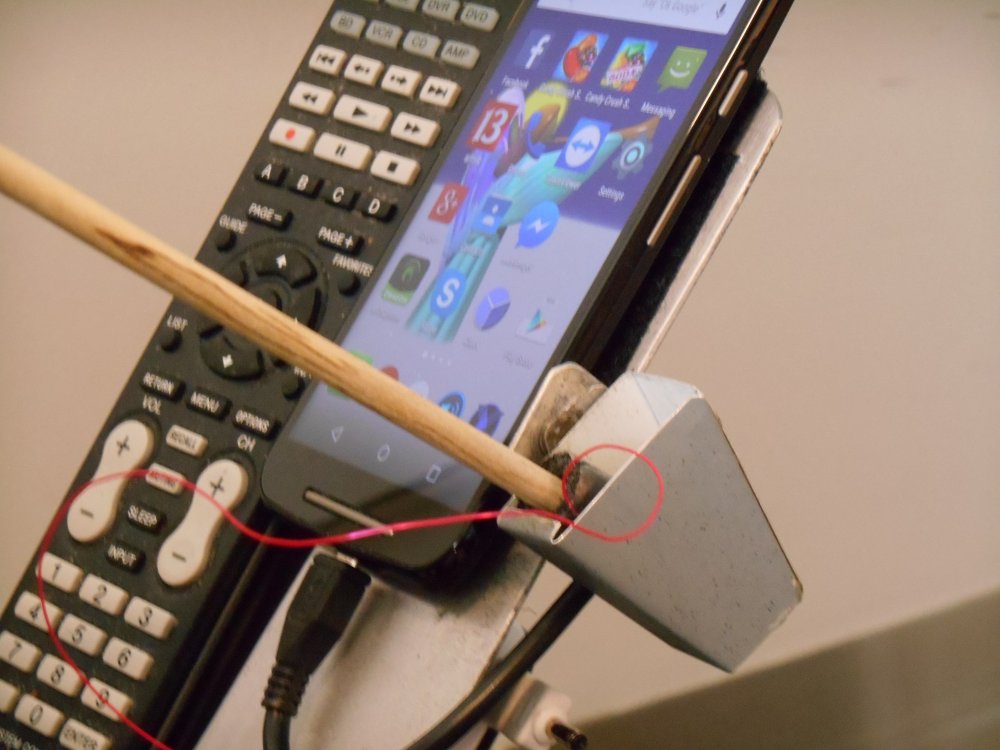
Small receptacle on the side of the mounting bracket holds the foam rubber tip when not in use.
Years ago I had upgraded the iPod touch version 1 to a version 4 but eventually it became obsolete. It would not run the latest version of iOS. Although there was an iPod version 5, the iPhone was already up to version 6 and I knew the minute I bought an iPod version 5 they would come out with 6. I waited and waited for various Apple product announcements. All of the rumor websites kept predicting that an iPod 6 was coming soon but it still hasn’t. A Google search on the phrase “android alternative to iPod touch” led to several articles suggested purchasing a cheap unlocked android phone. If you did not activate it, you could still use it for apps, Wi-Fi, games, music video etc. So that’s when I did. The image above shows the Motorola Moto G second-generation that I purchased. It is unlocked GSM phone which runs the latest version of android. It only cost about $180 and was a really good deal. I wasn’t sure I really needed a phone but once I was to the point where I couldn’t drive my wheelchair anymore, I could not drive up to get to the land line speakerphone that I usually use. I ended up activating it after all. I got a really cheap pay-as-you-go plan from ting.com that is costing me $12-$15 per month.
One of the problems with the android phone is it is larger than the old iPod touch. That means that as I reach from the top to the bottom of the screen, the angle of the stick varies more. It was more difficult to get a little flat metal tip to keep in contact with the surface. I came up with an interesting adaptation to solve that problem. We took a small piece of conductive foam such as used to protect IC chips from static electricity. We cut it in a little rounded hemispherical shape and glued it on to the little metal plate on the end of the stick. So no matter what angle I used, there was still sufficient surface touching the screen. Here is a photo comparing the size of the new android phone on the left and the iPod touch 4 on the right.

My comparatively tiny iPod touch 4 next to my newer Moto G android phone.
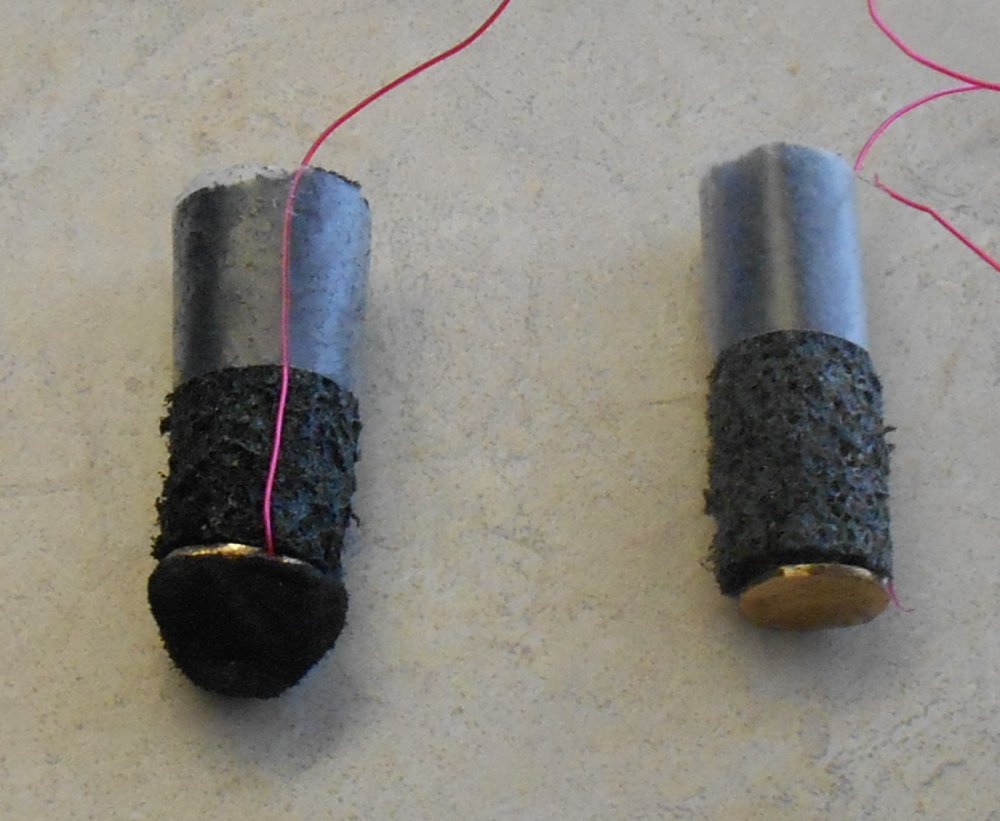
Here is a close-up showing the flat tip on the right that I used for the iPod and the one on the left is the new rounded tip use for the android phone.
That whole system worked really well for several years. It got me through hundreds of levels of Angry Birds and above level 1000 on Candy Crush as well as allowed me to look up countless facts on IMDb, post to Facebook, and check the weather radar anytime I felt like it.
I.R. An Expert
The stick isn’t the only piece of adaptive technology relevant to the story. A lot of what I do is assisted by infrared remote control such as the ones used by TV, cable, DVD etc. It was about three years ago that I got back into tinkering with electronics when I purchased my first Arduino microcontroller. I became interested in infrared remote controls and that led to the building of the TV/cable remote that I use in bed. The whole journey was documented elsewhere in this blog. I came up with another use for the Arduino when they introduced the Arduino Leonardo model. It is capable of emulating a mouse or keyboard when plugged into the USB port on the computer. So I built a little box that would pick up signals from my TV remote and it would create mouse movements as well as some keystrokes most specifically the arrow keys. I could switch back and forth between mouse mode and keyboard mode. Because I don’t have a cable box in my office, I use various codes from the cable box to control this device. However when I built another one for my laptop that I often use in the bedroom, I had to pick a different set of codes for that one so that it didn’t change channels. The one for the laptop used code from my Blu-ray player. I never use the laptop in the living room while watching Blu-ray so that was okay.
While Dragon dictation software does have mouse controls, they are not very flexible. For example you cannot use the mouse scroll wheel, it is difficult to shift drag and you cannot right-click drag at all. But pushing the TV remote with my stick, I can do all of that and more with the Arduino Leonardo and an IR receiver.
My infrared remotes are based on a library of code written by a guy named Ken Shirriff which I later rewrote to make a little more flexible. I published the code on GitHub and on this blog. My version has been so popular, I’m considered somewhat of an expert on IR remotes. It has been really satisfying to get emails from other people who have built their own IR remotes for their elderly or disabled friends and family. One guy build a remote for his nearly blind grandfather using my code. His version has very large pushbuttons and plays back soundbites when you push the button. It includes specialized buttons that automatically jump to some of his grandfather’s favorite channels such as news or sports. The guy just recorded his own voice to play back but I think it would’ve been better to have James Earl Jones say “THIS is CNN!” or the ESPN Sports Center jingle “Duh da dant, duh da dant”.
RIP The Stick
It’s kind of interesting that the stick saved me from two separate situations where I was very emotional over lost ability. When I couldn’t type anymore using my hands I thought it meant the end of using the computer altogether. The stick let me keep typing. Then when I couldn’t drive my wheelchair anymore, the stick let me keep driving. It also had other uses such as pushing TV remote buttons and operating an iPod or touchscreen smartphone. Unfortunately I met another one of those crossroads moments where I can’t do what I used to do. The stick is not going to bail me out. In fact because I could no longer get the stick into position that I needed, I’m not able to use it to operate the remote, the phone, or to assist me with driving. Here’s a brief video that shows how difficult it was for me recently to be able to get the stick into position.
That video was recorded back in June 2015. As I write this in January 2016 things have gotten worse. For the past couple of months I haven’t driven my wheelchair all. I couldn’t get the stick into position without help, so anytime I wanted to go somewhere, dad would have to get into position and even once I was there sometimes it was too difficult to drive. So in recent weeks he just pushes me everywhere. The new wheelchair I’ll be getting should resolve some of that. You can see other videos and blog entries about my quest to get new wheelchair.
Arduino to the Rescue
Now that I am no longer able to use the stick, I had to come up with something else. I had been anticipating this problem for many years especially when it came to using the TV remote. After using my specialized Arduino powered remote in bed with just a few pushbuttons, I realized it was much easier to use than pushing the buttons with my stick while sitting in the wheelchair. This latest remote that I purchased has very tiny buttons and unless you get the tip of the stick in exactly the right place they would not push. So over two years ago, I began working on building an Arduino powered TV remote to replace my usual universal remote.
I started out with an Arduino Leonardo and a 4 x 20 character LCD screen. This was going to be the ultimate remote that not only would control the TV and the computer mouse, it might also be used as a wireless infrared keyboard. That’s why I needed the bigger display. I decided I would put four or five pushbuttons on it to scroll through the menus. I would still using my mouth stick but I would have the options of attaching micro switches that I would hold in my hand. We actually built an early prototype of the device and it was pretty cool but it was a little bit impractical. It was rather large and heavy to be mounted on bracket that I had been using. I wasn’t sure what I was going to do to provide power to it. Also the various types of pushbuttons that I tried worked very well. If I used micro switches on the end of a wire, I had to put my arm in an awkward position in order to be able to use them. This particular device didn’t go completely unused. I programmed it with special codes for a toy helicopter that used in infrared remote as well as a toy dinosaur. I’ve already documented those projects in other blog posts and videos. I never did get around to using it as a TV remote because I couldn’t come up with the right buttons. Also I didn’t really need it, I could still pushbuttons with the mouth stick. Keep in mind this project started almost 3 years ago when I was in better shape. Here’s a photo of the prototype was a large 4 x 20 LCD display that I never did get fully working.
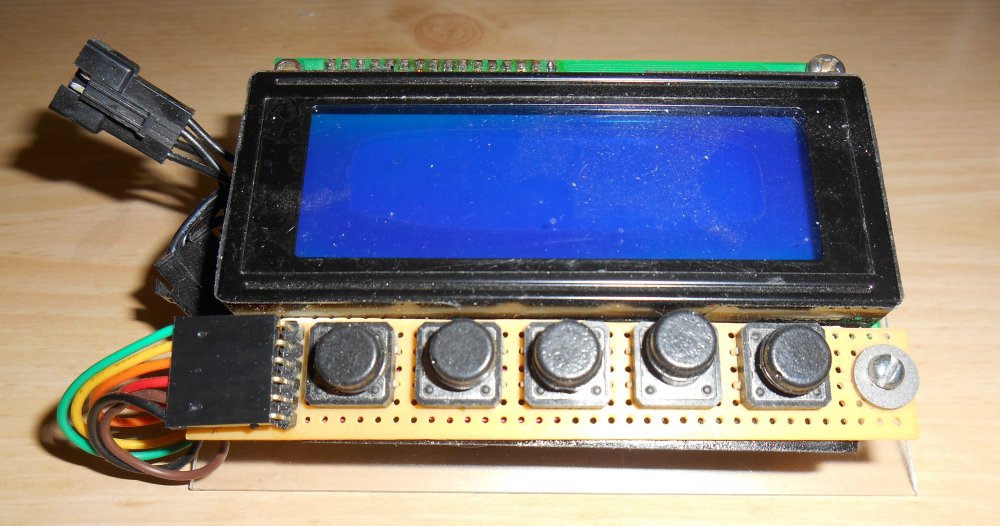
The Leonardo-based IR remote with 20×4 character LCD. I never finished it.
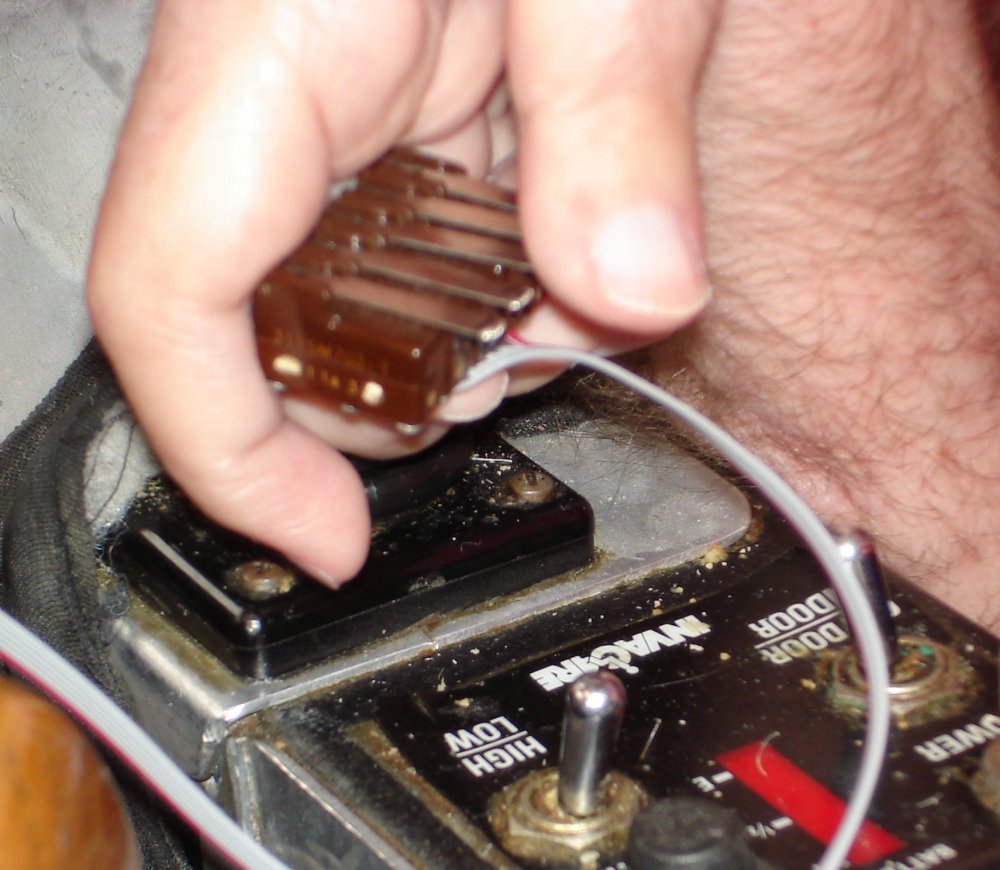
Here are the 5 micro switches connected to the Arduino Leonardo remote that I could have used as an alternative to the pushbuttons on the device itself. I used these switches to control the helicopter and the toy dinosaur. It turns out that 5 switches were too many. I could not comfortably hold them and I could not hold them if my arm was in a position where I could drive the wheelchair with the joystick. Now that I’m no longer using my hand for the joystick, I found a position where I could comfortably hold 3 of these switches with a little adaptation which I will show you later.
Internet of Things in the Interim
Pinoccio Wi-Fi Development Board
In the interim, I found other ways to control my TVs but this time over the Internet. Using the old Pinoccio Wi-Fi module and a webpage I was able to control the living room cable box from my adjacent office by clicking on a webpage. I have an HDMI splitter connected to the living room cable box. One output goes to the living room TV where my dad watches. The other output goes to a very long HDMI cable that goes through the wall into a TV in my office. There I can watch the same thing as dad is watching the living room. Of course he falls asleep in the recliner when doesn’t fast-forward through the commercials. Being able to control the living room cable box remotely is very useful. I also set up a similar system between the cable box/DVR in my bedroom and ran it into the office although I use RF coaxial cable for that link which makes it standard definition only. Still it’s very useful. I also made the webpage sensitive to keyboard presses which meant that I could use my voice control to operate it. For example if I would say “Press P” using Dragon dictation, the webpage would push the play button. The arrow keys were especially useful when browsing through the on-screen guide. I could simply speak the Dragon command “move right 6” or “page down” and it would scroll around the on-screen program guide.
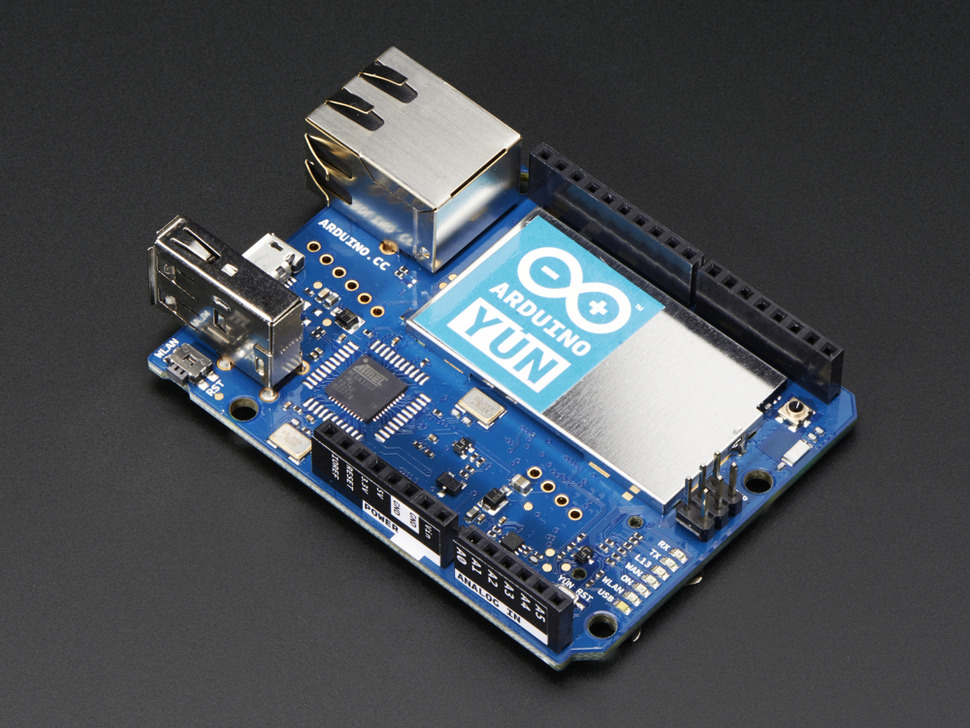
Arduino Yun
The Pinoccio platform was unreliable and eventually discontinued. You can read about my love/hate relationship with that elsewhere. I replaced it with the Arduino Yun which not only made it a Wi-Fi compatible Arduino platform but it had a built in advanced processor running a version of Linux that could serve the webpages rather than hosting them on my PC. The Arduino Yun can be reprogrammed by Wi-Fi which is very useful. I can upgrade the software anytime I want. The unit in the living room is stuck underneath an end table next to my dad’s chair. The one in my bedroom is up on a bookshelf. In recent months as I’ve lost the ability to use my regular remote and stick I even added a third Arduino Yun in the office which is only used to turn the office TV off and on and control the volume. Each has its own webpage and creates its own IR codes specific to the devices in that room. I also have webpage control to a Kodi/XBMC media server running on raspberry pi. So I can control 2 different cable boxes, three different televisions, and three different raspberry pi media players all using webpages designed to be compatible with voice control.
Chris helped Christopher. Christopher helps Chris.
I still miss being able to push remote buttons. Once I realized I really do need a cell phone for safety purposes since occasionally dad leaves me alone while doing errands, I had to come up with a way to control the phone again now that I could no longer use my stick to operate the android phone. I could give up playing Angry Birds. You can play Candy Crush on a Facebook webpage. But I really need the phone. Thanks to a young man named Christopher Hills who lives in Australia, I discovered that my move from iOS to android was a mistake. He has cerebral palsy but he doesn’t let it stop him from pursuing his hobby and vocation of making videos. He is somewhat of an expert in adaptive technology. He posted a YouTube video embedded below in which he describes new accessibility features in iOS version 9. It allows you to use one or more pushbuttons to access nearly every function of the phone. Of course it also works for iPad tablets. The pushbuttons are connected to the phone or tablet over a Bluetooth connection.
Seeing that video was a very emotional experience for me. For one it was the realization that I could continue to use a smart phone after all. But he also reminded me of my late friend Christopher Lee. He was a friend who had very severe cerebral palsy. I had built an accessible computer for him back in the early 1980s. My late friend could not push a button but he could make a clicking sound with his tongue. Of course there was no speech recognition back in those days because of eight bit computer just wasn’t powerful enough to do it. I will write a whole other series of blog posts about my friendship with him and the things that we went through to get him computer access. It’s amazing that 30 years ago Chris Young was building accessible computer for a guy with cerebral palsy named Christopher Lee. Now a guy named Christopher Hills with cerebral palsy extremely similar to the severity of my friend Christopher Lee is demonstrating to me how I can continue to access a smartphone. It all came full circle. Here’s a link to the video demonstrating the switch control features of iOS 9.
Just-In-Time Technology
It’s a bit creepy that the technology that I need, has been developing just in time for me to use it. For example the mouse control via Dragon dictation software is usable but awkward. Once I got into Arduino I wanted to find a way to emulate a mouse or keyboard. While I was investigating various hard ways to do that, they released the new Arduino Leonardo which made it incredibly easy. Just as the Pinoccio platform was shutting down I discovered the Arduino Yun which in the long run was a better solution. And just as I was losing the ability to use a smart phone, iOS 9 was being released with unprecedented powerful switch control features. Then another “just-in-time” technology came along. The electronic supplier that I use, Adafruit Industries, is a phenomenal organization designing and selling maker products around the world. They are where I buy all of my electronic parts and I show off my projects on their weekly video chat “show-and-tell”. They had recently begun slowing various modules for Bluetooth control. The new Bluetooth 4.0 also known as Bluetooth Low Energy or BLE makes it very easy to build gadgets that communicate with computers, tablets, or smart phones via Bluetooth. That was exactly what I needed if I was going to use wireless switch control.
Adaptive equipment suppliers market Bluetooth devices especially made for switch and/or joystick control at a cost of up to $500. There was another model for about $150 that wasn’t nearly as capable but would work with a couple of push buttons. However I could purchase a handful of parts from Adafruit and I could build one for under $75. By building it myself I could customize the software however I wanted. I could incorporate whatever other functions I wanted besides the iOS switch control including making it an infrared remote TV, cable and mouse control.
Step-by-step all of the technology that I needed was appearing exactly when I needed it. They say a coincidence is when God creates a miracle and nobody notices. I was noticing things falling into place.
Goodbye Android… Back to iOS
There was switch control the older versions of iOS however my old iPod touch only worked up to iOS 5 or 6 I forget which. Those earlier versions of switch control left a lot to be desired. Until I saw that Christopher Hills video, I had no idea how capable it had become. Latest android version also introduced switch control but it wasn’t nearly as powerful or useful as iOS 9. It was obvious I was going to have to switch back to iOS.
I recently purchased an iPad for my nephew that he needed for school. Before delivering it to him, I tinkered with it using an Adafruit Bluefruit Micro BLE module and prove that it could communicate with iOS 9. That startled the issue for me. Although it cost me a fortune, I purchased an unlocked iPhone 6. Really didn’t need the 6s or the 6 plus versions. I could still keep my cheap pay-as-you-go plan that’s costing me less than $15 per month. I very rarely am away from Wi-Fi so I don’t need to pay $40 per month for unlimited data. My dad retired his old flip phone and inherited my android phone. He’s having a lot of fun with it learning how to use smartphone features he’s never had before.
Finally the Ultimate Remote “The IRBLE”
Since I was going to be building an electronic device to operate the iPhone, it was time to also incorporate TV/cable remote capability as well. Technology had advanced that things were smaller and more capable than when I first started building the big display Arduino Leonardo remote three years ago. The Arduino Micro BLE has the same ATmega 32u4 processor as the Leonardo. Additionally it has Bluetooth and it is only slightly larger than a USB thumb drive. Instead of the huge LCD display that only display 4 lines of 20 characters, Adafruit now sells an OLED graphic display that is only 1.3 inches across but has 128 x 64 pixels of resolution. Because I no longer had to keep my arm in a particular position to drive the wheelchair, I could place my arm in a position that made it easy to hold the micro switches to activate the device. I now have a 3-D printer which allowed me to make a little gadget that attaches to the micro switches that makes it easier to position them in my hand securely. The only remaining problem was how to get power to device. I had solved that problem a few months ago by designing the Printy Boost battery pack which uses a LiPoly battery, an Adafruit charging module and a 3-D printed case of my own design. Click here to see the tutorial I wrote for the Adafruit Learning System showing you have to make your own Printy Boost battery pack. I had already been using this battery pack to supplement on my android or iPhone. I just needed to run a little cable from the battery pack over to the new remote.
I have decided to call it “IRBLE” (pronounced the same as herbal) which is an combination of IR for infrared and BLE for Bluetooth Energy. Here are a series of photos of the project.
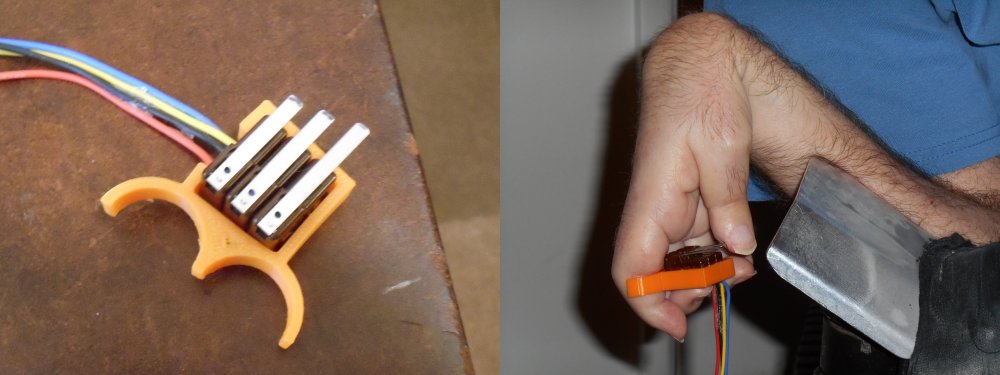
This is me holding three micro switches in my right hand. The orange plastic is a 3-D printed adapter that lets me hold the buttons in the proper orientation.
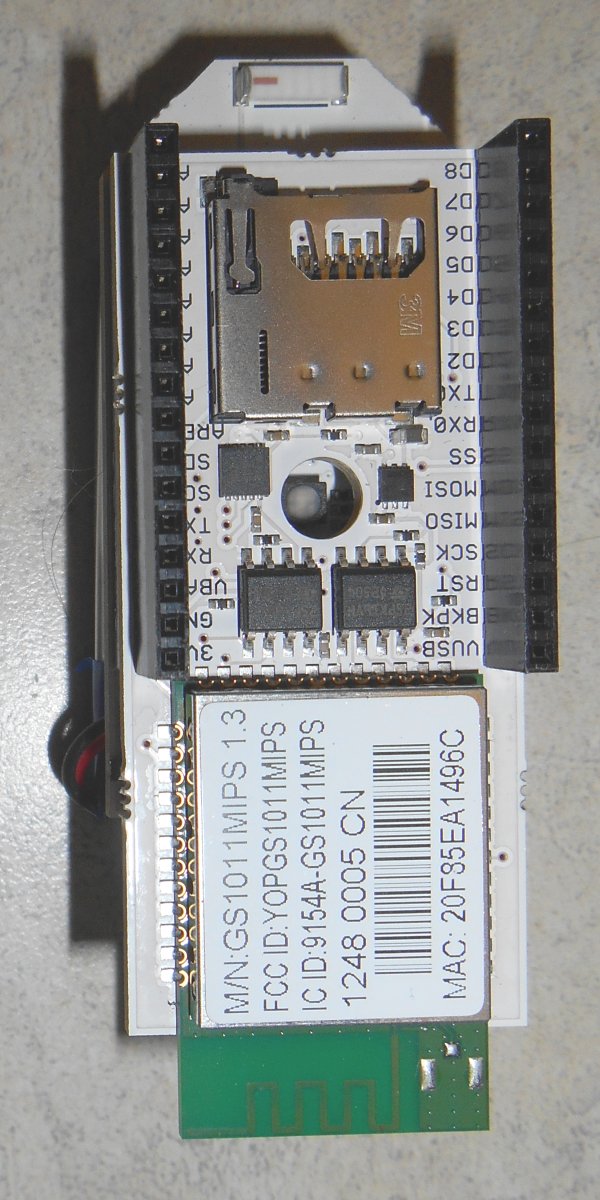
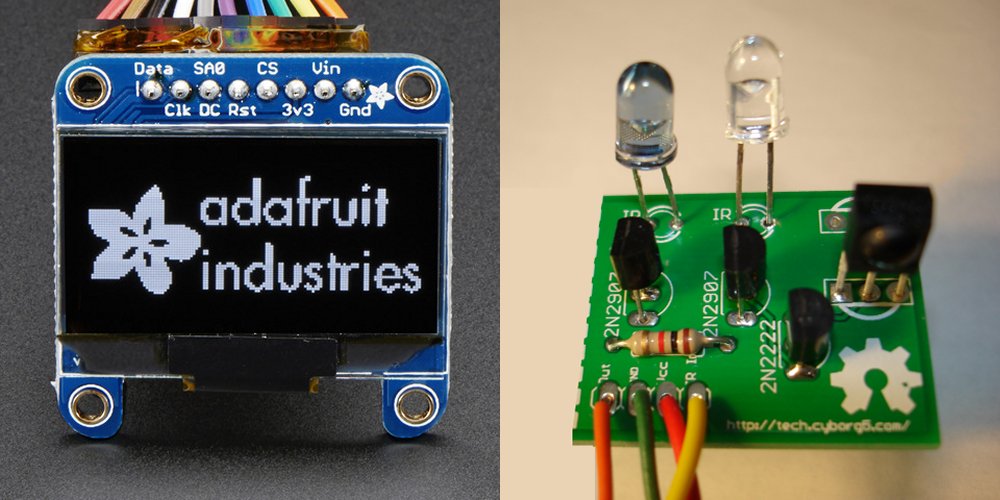
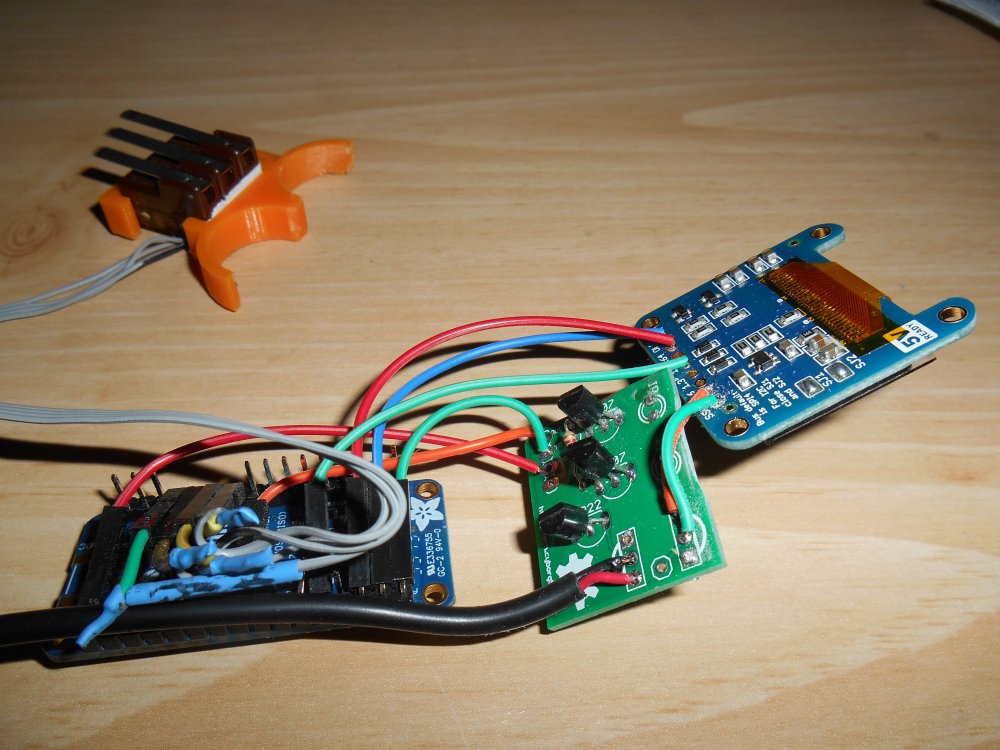
Here are the Adafruit Micro BLE board, the Adafruit 1.3 inch OLED, and my custom-designed infrared output board that I use for all my projects.

The Adafruit Micro BLE measures about 2″ long.
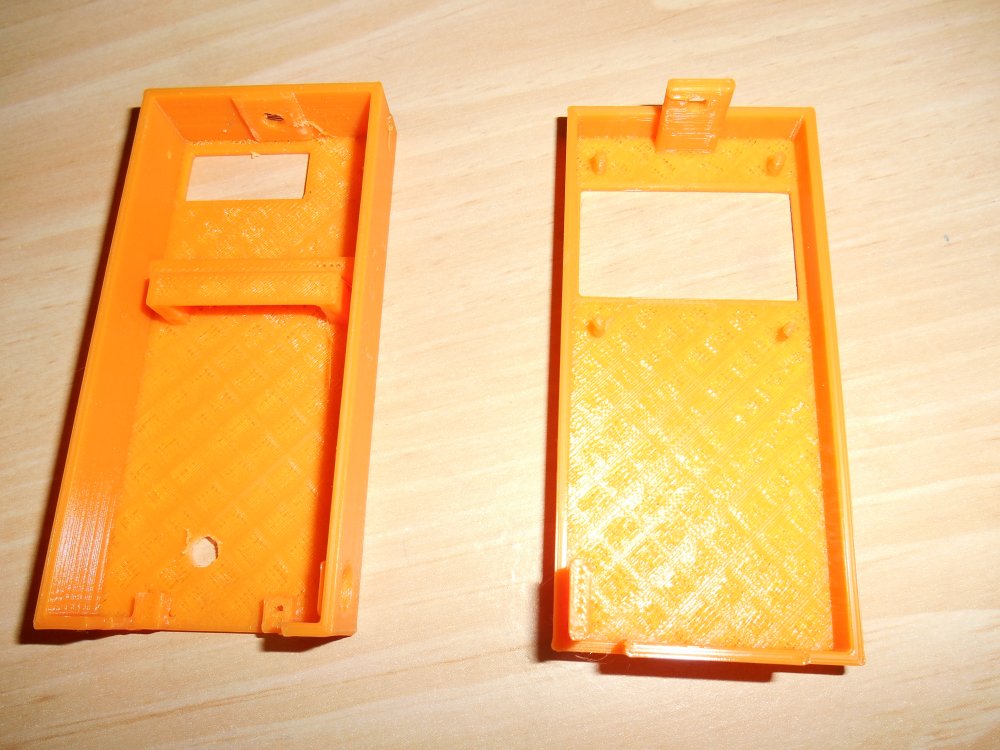
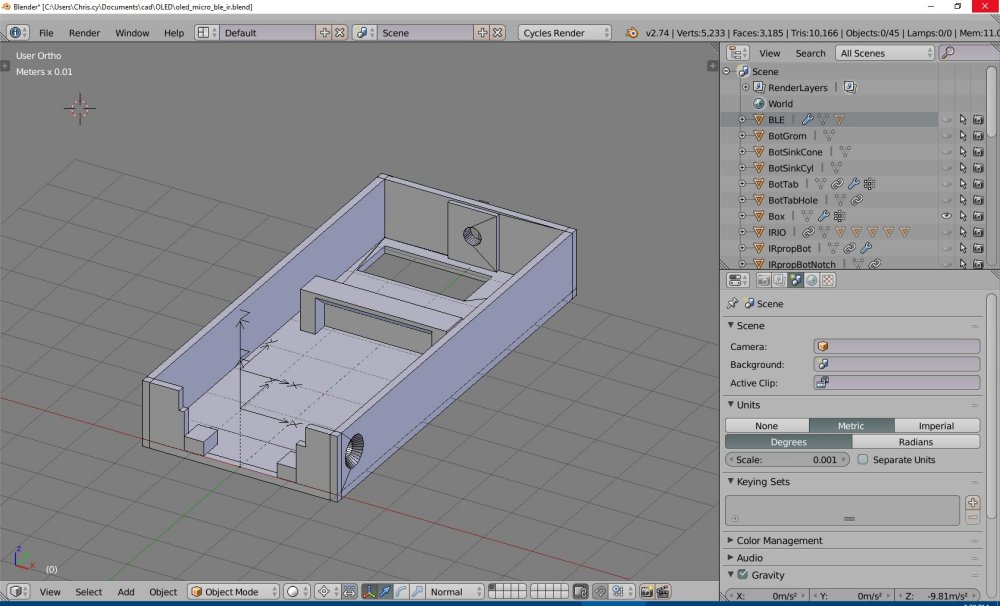
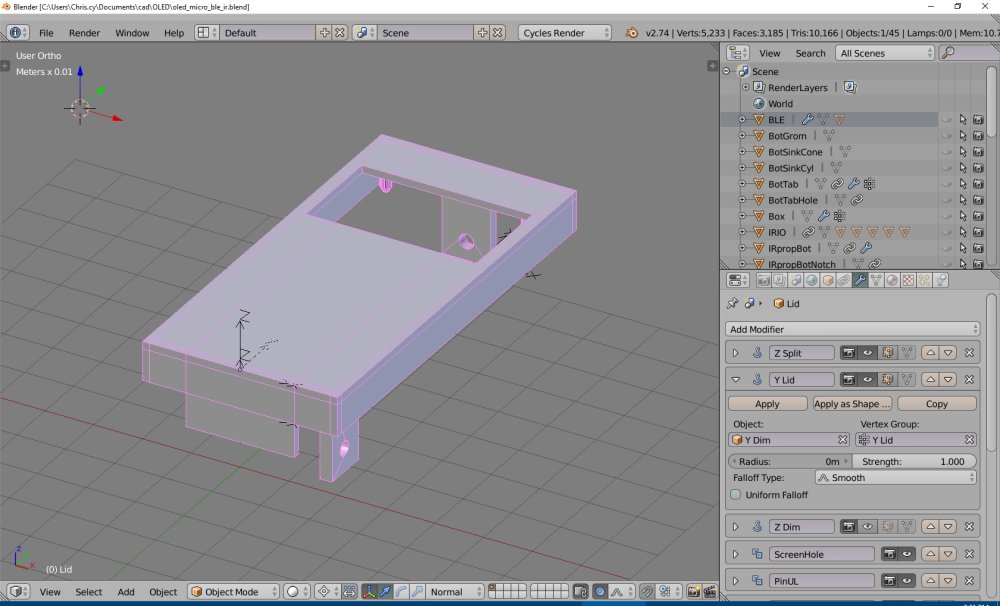
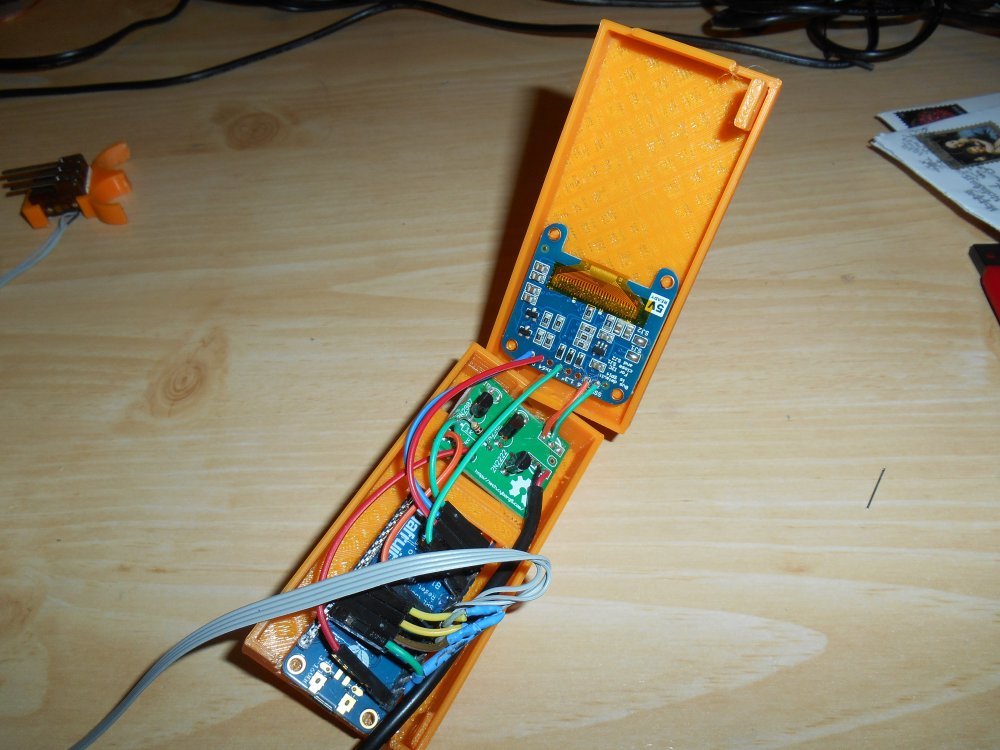
Here is the 3-D printed case will I made for the new device. Below that are some screen grabs from Blender 3-D when I designed the box.
Here’s the thing all wired up. It looks a mess but it works. Thanks to dad and his excellent wiring skills.
Here are the parts in the case.
Here is the backside of the assembled device showing the infrared LEDs protruding out of the case. These transmit the signals to the TV or cable box.
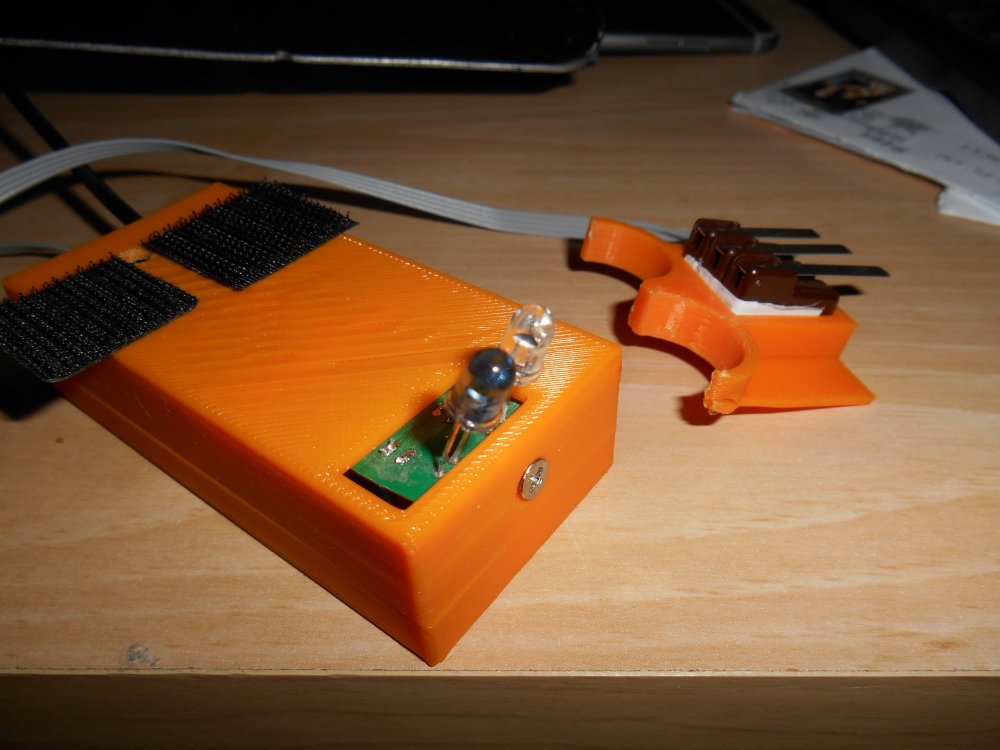
You can also see the Velcro tabs is to attach it to my bracket on the wheelchair. Between the tabs is a tiny hole which we drilled in the back of the case so I could reach the reset button. A couple of times during the programming I had a glitch and nearly bricked the device. Fortunately if you hit the reset button at just the right moment and initiate and upload it will work again. I was worried I would not be able to recover it After one of the glitches. Believe it or not even though this board was only introduced a few months ago, it has already been replaced by a new model. Adafruit has a new line of development boards called “Feather” that come in a variety of configurations. If I had ruined my board I already had purchased one of the newer Feather models but I would’ve had to redesign the wiring harness and the 3-D printed enclosure. Fortunately I was able to recover it.
Finally here is the final product mounted on my bracket next to my iPhone 6.
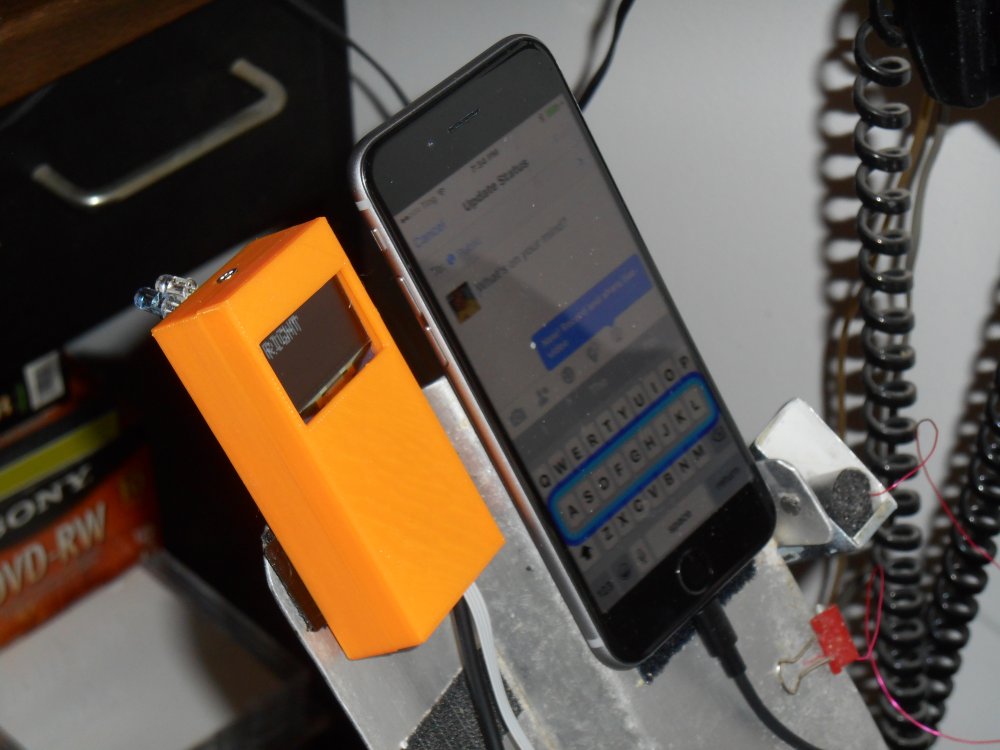
You can see on the side of the mounting practice holding the old capacitive touch foam rubber tip for my stick. I probably will never use it again but there is one final thing for which I might use the stick. When playing Candy Crush on a timed level I cannot work the mouse with my voice control or IR remote quickly enough to finish the level. I can only do those levels with the stick in my mouth. But other than that, I won’t be needing the stick anymore.
The TV in my living room, bedroom, and office are all Samsung and use the same codes even though they are different models. The cable box in my bedroom in the living room uses the same codes. In addition to being able to control all of that, and the mouse and arrow keys on my desktop PC, also programmed in the kitchen TV and the surroundsound amplifier in the living room. As I’m writing this, I still need to program in codes for my Blu-ray player. I’m a little bit worried I might run out of space on the Arduino. It is only has 2K of RAM memory and 32 K flash memory. I only have about 150 bytes of RAM remaining and I’ve used 94% of the flash memory. Fortunately Adafruit also has a Feather board that uses ARM Cortex M0 processor. https://www.adafruit.com/products/2995
It runs at 48 MHz, as 256 K of flash memory, and 32 K of RAM memory. I would have to rewrite my infrared code library but I intend to do that anyway.
Among the things I can do besides make phone calls and run most apps, I have an app that gives me remote control of the Kodi media players on my raspberry pi. Of course I could modify the design of the remote to use a Wi-Fi add-on and control the raspberry pi easier than through the phone. Adafruit does not yet make more than has both Wi-Fi and Bluetooth but my guess is by the time I got around that, they will have one. Possibly a Wi-Fi add-on for the Bluetooth board or a Bluetooth add-on for a Wi-Fi board. For now I got a remote do absolutely everything that I need it to do.
We can finally retire my last stick.
Epilog: Recently I was hospitalized and had to be put on a ventilator. The only way I could effectively communicate with doctors and nurses was to use this Bluetooth device to type messages into the notepad application on my iPhone. You can read a multipart blog about my hospital adventure titled “Pray That They Listen to the Man with No Voice“. Also I’ve written a tutorial for the Adafruit Learning System describing how to build a Bluetooth device for iOS switch control. You can read it here.
One more item… After over a year of faithful service my Ultimate Remote gave up the ghost. Here is an article about the replacement unit that I built.
The Ultimate Remote is Dead. Long Live the Ultimate Remote 2.0