In this installment we will cover the third and fourth days of working on the new wheelchair. We start to work on the new bib mount and continue to make other adjustments.
If the Shoe Doesn’t Fit…
We are now up to Wednesday which was the third day of the new wheelchair. We started out the day by sitting me in the new chair. Dad had previously shortened the foot rests so we were anxious to see how they fit. Somewhere along the way we miscalculated because both of the rest were still too low. For the time being we would put a pillow under my feet and dad would have to go back and get out the sawzall and shorten them even further.
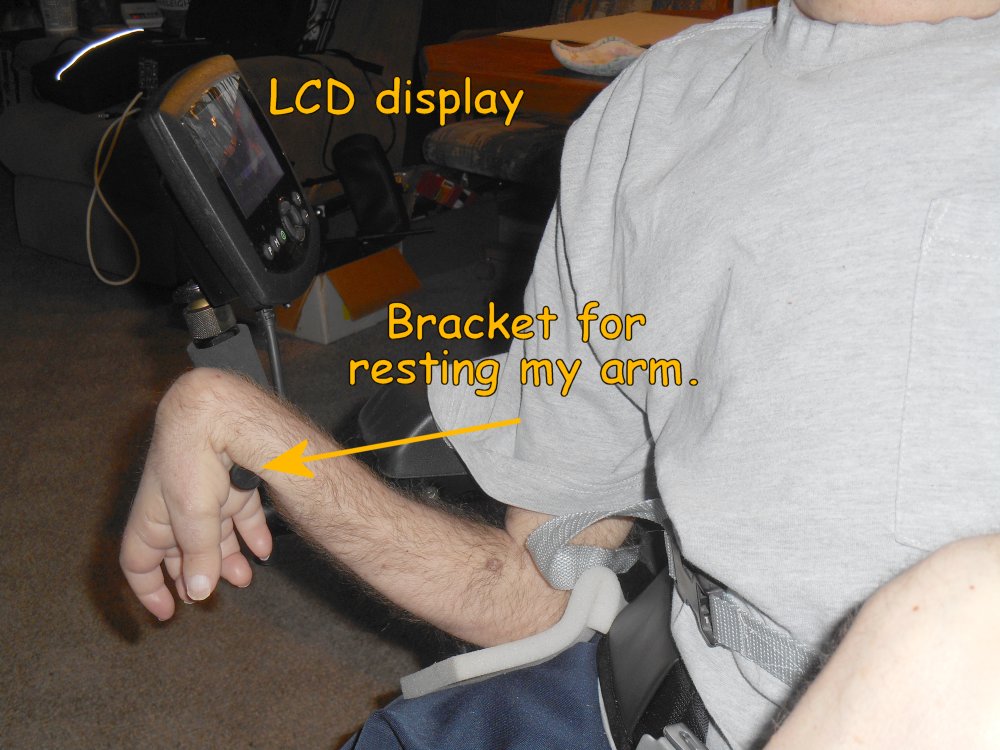
The headrest wasn’t exactly like I wanted it but it was good enough to get me through the day. We would do more tinkering with that later. When the wheelchair technicians were here they had raised my left arm rest as high as it would go. It still wasn’t high enough but as a temporary measure we put a pillow under my left arm.
Getting In the Mode
There is an LCD display mounted on the right arm rest. The chair has various modes that you can put it in for driving indoors or outdoors or for using the attendant controls. It also displays an image of the seat when you are in seat adjustment mode so you know which part of the seat you’re adjusting. For example when you push the mode button it would say one of the following “recline”, “tilt”, “recline and foot rest”, “both foot rests”, “left foot rest”, “right foot rest”. If you moves the joystick forwards or backwards it moves that item. If you tap the joystick left or right it moves to the next seat item such as going from recline to tilt and so on. Of course until I get a mode change button, I wasn’t going to be able to operate any of this.
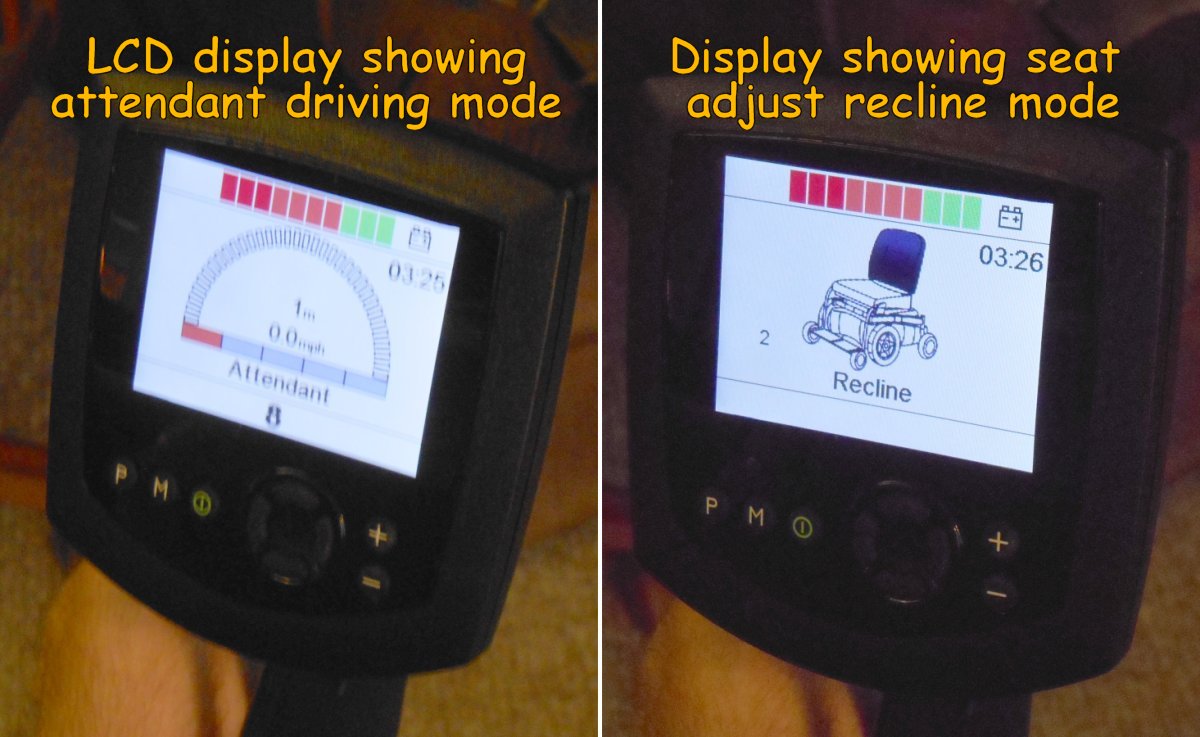
The LCD display was mounted pretty far forward sticking out in front of the armrest. It actually made the chair a little bit difficult to drive it through a narrow passage because it was sticking outside and so far forward. We would later adjust it so that it was not sticking outside or the front so far. When we got that adjusted, the little bar where the display is mounted actually is in a very good position where I can rest my right arm and still be able to hold the micro switches for my ultimate remote control.
I forgot to mention in an earlier post that I solved the mystery from the first day. When Patrick and tried to plug in the user control button for changing modes, it would turn the power off and on but would not change modes. That first night after I was in bed I got on my laptop and did some Google searches and found a PDF downloadable version of the technical manual. It turns out there are 3 places that you can plug in such a pushbutton. One of them is the user button for joystick port 1, the other is user button for joystick port 2, and the third one is for an extra power switch. He had been plugging the button into the wrong hole. That call to technical support was really unnecessary. I sent him an email the next day to tell him I had solved our mystery.
Anyway with a little adjustment we had managed to get me really comfortable. This would be my first full day sitting in the new chair and it turned out pretty good.
“For my yoke is easy”–Matt 11:30
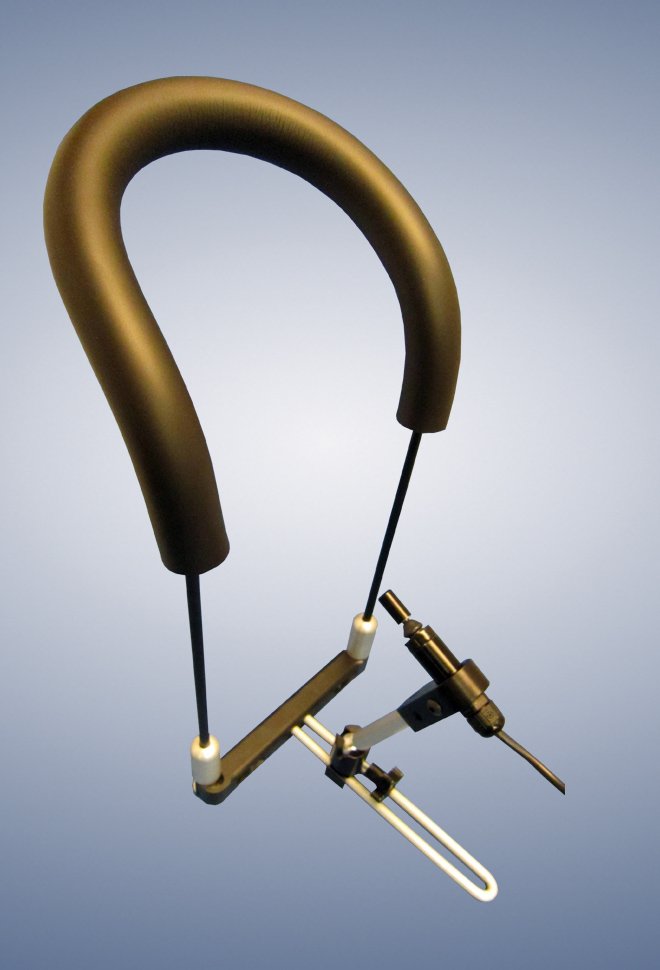
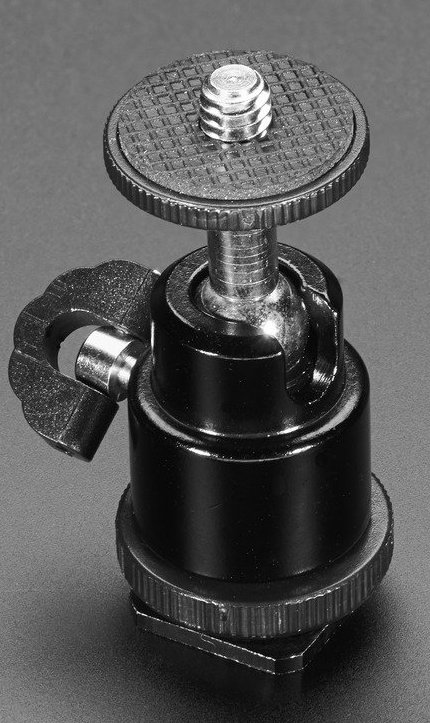
According to Matthew, Jesus says his yoke is easy but building a yoke around my neck to hold my new joystick was going to be quite a challenge. I had done a test drive using a bib mount from a company called “Switch It”. We are still using their joystick. However the bib was too tight around my neck and that’s why Patrick had replaced it with a different model that used straps instead of a solid bar. Unfortunately the straps would not hold the device steady enough. We could’ve told the wheelchair people to go ahead and order the original device from Switch It and we could’ve possibly bent it to fit. I had already thought about the possibility of building one from scratch after I saw the original test unit. Given the delays we had faced in getting any equipment at all the obvious choice was to build one ourselves. On the right is a photo of the gadget we were trying to re-create from scratch.
The main structure of the original one was a 1/4 inch or perhaps 3/8 inch aluminum rod bent in a U-shape. Dad found some one quarter inch stainless steel rod in the garage. It was left over from when he made some stainless steel weenie roast and marshmallow roast sticks that we used to use at the lake. He had no trouble bending it into the appropriate shape. The next job was to find some sort of foam tubing to slide over the bar to pad the device so that would not hurt my neck. I did lots of Google searches for foam rubber tubing and I found a place that would sell us exactly what we wanted and the cost was only $2 per foot. Unfortunately the minimum order was a 60 foot roll.
One of the great things about being a “maker” these days is that there are lots of makers out there was a wide variety of experience. There is a local maker space called “Club Cyberia” on the east side of Indianapolis that has a great bunch of people building all sorts of amazing projects. I visited their facility early last year to get some insight before buying my 3-D printer. I continue to follow all their activity on Facebook and I contribute to their discussions whenever I can. I asked them on Facebook if they knew of a place to buy foam tubing. They suggested the local industrial supply place called Grangers. We have had a Grangers catalog in this house for as long as I can remember. Dad buys all sorts of stuff from them for work or for his own projects. I felt kind of silly not thinking of them. Unfortunately they didn’t have anything small enough to meet my needs.
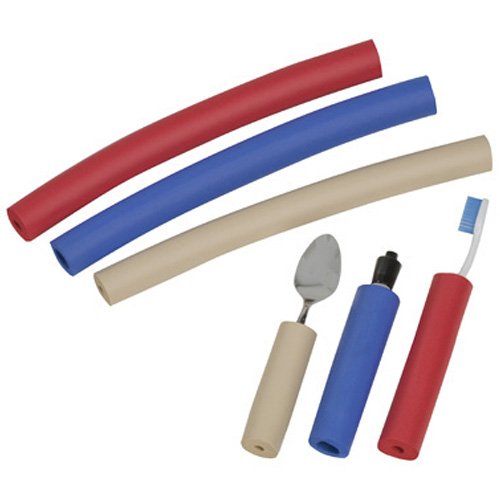
Meanwhile further Google searches found the following item on Amazon.com. It is a package of for long pieces of foam padding of various sizes and colors made by a company called “Ableware”. It is specifically intended for people who have physical disabilities and have trouble grasping ordinary objects like spoons, forks, toothbrushes etc. as you can see in the photo below. I immediately ordered a package on Amazon prime and it would arrive by Friday.
Now we turn to the mechanical portions of the mount. The two halves of the U-shaped bar are joined by a plastic bar that goes across them. I would have no trouble 3-D printing that. It’s just a straight bar with a hole on each end for the rod to go through. On the original Switch It bib mount they had a complicated set of ball and socket joints that allowed you to twist, bend, or pose the position of the joystick. I wasn’t sure that 3-D printer plastic was sturdy enough to create ball and socket joints with set screws to hold them in position. Also I wanted it to be as small and lightweight as possible but it is very difficult to print extremely small parts on a 3-D printer.
I did know where I could get parts that might do the trick. It was another instance of what I previously described as “just-in-time technology”. That is my term for the rather creepy experience I have had that whenever I need new technology to solve a particular adaptive equipment need, either by amazing luck or more likely divine providence that technology suddenly becomes available. Shortly after I did the first test drive with the bib mount and was thinking about what it would take to re-create one from scratch, my favorite electronics supplier Adafruit.com started selling some camera mounting hardware. I was especially interested in this ball and socket tilt and swivel camera mountshown on the right. It may seem strange that electronics company is selling camera mount equipment but they have all sorts of maker products. The camera mounts are featured that product in a tutorial on how to build your own computer controlled, motorized sliding camera mount useful for nice professional looking videos and time-lapse photos. Here’s a link to the tutorial. Here is a YouTube video showing how they created the mount.
They also added a couple of other camera mounting products like 1/4 inch screw adapters and set screws as used on camera mounts. So I went to the Adafruit store online and ordered a variety of parts which would arrive on Monday.

Each Wednesday night Adafruit hosts a live video chat using Google hangouts. If you have a WebCam you can join the discussion and show off your maker projects. I’ve done it a number of times before. Most people hold up their projects to the WebCam to demonstrate what they built but that’s a little bit difficult for me. I got in the habit of just having dad take photos of my gadgets. I use the same photos here on the blog or for showing off at the weekly Show-and-Tell. I spent the rest of the day on Wednesday preparing some photos of the 3-D printing parts I had already made for the joystick mount and to preview the fact that I was going to be using Adafruit parts and the rest of the design. Here is the video of my presentation on that particular evening. My section of the program starts at the 18 minute mark. The guy who presented just before me was so long-winded they couldn’t get him to shut up.
“Evening came and morning followed — the third day” — Genesis 1:13
A Minor Disaster
On Thursday, the fourth day of the new wheelchair, I decided not to sit in it so that dad could do more adjustment on the foot rest. That morning we got a phone call from my uncle Keith who said he wanted to stop by and visit that afternoon. His daughter, my cousin Nancy, recently passed away. She had spent her life in a wheelchair because she was born with spina bifida. Keith brought us a big box of leftover parts from some of her old wheelchairs. They were mostly headrests, brackets, and foam padding pieces. We figured there was something in there that we might be able to use. As it turned out they headrest that I ended up using was one that he brought us. Other pieces of foam padding also turned out useful for placing between my right side ribs in the armrest of the wheelchair and is a temporary pillow for the left arm rest until we can come up with something. We spent the entire afternoon visiting with him and talking about all of the troubles that Nancy had been through fighting her illness. I also had the opportunity to show him my 3-D printer. I made a souvenir for him. A 3-D printed thing to hang on your keychain. It had his name on it in raised letters.
That evening we did some tinkering with the new chair. Dad had noticed that when he tried to operate it using the mouse controlled joystick that the display unit would show “joystick error”. I had him push the buttons to get it into programming mode to see if I could figure out what was configured improperly. The process for pulling up the programming mode is to hold down the “Profile” button which is used to switch the chair from different driving profiles such as indoor, outdoor, attendant. While holding that button down, press and hold the power button. Then you release the profile button and wait for a beep. Then you release the power button. An icon of an hourglass appears on the LCD screen briefly and then you get into a series of menus. I had been studying the technical manuals and was pretty familiar with what was available in these menus. We tried swapping the joystick between port 1 and part 2 and doing other adjustments but we kept getting the joystick error message. I later learned that one of the things that can cause this problem is that the joystick was not properly calibrated in the programming menu. I began to speculate that this particular setup step had not been done given my discovery that the wheelchair technicians seemed unfamiliar with the contents of the technical manuals.
At some point something went wrong. The joystick stopped working altogether. You could still operate the attendant joystick in the back of the chair but nothing else seem to work. It was stuck in the attendant profile. I figured that was no problem. I would just go back in and undo whatever setting I had previously done. Unfortunately pushing the buttons in the proper sequence as I described above would no longer get me into the programming menus. We tried using 2 different joysticks plugged in either port. We tried pushing the buttons slower or quicker. Nothing that we did could get us back into the programming menus.
It was only the fourth day that I owned the new wheelchair and I had broken it already.
“Evening came and morning followed — the fourth day” Genesis 1:19
Stop!! Enough already !!! Are you roling yet???
You will get it all working correctly.