IRLibCP has been updated for use with Circuit Python 2.x and has been tested on Circuit Playground Express using Circuit Python 2.2.0. Note that previously this library was only available for use on Express style boards because they were the only ones that supported the required “pulseio” module. Theoretically with Circuit Python 2.0 and beyond that module is available on non-express boards but we have not yet tested the library on those platforms.
There have been no changes to the code since the previous version. This update merely provides updated .mpy files compatible with Circuit Python 2.x.
We are pleased to announce a very early pulmonary beta release of IRLibCP. This is a Circuit Python module for receiving, decoding, and transmitting infrared signals. It is a translation from the original IRLib2 written in C++
Because the module depends on the “pulseio” module of Circuit Python it can only be used on “Express” versions of Adafruit boards. Specifically Circuit Python Express, Feather M0 Express, and Metro M0 Express. It cannot be used on other versions of Circuit Python such as Feather M0 Basic or BLE nor on ESP 8266 platforms.
As previously mentioned this is a very early beta release. Further example programs and updated documentation will be coming soon as well as refinements to the modules themselves.
Also a bit of disclaimer… I began computer programming writing and BASIC when I was in high school in the early 1970s. I went to college and wrote Fortran and Pascal and God help me even a little COBOL as well as other programming language that don’t exist anymore such as Algol and PL/1. For the last 25 years I’ve written nothing but C and C++ with minor dabbling’s in JavaScript and PHP. But converting IRLib2 into Python is only the second Python program I’ve ever written. I’m sure experienced Python programmers will cringe when a see my code. Please be patient with me. I’m still learning. If you want to give me some constructive tips please send them to me at cy_borg5@cyborg5.com
Recently I did some 3D printing objects as a kind of diorama that I photographed for my 2016 Christmas card. One of the objects was this sign saying “Emmanuel – God Is with Us”. The background or base of the object was printed in brown filament and the raised lettering was printed in white filament. I use a single extruder Printrbot Metal Plus.
The trick to printing this is to print the brown portion, get the printer to pause while you change filaments, and then print the white lettering raised above it. I’m using Cura 15.04 which is the most recent version that can be easily configured for Printrbot. It has a plugin called “Pause at Height” that is designed to allow you to do just what I want. You pick a Z height at which the printhead is retracted and paused while you swap the filaments.
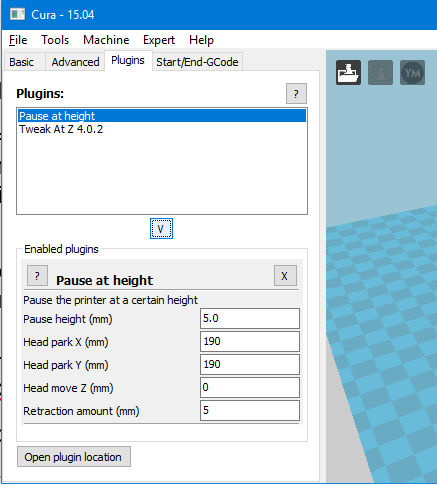
If you open Cura and click on the “Plugins” tab you will see the following:
There are two plugins installed by default. The one we are interested in is Pause at Height. You click on the plugin and then click on the tiny down arrow at the bottom of the window and a dialog will appear that allows you to set the parameters for the plugin. It will look like this…
It gives you a series of parameters that you can fill out. Then when you print your object, theoretically the printer will pause and allow you to change filaments. Unfortunately the Printrbot Metal Plus does not have any sort of control panel so there’s no way to resume the print once you’ve paused. I tried using the plugin anyway just to see what would happen. At the proper point in the print, the printhead retracts back and to the side as it’s supposed to. But rather than pausing, it immediately goes back where it left off and begins printing.
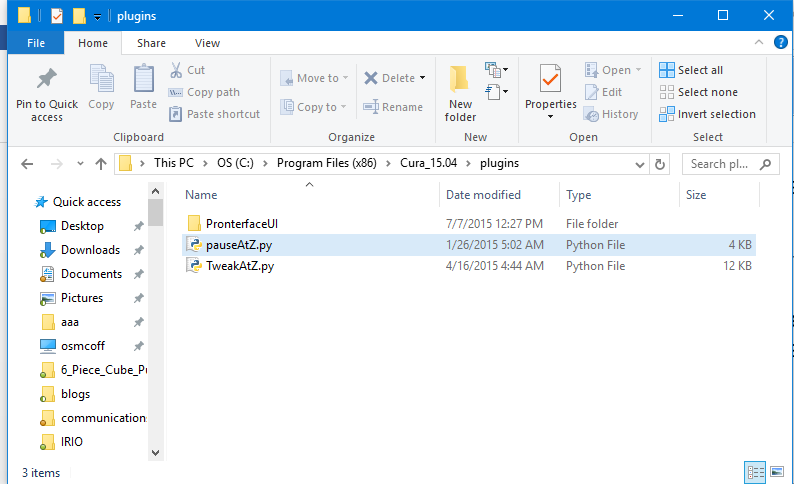
If you look at the lower left corner of the plugin screen you will see a button that says “Open plugin location”. If you click on that button here’s what the folder looks like in Windows Explorer.
You can see the plugins are actually Python programs that have a .py extension. We want to look at the one named “pauseAtZ.py”. We will open it up in our favorite text editor and take a look around. If you look at the code at approximately line 104 you will see this
#Move the head away
f.write("G1 X%f Y%f F9000\n" % (parkX, parkY))

#Disable the E steppers
f.write("M84 E0\n")
#Wait till the user continues printing
f.write("M0\n")
#Push the filament back, and retract again, the properly primes the nozzle when changing filament.
f.write("G1 E%f F6000\n" % (retractAmount))
f.write("G1 E-%f F6000\n" % (retractAmount))
It appears that this Python script is reading and writing your G-code looking for the proper place to do the pause. Then it inserts additional G-code to do the retraction and the actual pause. The important line is line number 110 which inserts the G-code command “M0”. This is a stop command as described here http://www.reprap.org/wiki/G-code#M0:_Stop_or_Unconditional_stop
Apparently the firmware in the Printrbot Metal Plus does not recognize that particular G-code. There are other G-code options that we can substitute.
Using your text editor, do a “save as” and give it a different filename with a .py extension and save it in the same folder as the original. Modify line number 110 to read as follows
f.write("G4 S30\n")
The “G4” command is described here http://www.reprap.org/wiki/G-code#G4:_Dwell
It causes a 30 second pause. I found that this gives me sufficient time to withdraw the original filament, replace it with a different color, and force some of the new filament through the nozzle to flush out the old color.
There is one other change you should make in that file. On the very first line it reads:
#Name: Pause at height
This is the name that appears in the plugin tab of Cura. You should change this name to something like
#Name: My Modified Pause
so that you can distinguish it from the original plugin.
I made those changes, selected the modified plugin and it worked perfectly. You have to play around with the preview slicing to determine what level you need to set for the pause. You might try printing a small test piece if your object is extremely large.
Part 3 of this tutorial is so big we have spread it over 4 installments. This blog post is just to pull all of those post together in a single location.
Part 3a: Sending IR Codes
In this segment we create a small Arduino sketch that allows you to type IR codes into the serial monitor and have them transmitted by your IR LED.
Part 3b: Creating a Virtual Remote Using Python
In the segment we use a Python script on a PC or Raspberry Pi to communicate over the serial port with the Arduino. By clicking on the virtual buttons on the PC, the Python script transmits the codes to the Arduino which in turn translates into your device by your IR LED.
Part 3c: Python, PySerial and PyGame Installation on Windows
Because Python and the other tools for creating the Virtual Remote may not be on your system, we have included this extra tutorial on how to install the necessary software on a Windows PC. While it isn’t technically connected to IRLib, we thought it would be useful to a variety of people not just users of our library.
Part 3d: Installing the Arduino IDE on a Raspberry Pi
Again this is not strictly related to IRLib but if you want to run the Part 3b example on a Raspberry Pi you will need to install the Arduino IDE. General users of Arduino and Raspberry Pi might be interested in this even if they do not use our libraries. If you do not use a Raspberry Pi then you do not need this part of the tutorial.
Although technically this installment of our tutorial isn’t directly related to IRLib, we are including it here as part 3c because it may be necessary to do these steps if you want to use the example in part 3b of our tutorials.
We’re going to take you step-by-step through installing Python and other necessary modules on a Windows system. We used this method on a Windows 7 64-bit home premium PC. Other versions of Windows will have extremely similar installations.
In order to use the previous examples, we highly recommend that you use Python 2 rather than Python 3 and we recommend that you use the 32-bit version even if you are on a 64-bit Windows machine. You might be able to get our examples to work under 64 bits or Python 3 but we were warned there might be problems and we did encounter them and chose not to try to come up with workarounds.
Installing the Python Interpreter
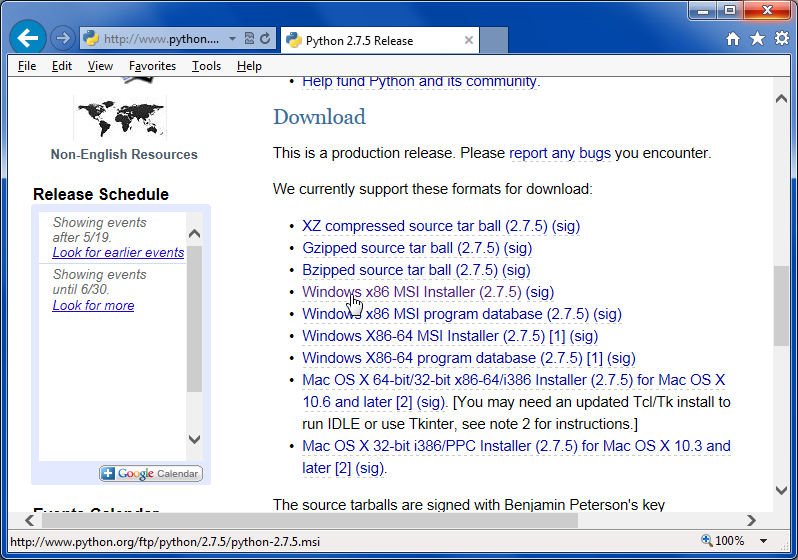
Python is an interpreted language rather than a compiled language. The Python interpreter is a program that runs on your PC, reads the text script of your Python program and executes the script rather than compiling it into native machine language for your type of hardware. You can download the Windows version of Python 2 or 3 at…
As of this writing the most recent version of Python 2 is 2.7.5 dated May 15, 2013. Download the file named “Windows x86 MSI Installer (2.7.5) (sig)” you can save the program and run it from the same location or run it immediately.
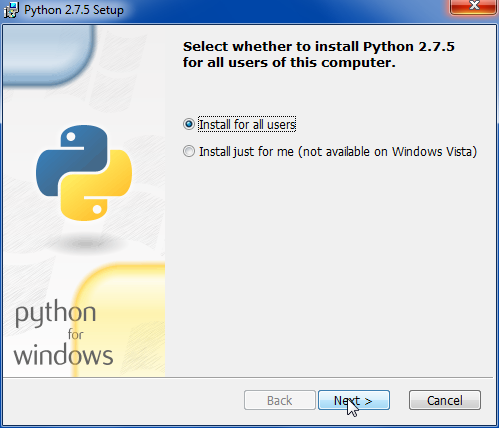
Install the program for all users.
Choose your directory. The default will work.
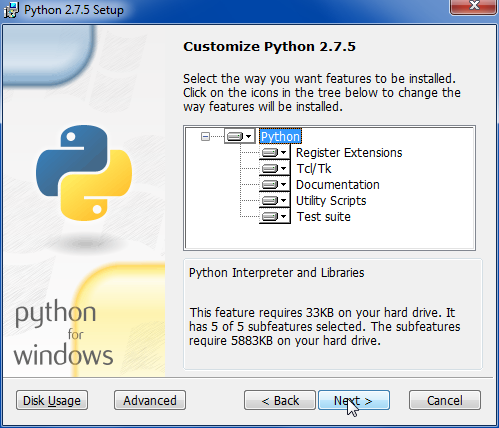
The default for customization is install everything. That will work fine.
And complete the installation
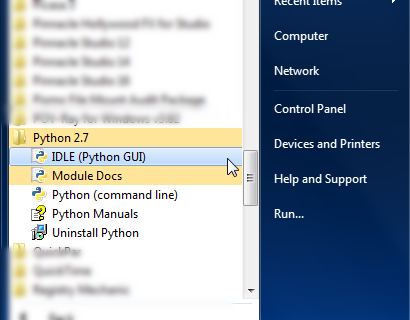
When you completed the installation the following items will be in your start menu.
There is a command line version that can run scripts directly or there is an IDE called “IDLE”. In our previous installment of the tutorial we use the IDE.
There is one more item we need to do to complete this installation. We need to add the Python interpreter to the default system path so that when you try to execute a Python script it will know where to find the interpreter. The process is slightly different on Windows XP versus Windows Vista, 7, or 8.
Adjusting the path on Windows Vista, 7, or 8…
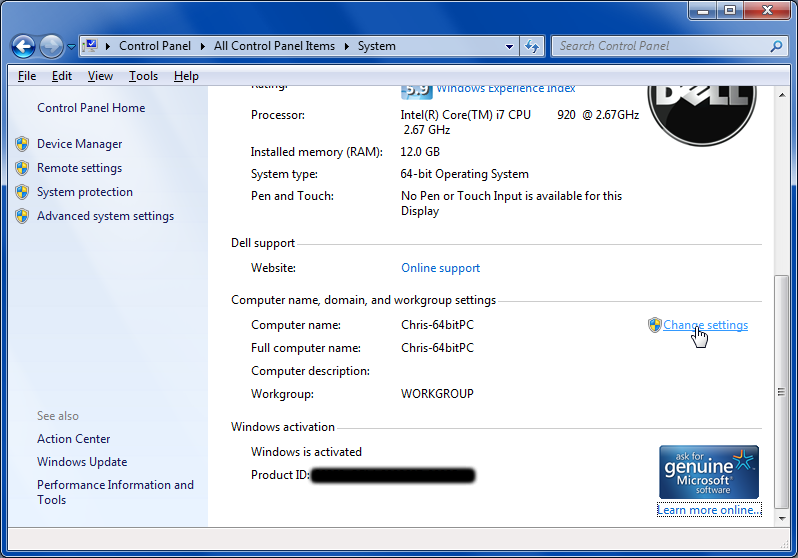
Go to your Control Panel and click on “System”. If you are in icon view you can click on “System” directly. If you are in category view you should click on “System and Security” and then click on “System”. You should next click on “Change Settings” as shown here
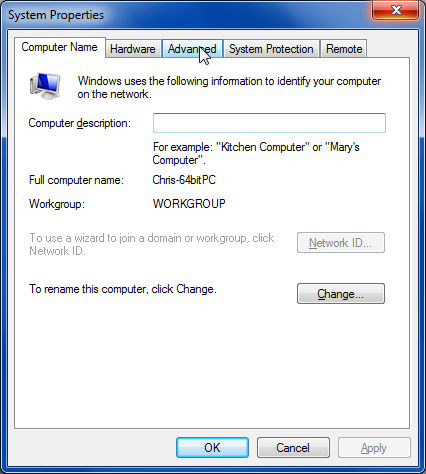
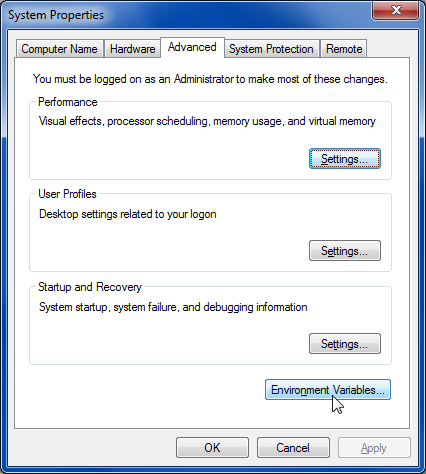
You will get a system properties dialog that looks like this. You should click on the “Advanced” tab.
Next click on environment variables.
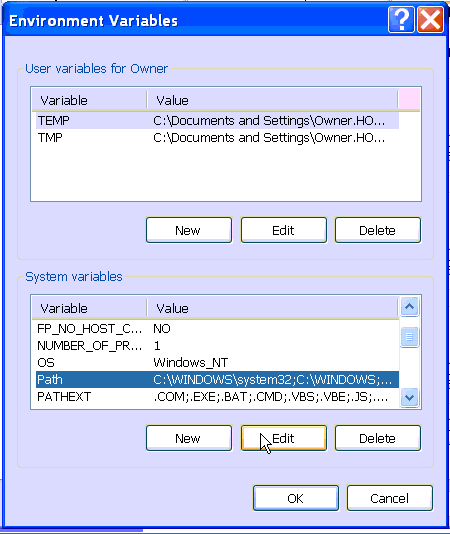
You’ll get the Environment Variables dialog which looks like this.
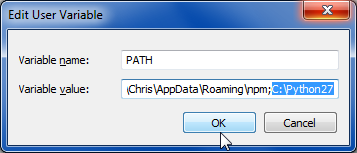
In the upper section look for the item “Path”. Select it and click on “Edit” just below it.
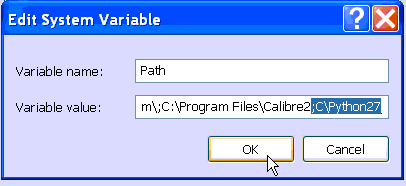
Then very carefully go to the end of the variable value and add a semicolon followed by the path where you installed Python. Make sure do not erase any other text that was previously there. On my system I added “;C:\Python22” to the end of the value. Then click on okay and continue out of all of the open dialogues. You can now proceed to the next section where we will install pySerial.
Adjusting the path on Windows XP
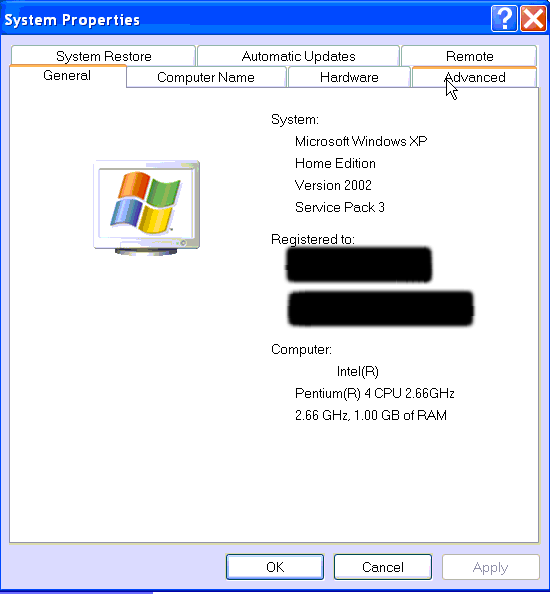
Go to your Control Panel and click on “System”. If you are in classic icon view you can click on “System” directly. If you are in category view you should click on “Performance and Maintenance” and then click on “System”. Unlike later versions of Windows, this will take you directly to the “System Properties” dialog. You do not need to click on any “Change Settings” link. It will look like this…
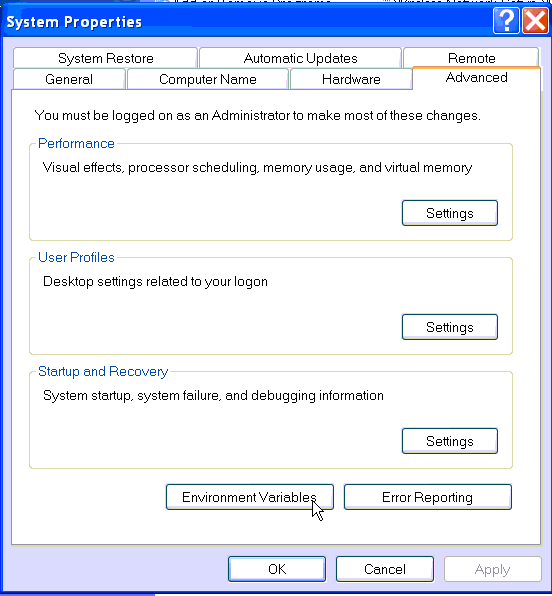
Click on the tab labeled “Advanced” and it will look like this
Click on the “Environment Variables” button and you will see the following dialogue.
In the lower section look for the item “Path”. Select it and click on “Edit” just below it.
Then very carefully go to the end of the variable value and add a semicolon followed by the path where you installed Python. Make sure you do not erase any other text that was previously there. On my system I added “;C:\Python22” to the end of the value. Then click on okay and continue out of all of the open dialogues. You can now proceed to the next section where we will install pySerial.
Installing PySerial
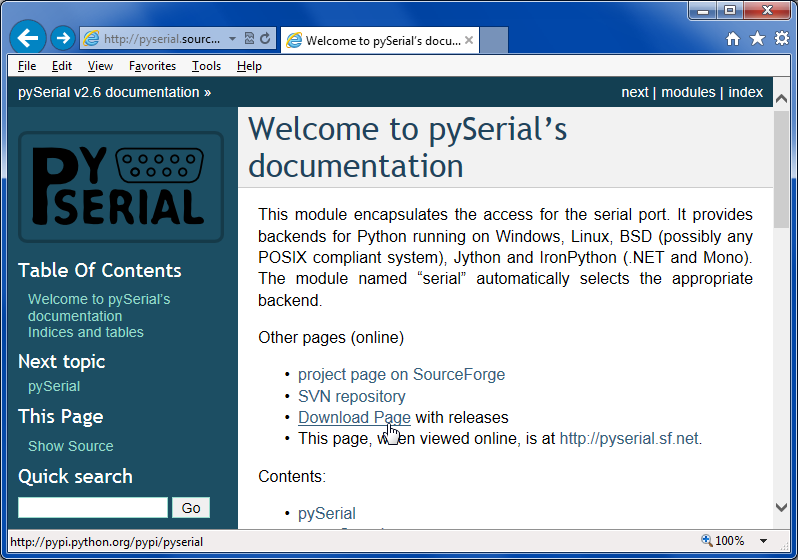
Next we will install the PySerial module which will allow us to do serial communication through Python. The main page for the PySerial code is…
Click on the “Download Page” link as shown here At click on the big green download button. Save the file to a convenient location. Note that the version “2.6” refers to the pySerial version and not to the version of Python which you are running.
Unzip the file. If you do not have a utility that can handle .tar.gz compressed files we recommend using “7 Zip” which can be downloaded here…
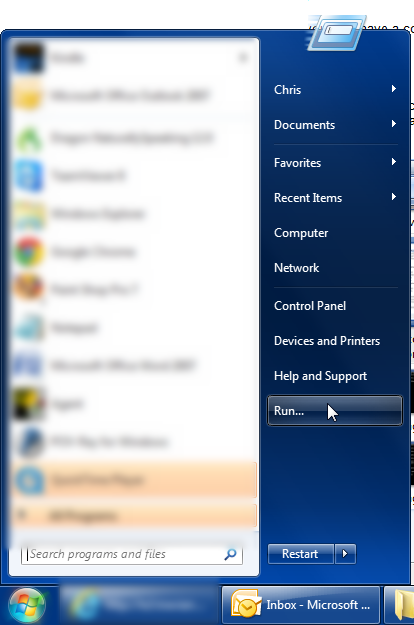
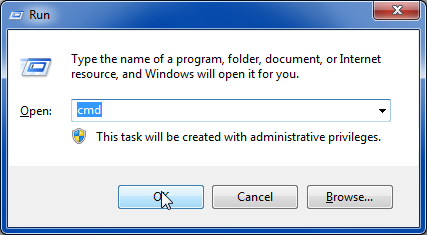
Now we will have to do something that Windows users rarely do. We need to type some command lines to install the package. Click on your start button and choose the “run” command and then type “cmd”.
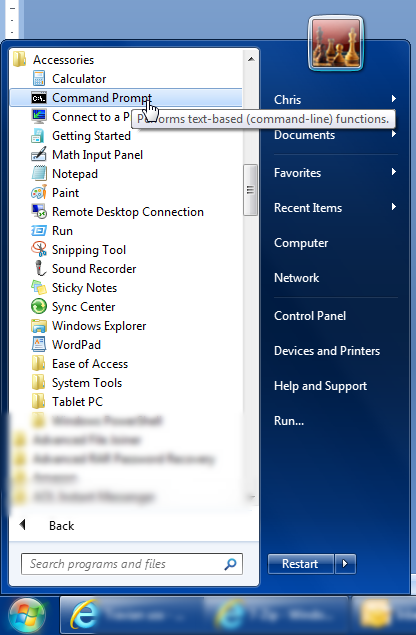
Or alternatively you may have a command prompt shortcut in your start menu under accessories as shown here.
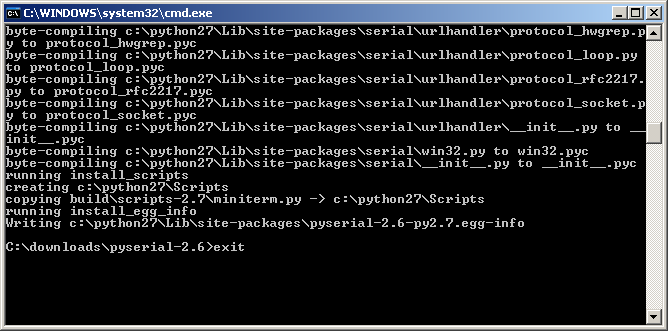
When the command line window comes up you need to change directories to where you unzipped the pySerial package. In my case it was in the c:\downloads\pyserial-2.6 so the command was…
cd c:\downloads\pyserial- 2.6
Then type the following command…
python setup.py install
When the installation is complete type “exit”
Instructions for Installing Pygame
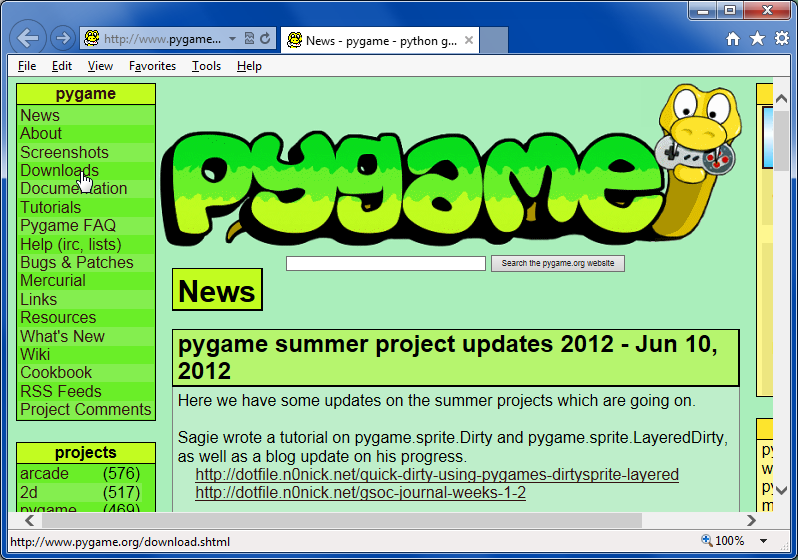
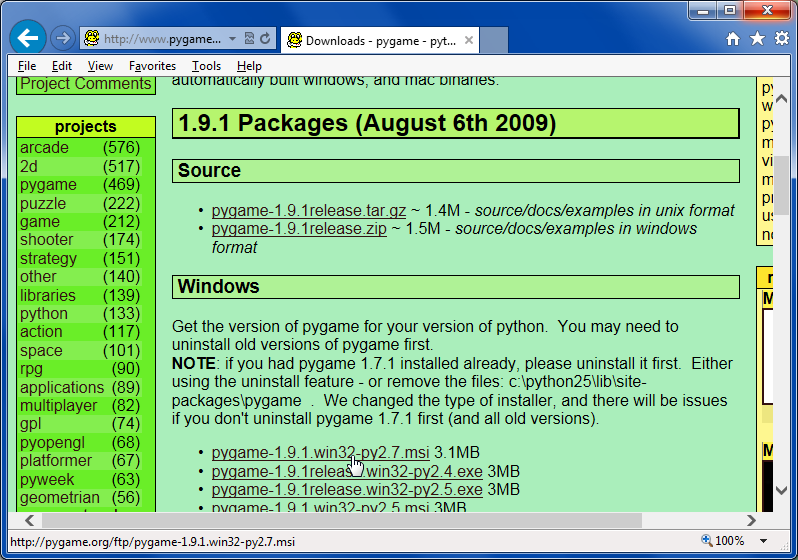
Our final step is to install the Pygame package. You can download it at
Scroll down to the section for windows and click on the link labeled “pygame-1.9.1.win32-py2.7.msi”
Or whatever the most recent 32-bit Windows installer link is. Simply run the installer and use all of the default settings to complete installation.
That’s everything you need to know to install Python, PySerial and Pygame on a Windows machine.
If you are using a Raspberry Pi you will already have Python and Pygame installed with the standard version of Raspbian. To install PySerial simply go to a command prompt and type
sudo apt-get install python-serial
This tells it to issue a superuser command to get the package and install it. In the next installment of this tutorial we will talk about how to install the Arduino IDE on a Raspberry Pi.
In the previous lesson we demonstrated how to send IR codes to a TV, DVD, DVR/cable box or any other device that uses an infrared remote. In order to tell the Arduino what code to send, we typed codes into the serial monitor of the Arduino IDE. While that’s great for demonstration purposes, it’s not very practical. In this continuation of the lesson, we will create a small program using Python which will create a “virtual remote”. This Python script will run on your PC, laptop or even Raspberry Pi which is connected to the Arduino. As you click on the buttons on the app, the script will send the proper codes over the serial link to the Arduino. The Arduino in turn will send the IR signals to your device. In addition to the items listed in part 3a will also need…
a PC, laptop or even a Raspberry Pi with the Arduino connected to a USB port.
Python 2.x programming environment installed
PySerial add-on for Python that enables serial communication
PyGame add-on for Python that makes it easy to use graphics, mouse, keyboard
IRLib version 1.1 or later which includes the sample code
At the end of this tutorial we will post links to the Python, PySerial and PyGame packages. In part 3c of this tutorial we will give detailed instructions on how to install these passages on a Windows PC and a Raspberry Pi. When using Raspberry Pi it will probably already have Python and probably PyGame installed or you can find instructions on how to install them elsewhere online. We will include instructions on installing PySerial, the Arduino IDE and the IRLib packages on Raspberry Pi.
This example assumes you are using Python 2.7.x or later. Python 3 has some problems with serial communication especially in the Windows version. We also highly recommend installing the 32-bit version even if you have a 64-bit computer. We cannot guarantee this will run on 64 bits. Similarly when installing PySerial we recommend the 32-bit version.
Presuming you already have these packages installed we can proceed to customize a Python script to create virtual remote. In the previous installment we had you use the dump routine on your Arduino to capture the protocols, codes and number of bits for the functions you want to use. Our Python app can handle up to 40 functions however you can leave some of the buttons empty if you wish. But if you’re not yet done so, go back to the previous lesson and write down a whole bunch of codes you want to put in this new remote.
The Python script we will use is available in IRLib/examples/IRserial_remote/IRserial_remote.py. You also need the files “click.wav” and “remotebg.png” in the same folder. You will have to edit several lines of the script to customize it for your purposes.
A few lines into the script we will have to edit the serial port that the script we use to communicate to the Arduino. Look for these lines…
# You will have to edit this to the proper port and speed

ser = serial.Serial('COM4', 9600)
As distributed it is set to “COM4” but on a PC it might be some other COM port or on a Linux machine such as a Raspberry Pi it would be something like
ser = serial.Serial('/dev/ttyACM0', 9600)
We also need to specify what font will be used to put the labels on the buttons a few lines down like this…
# Specify a font. I'm using Arial narrow bold from my Windows

# font folder. However the default font shown below also works.

myfont =pygame.font.Font ("c:/windows/fonts/ARIALNB.TTF",30)

#myfont=pygame.font.Font(None,36)
By the way if you are not familiar with the Python language it uses a hash tag at the beginning of the line to specify it is a comment. The default is a Windows font that is Arial narrow bold that you can specify your own font of choice or used default font by substituting the word “None” as shown above. Look for the section where we define the label text each button. Here are the values as distributed.
# These are the text labels that will appear on each button

label_text=("TVp", "CBp", "P^", "Pv",

           "<<", ">", ">>", "->",

           "Rec", "=", "s", "<-",
           "Gd", "^", "Fav", "Inf",

          "<", "sel", ">", "Lis",

          "ret", "v", "Prv", "Mnu",

          "1", "2", "3", "Ch+",
These correspond to TV power, cable box power, Page Up, Page Down, rewind, play, fast-forward, jump to live, record, pause stop, jump back, Up Arrow, favorites, info, Left Arrow, Select, Right Arrow, Lists Recordings, Return, Down Arrow, Previous Channel, Menu, numbers 1 through 9 and 0, Channel up, Channel down, Volume up, Volume Down, Mute, and PIP. However you can make them say anything you want.
Below that we insert the actual codes. We will use the same format we used in the previous lesson when we type codes into the serial monitor. First is a single digit that describes the protocol number, followed by a hex value, followed by the number of bits. Note that when some protocols the number of bits is optional. Here are the codes I used for a Magnavox TV using the “RC5” protocol and 13 bids And a Scientific Atlantic SA 8300 DVR using the PANASONIC_OLD protocols.
Once you have everything edited using your codes you should then load the IRserial_remote sketch into your Arduino. You can try typing a few codes into the serial monitor to make sure it’s working but once you are sure the sketch is running properly you need to close the serial monitor and the Arduino IDE so that they do not tie up the serial port. If you do not close at least the serial monitor, your Python script may not be able to connect to the Arduino properly.
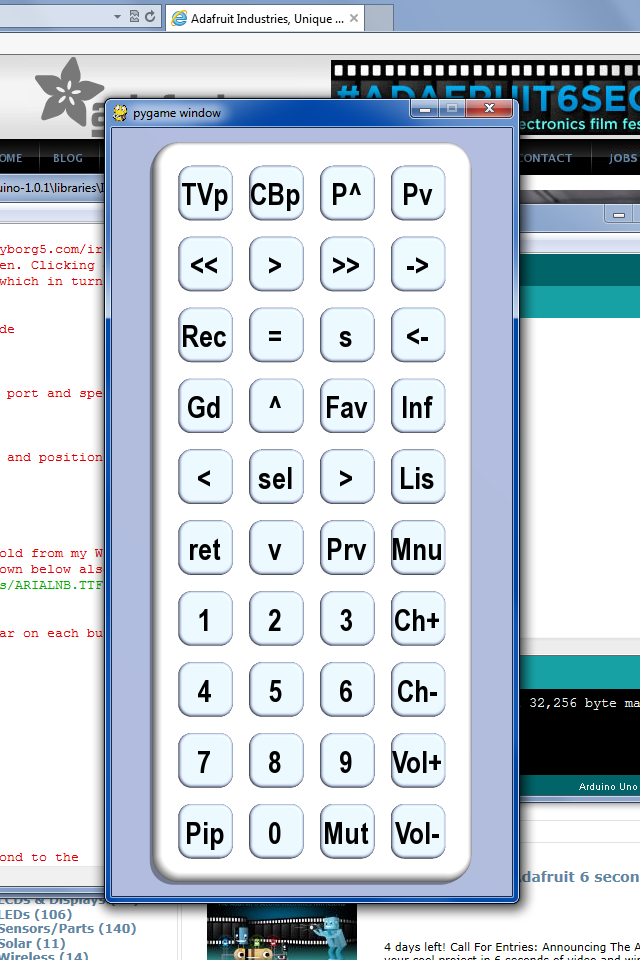
Then run the Python script IRserial_remote.py script. A window should pop up showing a virtual remote control with 40 buttons on it looking something like this…
Virtual TV Remote using Python
Notice as you hover your mouse over each button, the text will turn red. If you click on the button with the mouse it will make a clicking noise and it will instruct the Arduino send the proper IR codes. If everything works properly you should be able to control your device. Here is a YouTube video demonstrating how it works.
It’s not our intent to make this a Python tutorial so we will not go through the Python script line by line to explain how it works. Also included in the examples folder under IRserial_remote is a folder called “povray” which contains the source file for the Persistence of Vision Ray Tracer POV-Ray which is a freeware rendering program which was used to create the background image for the buttons on the remote.
Here is a video which demonstrates this application. This video was shown on the weekly Adafruit Show and Tell video chat on Google+ You can click on the “As seen on Show-and-Tell” logo at the top of this post to see it on the show and tell.
As promised here are links to various downloads you may need for this tutorial