Stop Calling Raspberry Pi a “$35 Computer”.

I am a huge fan of the Raspberry Pi single board computer. I have 2 of the original Rpi 1 Model B and two of the Rpi 2 Model B although one of them is in a box waiting for me to come up with something creative to do with it. I’ve used them to learn the Linux operating system, Python programming, and a variety of other things but mostly I use them as media players using the osmc implementation of Kodi media software.

A few weeks ago the Raspberry Pi Foundation announced the new stripped-down Rpi Zero that cost just $5 and a few days ago announced the Model 3 which is faster than any previous model it includes built-in Wi-Fi and Bluetooth while maintaining to the $35 base price.

Raspberry Pi 3 Model B

But it’s that famous “$35 price” that is a pet peeve of mine ever since the device was introduced. Take for example this article from TechRepublic which asks “Can you use the Raspberry Pi 3 as your work PC?”

That’s an excellent idea for an article and the article itself talks about most of the pros and cons of using this computer as a real work computer and not just an educational toy or an embedded controller in some hobbyist project. My problem is that the very first paragraph or sort of subtitle to the article reads “We spent a week working on the Raspberry Pi 3, to see how the $35 machine matched up to laptops costing more than 10 times its price.”

However when they tout the Raspberry Pi as a $35 computer especially comparing it to the cost of other devices that’s where they are at best deceiving you and at worst outright lying to you. While it’s true that you can go many places and purchase the single board computer for that price, at $35 it does nothing but keep small pieces of paper from flying off your desk. You need many more components to allow it to do anything. This especially disturbed to be when people went nuts over the $5 Model Zero which needs even more components to make it do anything at all. Let’s take a look at the real cost of a Raspberry Pi.

The bare minimum to get the computer to work you need a USB power supply that is at least one amp and better yet two amps (about $8), a micro USB cable (Amazon basic $6), a micro SD card of at least 8 GB (about $5). The SD card stores the operating system and served as the solid-state hard drive for the device. I use 32 GB SD card because I’m using them as a media player and I want plenty of space for the files. I found them for about $17.

Our price is up to $54 and technically we could login to the device from another PC or laptop using terminal software. This is a so-called “headless” access because it doesn’t have a mouse, a keyboard, or a display. You use terminal software on your PC to log into the Pi and control it by command line or Xwin GUI. But you need an entire other computer just to use it.

You can purchase an Amazon basic wired keyboard and mouse for $16. But you still need a display. There is an official 7 inch raspberry pi touchscreen available for $60 but most people would want to use a real computer monitor. You can plug it into any TV with an HDMI port. Let’s say you get a cheap flatscreen TV for $180 plus a couple of dollars for an HDMI cable.

Now you can finally do something useful with a Raspberry Pi as a desktop computer. Note that this doesn’t include a case. You can spend $10 or much more for a plastic case or 3-D print your own if you have a 3-D printer. The touchscreen does not have a case.


The bottom line is to get a really useful PC based on a Raspberry Pi is going to cost you $70 plus $60 for touchscreen or $150 for a monitor. So now we’re talking $130- $220. You can get a basic chrome book notepad computer for $150 or a really nice tablet for that price. The newest Amazon Kindle tablet is just $50. My configuration as a media player even without mouse and keyboard is around $65-$70 and compare that to a Chromecast or Amazon Fire Stick which do indeed cost $35 but are functional out-of-the-box assuming you have a smart phone or PC to set them up and control them.

The real power of the Raspberry Pi is that little double row of pins called GPIO pins (general-purpose input/output). It allows you to connect the device to a variety of sensors, motors, servos to build all sorts of amazing gadgets like robots, remote-sensing and data recording devices that are as limitless as your imagination. The other thing that Raspberry Pi has that have nothing to do with its price or computing capabilities is the philosophy of the Raspberry Pi Foundation which designed the device to teach programming to kids. It is amazingly well-suited to the task.

It’s a wonderful device. It deserves lots of hype. The new model 3 is faster, cheaper because you don’t have to buy a Wi-Fi or Bluetooth add-on, and really cheap.

But stop calling it a $35 computer.


New Software for Analyzing IR Signals

It was my pleasure to be an Indigogo supporter and beta tester of the new software solution for analyzing infrared signals using Arduino, Raspberry Pi and other controllers. It is a Windows application called AnalysIR. Software is now available for the general public here http://www.analysir.com/blog/

One of the nicest features of this system is that it allows you to use and IR learner chip to directly decode raw IR signals rather than using a decoder bandpass filter and AGC style chip that I normally recommend for my projects. This is essential if you do not know the base frequency of an unknown protocol.

The Arduino portion of their software is freely distributable at some point I will be adding something to my IRLib library for Arduino that will allow you to do frequency analysis. But no matter what I come up with it’s not going to be as useful as this full-featured package which is now available at a reasonable price considering the effort they’ve put into it.

I’ve had many requests for output of IR signals in different formats such as ProntoHEX that I’ve not yet been able to implement in my code. However this software easily outputs that format.

I highly recommend you check out the software.

IRLib Tutorial part 3: Overview Sending IR Codes

Part 3 of this tutorial is so big we have spread it over 4 installments. This blog post is just to pull all of those post together in a single location.

Part 3a: Sending IR Codes
In this segment we create a small Arduino sketch that allows you to type IR codes into the serial monitor and have them transmitted by your IR LED.

satb100Part 3b: Creating a Virtual Remote Using Python
In the segment we use a Python script on a PC or Raspberry Pi to communicate over the serial port with the Arduino. By clicking on the virtual buttons on the PC, the Python script transmits the codes to the Arduino which in turn translates into your device by your IR LED.

Part 3c: Python, PySerial and PyGame Installation on Windows
Because Python and the other tools for creating the Virtual Remote may not be on your system, we have included this extra tutorial on how to install the necessary software on a Windows PC. While it isn’t technically connected to IRLib, we thought it would be useful to a variety of people not just users of our library.

Part 3d: Installing the Arduino IDE on a Raspberry Pi
Again this is not strictly related to IRLib but if you want to run the Part 3b example on a Raspberry Pi you will need to install the Arduino IDE. General users of Arduino and Raspberry Pi might be interested in this even if they do not use our libraries. If you do not use a Raspberry Pi then you do not need this part of the tutorial.

IRLib Tutorial part 3d: Installing the Arduino IDE on a Raspberry Pi

As we mentioned in part 3c, this section of the tutorial doesn’t have anything to do with IRLib specifically, however if you have not already installed the software necessary to run the tutorial part 3b then you will have to follow these instructions. In this section we will install the Arduino IDE on a Raspberry Pi. If you’re not using Raspberry Pi as a host machine but are using Windows like we did in part 3c then you do not need this tutorial at all.

Note: This article has only been tested with Arduino IDE version 1.0.x and not with the beta version 1.5.x. We cannot guarantee these procedures will work with the new version which may have a totally different structure since it is a fairly big upgrade.

We are assuming that you are using a plain vanilla Raspbian Wheezy OS on your Raspberry Pi. We cannot guarantee any of these instructions will work on other versions of the operating system. We are also assuming that your Raspberry Pi has Internet access for downloading updates. If your Raspberry Pi is not connected to the Internet you’ll have to figure out how to get the necessary files onto your system by an alternate means.

Raspbian Wheezy is actually a version of Debian Linux and according to the following reference http://playground.arduino.cc/Linux/Debian the Arduino IDE has already been prepackaged for easy installation. Go to a command prompt and type the following command
sudo apt-get install arduino
Breaking this command down for those of you who may not be familiar with Linux commands… The “sudo” stands for “Super User Do”. Access to the root directory and installation on your machine requires superuser privileges. This command temporarily gives you those privileges. And what are you going to do with them? You’re going to run the “apt-get” command. This is a system already set up in most Linux distributions to get various programs from a central repository. And the command that we passed this program is “install arduino”. I take the time to explain all of that because when I was new to Linux and didn’t know what I was doing, I would ask a question on the support forum and they would give me some obscure line of text type and I had absolutely no idea what I was doing or why.

This process not only installs the necessary Arduino components it also installs and/or updates various Java components necessary to run the Arduino IDE. If you do not have Internet access and did not use the “apt-get” command to install the package but simply copied the programs over to your Raspberry Pi, then you do not have the full package. The process of getting those additional Java packages is beyond the scope of this tutorial.

When the installation is completed most of the software is installed in the folder “/usr/share/arduino” and the folders inside that include “hardware”, “lib”, “libraries”, and “tools”. There is also an alias for the “examples” and “reference” folders however these folders are actually stored in “/usr/share/doc/arduino-core/”.

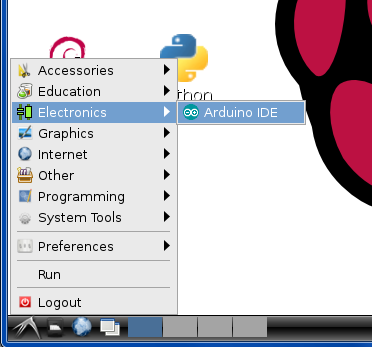
Also upon completion you will discover that your GUI start menu now has a new folder and it called “Electronics” which contains a link to the Arduino IDE as seen here.
startmenu
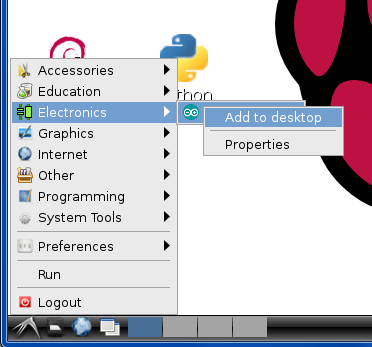
If you would like a shortstop on your desktop, the easiest way to do it is to collect up on the start but do not actually click on it. Instead do a right-click and there will be an opportunity to “Add to desktop” as seen here.
add2desktop
You now have an Arduino IDE shortcut on your desktop. For future reference your desktop icon is at /usr/share/pixmaps/arduino.xpm
icon
If you double-click on the desktop icon on select it from the start menu the Arduino IDE the first thing you will want to check is the version number. As of this writing the pre-packaged version of Arduino was only at version 1.0.1 however the most recent version was 1.0.4 which among other things added support for other Arduino boards such as the Arduino Esplora and Arduino Micro. If the above installation process did not get you the latest version then you will have to manually updated yourself. We successfully used the procedure below to update from 1.0.1 up to 1.0.4 and a week or so later ran the process again to get up to 1.0.5.

We’re going to assume you are starting out in a directory called “/home/pi” where “pi” is your username. If you’re logged in under a different username that will be different naturally. We recommend that you create a directory for downloading programs. At the command prompt type
mkdir downloads
Which obviously makes a directory called “downloads”. Then type…
cd downloads
Which changes your current directory to the downloads directory or folder. Then you should type the following command
wget http://arduino.googlecode.com/files/arduino-1.0.5-linux32.tgz
The “wget” command gets a file from the web. If you are installing something newer than 1.0.5 you will have to change the filename. If you are uncertain of the filename, call up a web browser in your computer and go to http://arduino.cc/en/Main/Software and then right-click on the 32-bit Linux link and copy shortcut. Then paste that text somewhere so that you can see the proper filename for the most recent version.

We will now use the “tar” utility to unzip the archive that we have downloaded. Issue the following command.
tar zxvf arduino-1.0.5-linux32.tgz
This will create a folder under your downloads folder called “arduino-1.0.5”. Then change to that folder with this command.
cd arduino-1.0.5
We now want to get rid of the “hardware/tools” folder inside the unzipped distribution. That is because the version that we have downloaded is compiled for an Intel x86 or AMD x86 processor and not the ARM chip that is in your Raspberry Pi. We will use the “rm” command to “remove” that folder.
rm -rf hardware/tools
Now we will copy using “cp” to copy the other files into their proper locations. We will go through the subfolders and overwrite any existing files.
cp -ru lib /usr/share/arduino
cp -ru libraries /usr/share/arduino
cp -ru tools /usr/share/arduino
cp -ru hardware /usr/share/arduino
cp -ru examples /usr/share/doc/arduino-core
cp -ru reference /usr/share/doc/arduino-core

Note some readers of this blog have reported that they needed to pre-append “sudo” to these commands above. If you are having difficulty with these commands you should try using “sudo cp -ru… etc.” instead.
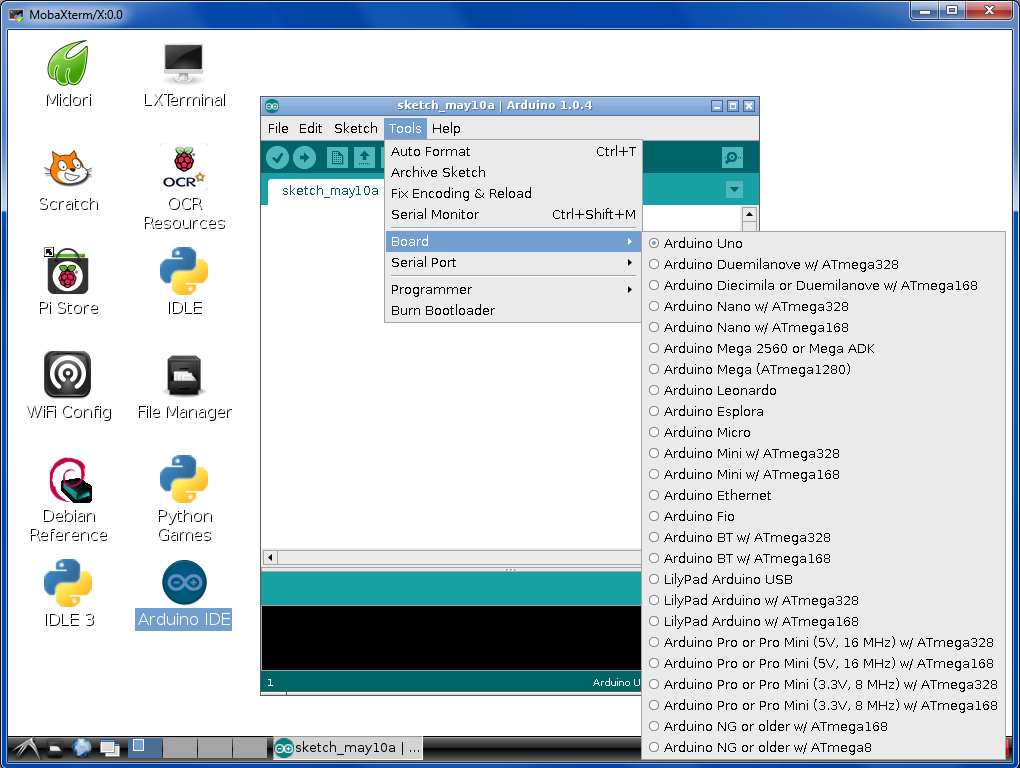
Now if you launch the Arduino IDE you will see that the version has been updated. In this image we had only updated it to 1.0.4 but you can see it does have the additional boards that were missing from the 1.0.1 installation.
boards
One last item… If you were doing this in order to run the IRLib tutorial part 3b on your Raspberry Pi then you will also need Python, PySerial, and Pygame. Fortunately Python and Pygame are already installed on your system. Be sure to use the Python 2 and not Python 3. You will however have to install the PySerial module with the following command.
sudo apt-get install python-serial
That should be all you need.

IRLib Tutorial part 3c: Python, PySerial and PyGame Installation on Windows

Although technically this installment of our tutorial isn’t directly related to IRLib, we are including it here as part 3c because it may be necessary to do these steps if you want to use the example in part 3b of our tutorials.

We’re going to take you step-by-step through installing Python and other necessary modules on a Windows system. We used this method on a Windows 7 64-bit home premium PC. Other versions of Windows will have extremely similar installations.

In order to use the previous examples, we highly recommend that you use Python 2 rather than Python 3 and we recommend that you use the 32-bit version even if you are on a 64-bit Windows machine. You might be able to get our examples to work under 64 bits or Python 3 but we were warned there might be problems and we did encounter them and chose not to try to come up with workarounds.

 Installing the Python Interpreter

Python is an interpreted language rather than a compiled language. The Python interpreter is a program that runs on your PC, reads the text script of your Python program and executes the script rather than compiling it into native machine language for your type of hardware. You can download the Windows version of Python 2 or 3 at…

http://www.python.org/download/releases/

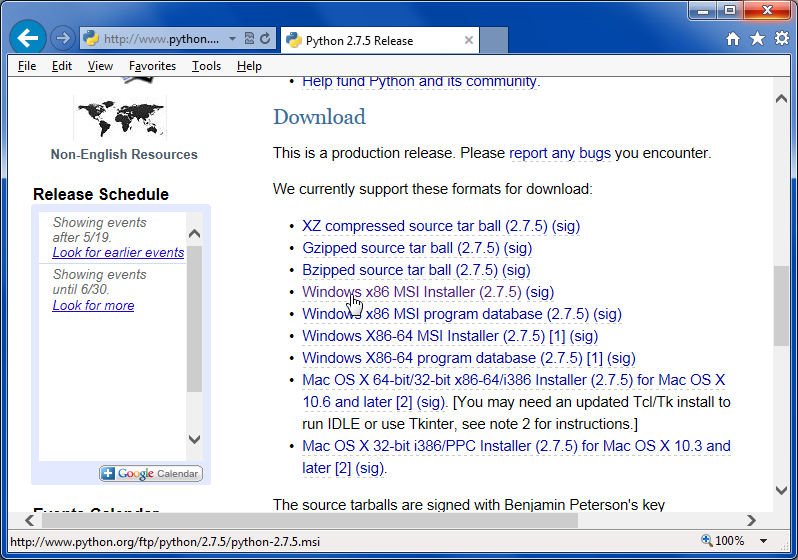
As of this writing the most recent version of Python 2 is 2.7.5 dated May 15, 2013. Download the file named “Windows x86 MSI Installer (2.7.5) (sig)” you can save the program and run it from the same location or run it immediately.

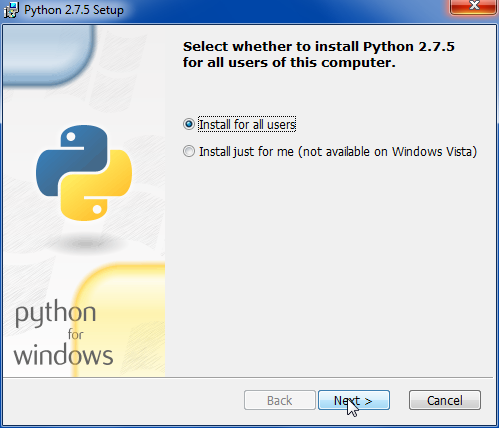
01 downloadInstall the program for all users.

02 all usersChoose your directory. The default will work.03 directory

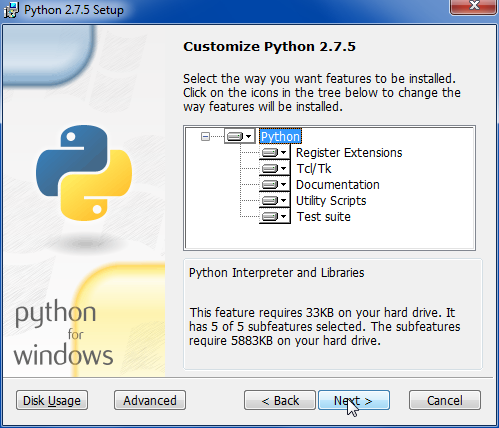
The default for customization is install everything. That will work fine.

04 customize

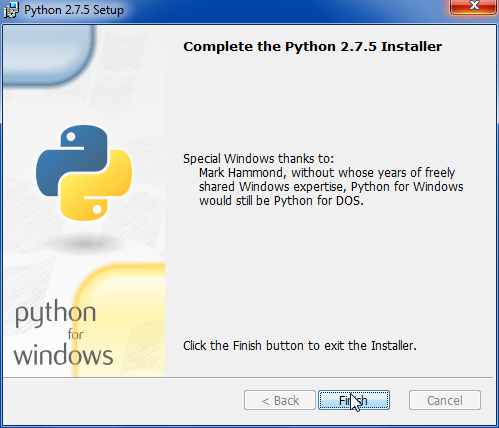
And complete the installation

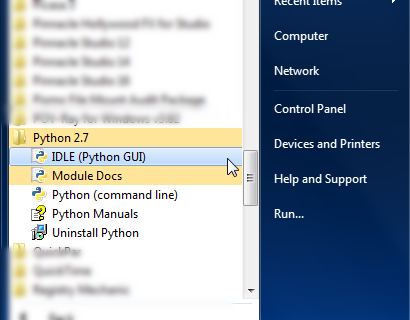
04 finishWhen you completed the installation the following items will be in your start menu.

06 start menuThere is a command line version that can run scripts directly or there is an IDE called “IDLE”. In our previous installment of the tutorial we use the IDE.

There is one more item we need to do to complete this installation. We need to add the Python interpreter to the default system path so that when you try to execute a Python script it will know where to find the interpreter. The process is slightly different on Windows XP versus Windows Vista, 7, or 8.

 Adjusting the path on Windows Vista, 7, or 8…

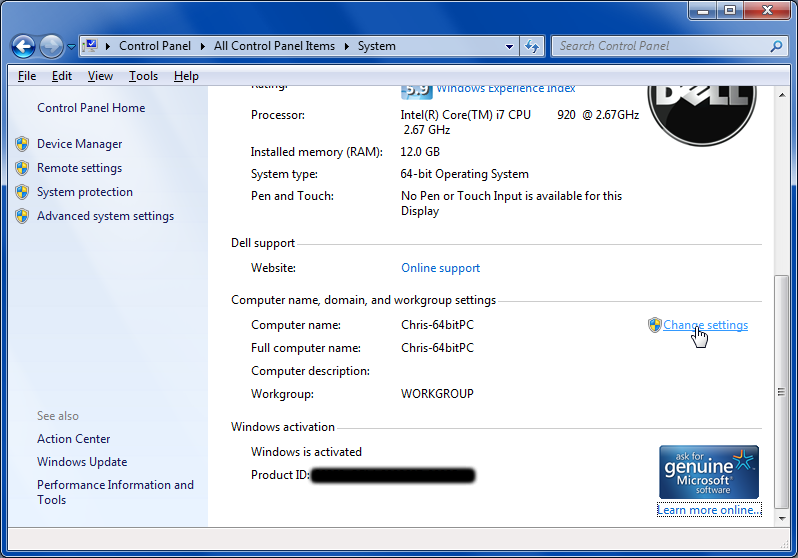
Go to your Control Panel and click on “System”. If you are in icon view you can click on “System” directly. If you are in category view you should click on “System and Security” and then click on “System”. You should next click on “Change Settings” as shown here

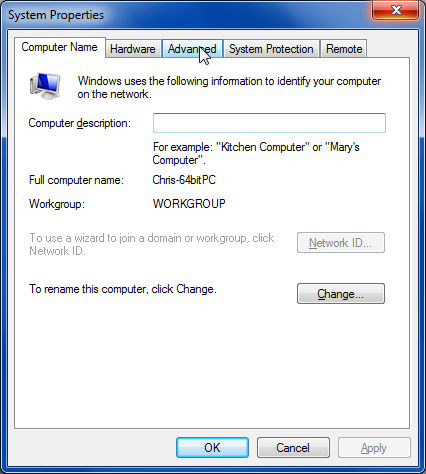
07 change settingsYou will get a system properties dialog that looks like this. You should click on the “Advanced” tab.

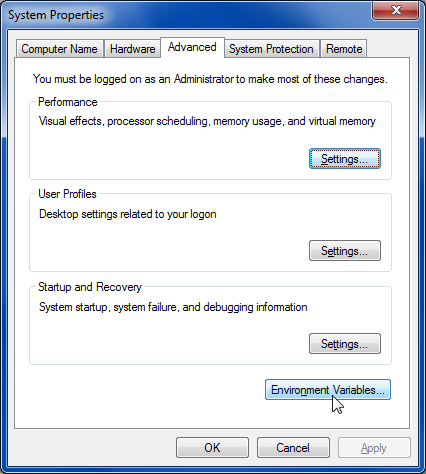
08 system propertiesNext click on environment variables.

09 advancedYou’ll get the Environment Variables dialog which looks like this.

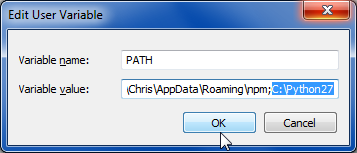
In the upper section look for the item “Path”. Select it and click on “Edit” just below it.

11 pathThen very carefully go to the end of the variable value and add a semicolon followed by the path where you installed Python. Make sure do not erase any other text that was previously there. On my system I added “;C:\Python22” to the end of the value. Then click on okay and continue out of all of the open dialogues. You can now proceed to the next section where we will install pySerial.

Adjusting the path on Windows XP

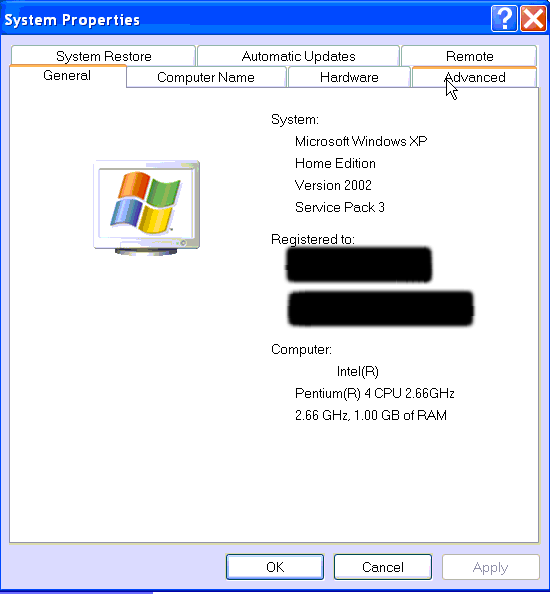
Go to your Control Panel and click on “System”. If you are in classic icon view you can click on “System” directly. If you are in category view you should click on “Performance and Maintenance” and then click on “System”. Unlike later versions of Windows, this will take you directly to the “System Properties” dialog. You do not need to click on any “Change Settings” link. It will look like this…

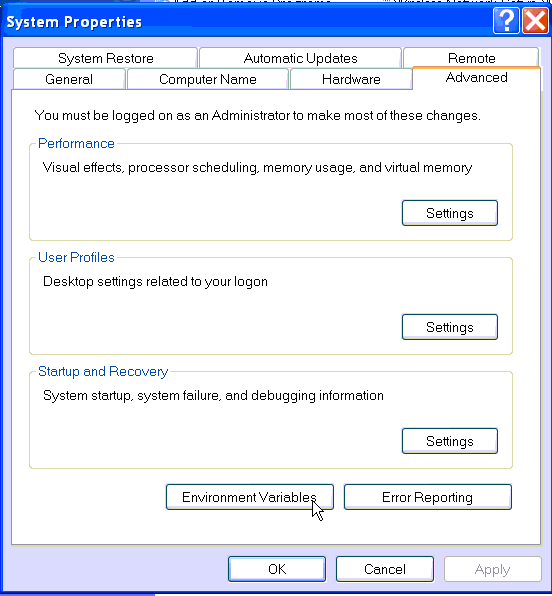
08 system properties XPClick on the tab labeled “Advanced” and it will look like this

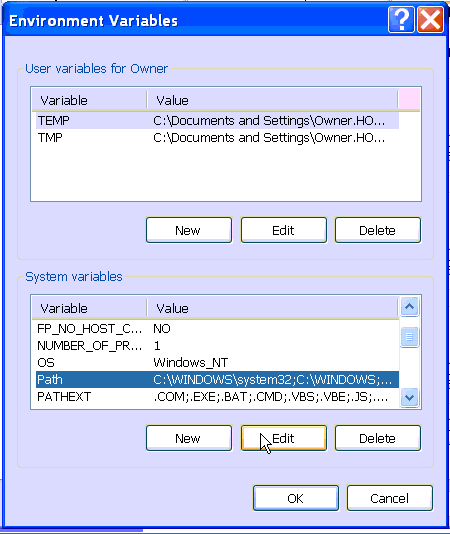
09 advanced XPClick on the “Environment Variables” button and you will see the following dialogue.

10 environment variables XPIn the lower section look for the item “Path”. Select it and click on “Edit” just below it.

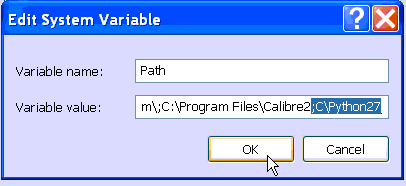
11 path XPThen very carefully go to the end of the variable value and add a semicolon followed by the path where you installed Python. Make sure you do not erase any other text that was previously there. On my system I added “;C:\Python22” to the end of the value. Then click on okay and continue out of all of the open dialogues. You can now proceed to the next section where we will install pySerial.

Installing PySerial

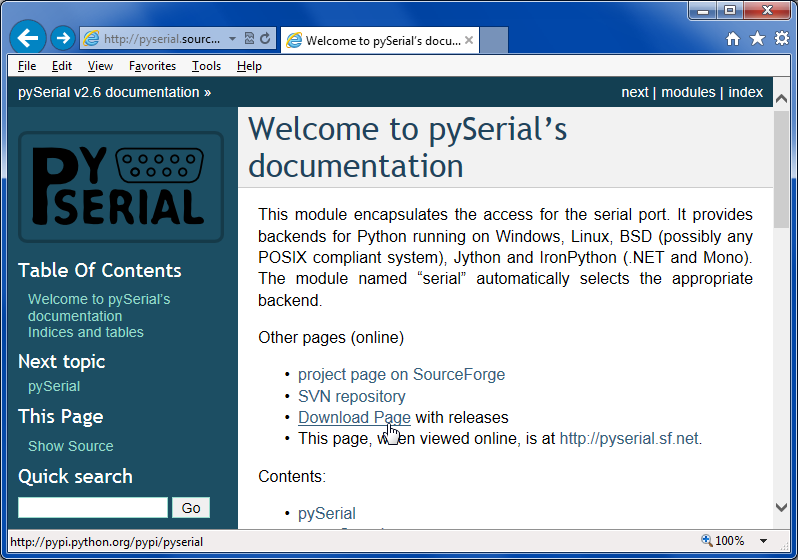
Next we will install the PySerial module which will allow us to do serial communication through Python. The main page for the PySerial code is…

http://pyserial.sourceforge.net/

Click on the “Download Page” link as shown here
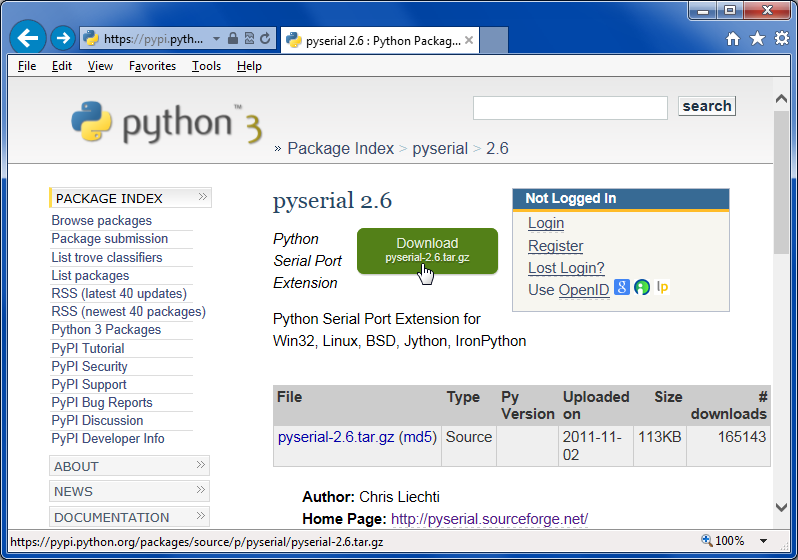
20 pySerialAt click on the big green download button. Save the file to a convenient location. Note that the version “2.6” refers to the pySerial version and not to the version of Python which you are running.

21 downloadUnzip the file. If you do not have a utility that can handle .tar.gz compressed files we recommend using “7 Zip” which can be downloaded here…

http://www.7-zip.org/

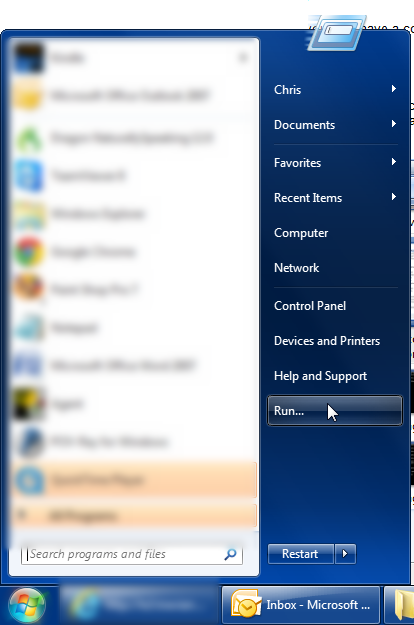
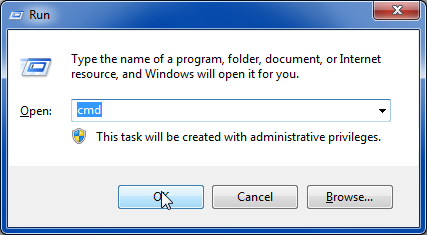
Now we will have to do something that Windows users rarely do. We need to type some command lines to install the package. Click on your start button and choose the “run” command and then type “cmd”.
22 run command
23 run dialog cmd

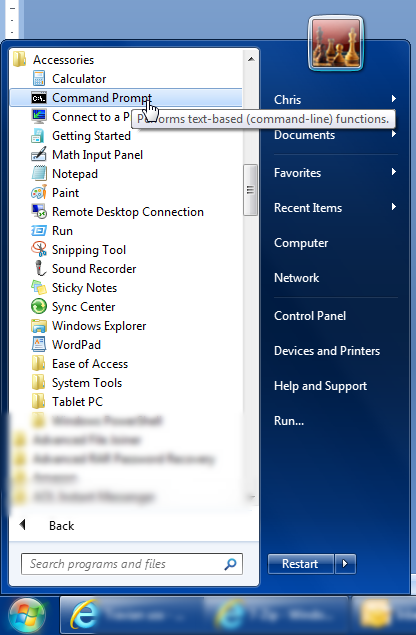
Or alternatively you may have a command prompt shortcut in your start menu under accessories as shown here.
24 command prompt

When the command line window comes up you need to change directories to where you unzipped the pySerial package. In my case it was in the c:\downloads\pyserial-2.6 so the command was…

cd c:\downloads\pyserial- 2.6

Then type the following command…

python setup.py install

25 set up install

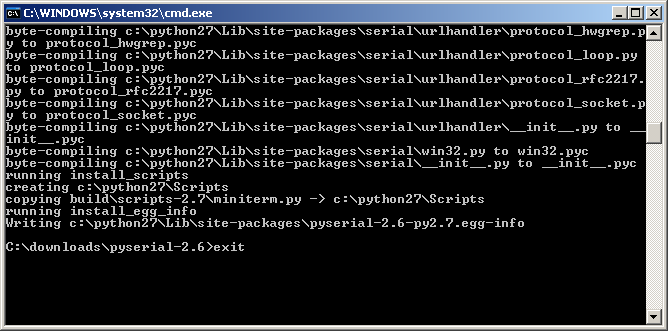
When the installation is complete type “exit”
26 exit

 Instructions for Installing Pygame

Our final step is to install the Pygame package. You can download it at

http://www.pygame.org/

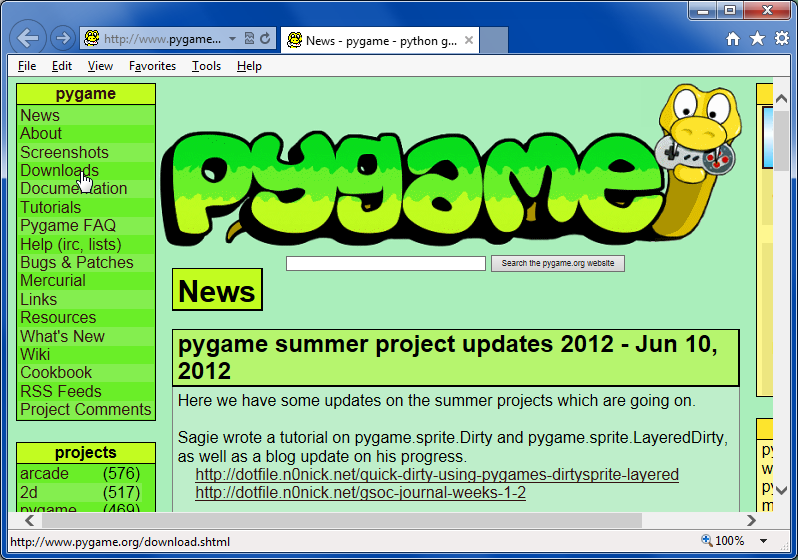
Click on the download link in the upper left menu

30 pygame

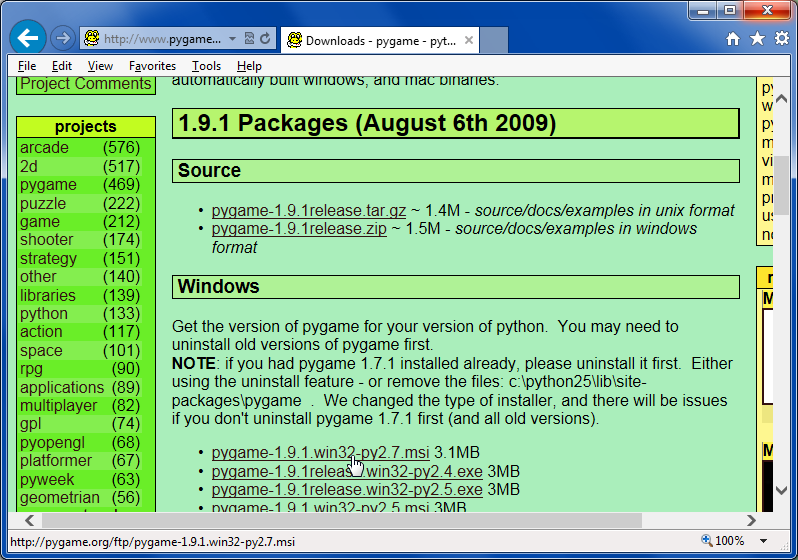
Scroll down to the section for windows and click on the link labeled “pygame-1.9.1.win32-py2.7.msi”
31 download

Or whatever the most recent 32-bit Windows installer link is. Simply run the installer and use all of the default settings to complete installation.

That’s everything you need to know to install Python, PySerial and Pygame on a Windows machine.

If you are using a Raspberry Pi you will already have Python and Pygame installed with the standard version of Raspbian. To install PySerial simply go to a command prompt and type

sudo apt-get install python-serial

This tells it to issue a superuser command to get the package and install it. In the next installment of this tutorial we will talk about how to install the Arduino IDE on a Raspberry Pi.

IRLib Tutorial part 3b: Creating a Virtual Remote Using Python

satb100In the previous lesson we demonstrated how to send IR codes to a TV, DVD, DVR/cable box or any other device that uses an infrared remote. In order to tell the Arduino what code to send, we typed codes into the serial monitor of the Arduino IDE. While that’s great for demonstration purposes, it’s not very practical. In this continuation of the lesson, we will create a small program using Python which will create a “virtual remote”. This Python script will run on your PC, laptop or even Raspberry Pi which is connected to the Arduino. As you click on the buttons on the app, the script will send the proper codes over the serial link to the Arduino. The Arduino in turn will send the IR signals to your device. In addition to the items listed in part 3a will also need…

  • a PC, laptop or even a Raspberry Pi with the Arduino connected to a USB port.
  • Python 2.x programming environment installed
  • PySerial add-on for Python that enables serial communication
  • PyGame add-on for Python that makes it easy to use graphics, mouse, keyboard
  • IRLib version 1.1 or later which includes the sample code

  • At the end of this tutorial we will post links to the Python, PySerial and PyGame packages. In part 3c of this tutorial we will give detailed instructions on how to install these passages on a Windows PC and a Raspberry Pi. When using Raspberry Pi it will probably already have Python and probably PyGame installed or you can find instructions on how to install them elsewhere online. We will include instructions on installing PySerial, the Arduino IDE and the IRLib packages on Raspberry Pi.

    This example assumes you are using Python 2.7.x or later. Python 3 has some problems with serial communication especially in the Windows version. We also highly recommend installing the 32-bit version even if you have a 64-bit computer. We cannot guarantee this will run on 64 bits. Similarly when installing PySerial we recommend the 32-bit version.

    Presuming you already have these packages installed we can proceed to customize a Python script to create virtual remote. In the previous installment we had you use the dump routine on your Arduino to capture the protocols, codes and number of bits for the functions you want to use. Our Python app can handle up to 40 functions however you can leave some of the buttons empty if you wish. But if you’re not yet done so, go back to the previous lesson and write down a whole bunch of codes you want to put in this new remote.

    The Python script we will use is available in IRLib/examples/IRserial_remote/IRserial_remote.py. You also need the files “click.wav” and “remotebg.png” in the same folder. You will have to edit several lines of the script to customize it for your purposes.

    A few lines into the script we will have to edit the serial port that the script we use to communicate to the Arduino. Look for these lines…


    # You will have to edit this to the proper port and speed
    ser = serial.Serial('COM4', 9600)

    As distributed it is set to “COM4” but on a PC it might be some other COM port or on a Linux machine such as a Raspberry Pi it would be something like

    ser = serial.Serial('/dev/ttyACM0', 9600)

    We also need to specify what font will be used to put the labels on the buttons a few lines down like this…


    # Specify a font. I'm using Arial narrow bold from my Windows
    # font folder. However the default font shown below also works.
    myfont =pygame.font.Font ("c:/windows/fonts/ARIALNB.TTF",30)
    #myfont=pygame.font.Font(None,36)

    By the way if you are not familiar with the Python language it uses a hash tag at the beginning of the line to specify it is a comment. The default is a Windows font that is Arial narrow bold that you can specify your own font of choice or used default font by substituting the word “None” as shown above. Look for the section where we define the label text each button. Here are the values as distributed.

    # These are the text labels that will appear on each button
    label_text=("TVp", "CBp", "P^", "Pv",
    "<<", ">", ">>", "->",
    "Rec", "=", "s", "<-", "Gd", "^", "Fav", "Inf", "<", "sel", ">", "Lis",
    "ret", "v", "Prv", "Mnu",
    "1", "2", "3", "Ch+",

    "4", "5", "6", "Ch-",
    "7", "8", "9", "Vol+",
    "Pip", "0", "Mut", "Vol-",
    )

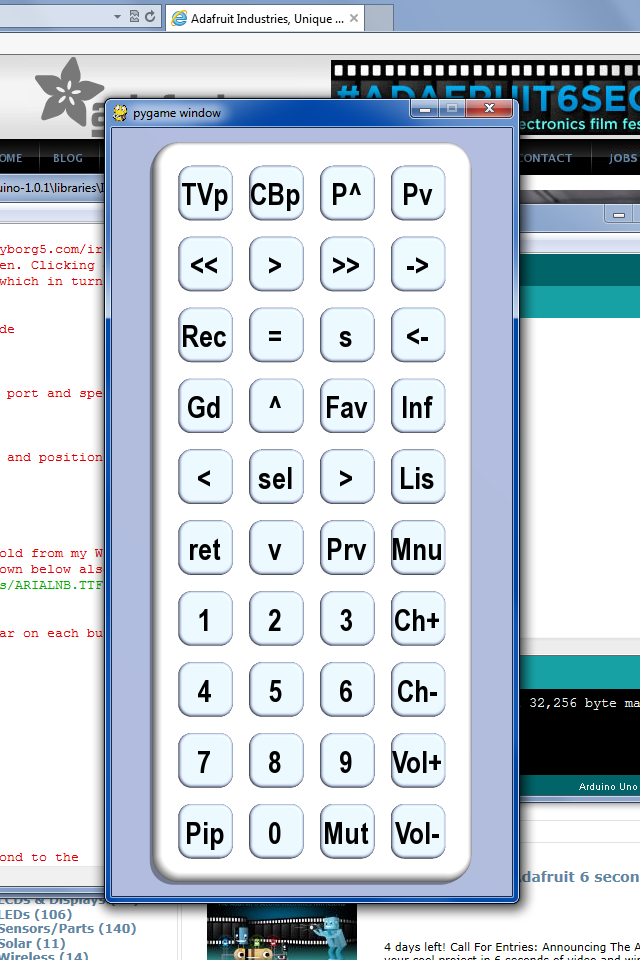
    These correspond to TV power, cable box power, Page Up, Page Down, rewind, play, fast-forward, jump to live, record, pause stop, jump back, Up Arrow, favorites, info, Left Arrow, Select, Right Arrow, Lists Recordings, Return, Down Arrow, Previous Channel, Menu, numbers 1 through 9 and 0, Channel up, Channel down, Volume up, Volume Down, Mute, and PIP. However you can make them say anything you want.

    Below that we insert the actual codes. We will use the same format we used in the previous lesson when we type codes into the serial monitor. First is a single digit that describes the protocol number, followed by a hex value, followed by the number of bits. Note that when some protocols the number of bits is optional. Here are the codes I used for a Magnavox TV using the “RC5” protocol and 13 bids And a Scientific Atlantic SA 8300 DVR using the PANASONIC_OLD protocols.


    IR_Codes= ("3,180c,13","5,37c107","5,36d924","5,37d904",
    "5,37291a","5,37990c","5,36293a","5,36b129",
    "5,375914","5,374117","5,365934","5,37c906",
    "5,36c127","5,36812f","5,37f101","5,36213b",

    "5,37810f","5,366133","5,364137","5,36c926",
    "5,366932","5,37a10b","5,36e123","5,373918",
    "5,36113d","5,37111d","5,36912d","5,377111",

    "5,37910d","5,365135","5,375115","5,36f121",
    "5,36d125","5,37d105","5,363139","3,1810,13",
    "5,37b908","5,373119","3,180d,13","3,1811,13",
    )

    Once you have everything edited using your codes you should then load the IRserial_remote sketch into your Arduino. You can try typing a few codes into the serial monitor to make sure it’s working but once you are sure the sketch is running properly you need to close the serial monitor and the Arduino IDE so that they do not tie up the serial port. If you do not close at least the serial monitor, your Python script may not be able to connect to the Arduino properly.

    Then run the Python script IRserial_remote.py script. A window should pop up showing a virtual remote control with 40 buttons on it looking something like this…

    Virtual TV Remote using Python

    Virtual TV Remote using Python


    Notice as you hover your mouse over each button, the text will turn red. If you click on the button with the mouse it will make a clicking noise and it will instruct the Arduino send the proper IR codes. If everything works properly you should be able to control your device. Here is a YouTube video demonstrating how it works.

    It’s not our intent to make this a Python tutorial so we will not go through the Python script line by line to explain how it works. Also included in the examples folder under IRserial_remote is a folder called “povray” which contains the source file for the Persistence of Vision Ray Tracer POV-Ray which is a freeware rendering program which was used to create the background image for the buttons on the remote.

    Here is a video which demonstrates this application. This video was shown on the weekly Adafruit Show and Tell video chat on Google+ You can click on the “As seen on Show-and-Tell” logo at the top of this post to see it on the show and tell.

    As promised here are links to various downloads you may need for this tutorial

    In the next installment we will show you how to install these packages in case you haven’t already done so.