As most of you know I bought a 3-D printer as a 60th birthday present to myself back in July. Mostly I’ve used it to make little boxes for my electronics projects but I thought I would do something a little more fun and print some Christmas ornaments. I did a search on thingiverse.com but the only thing I found it really appealed to me was this one which I printed out. Here is a link to it on thingiverse.com.
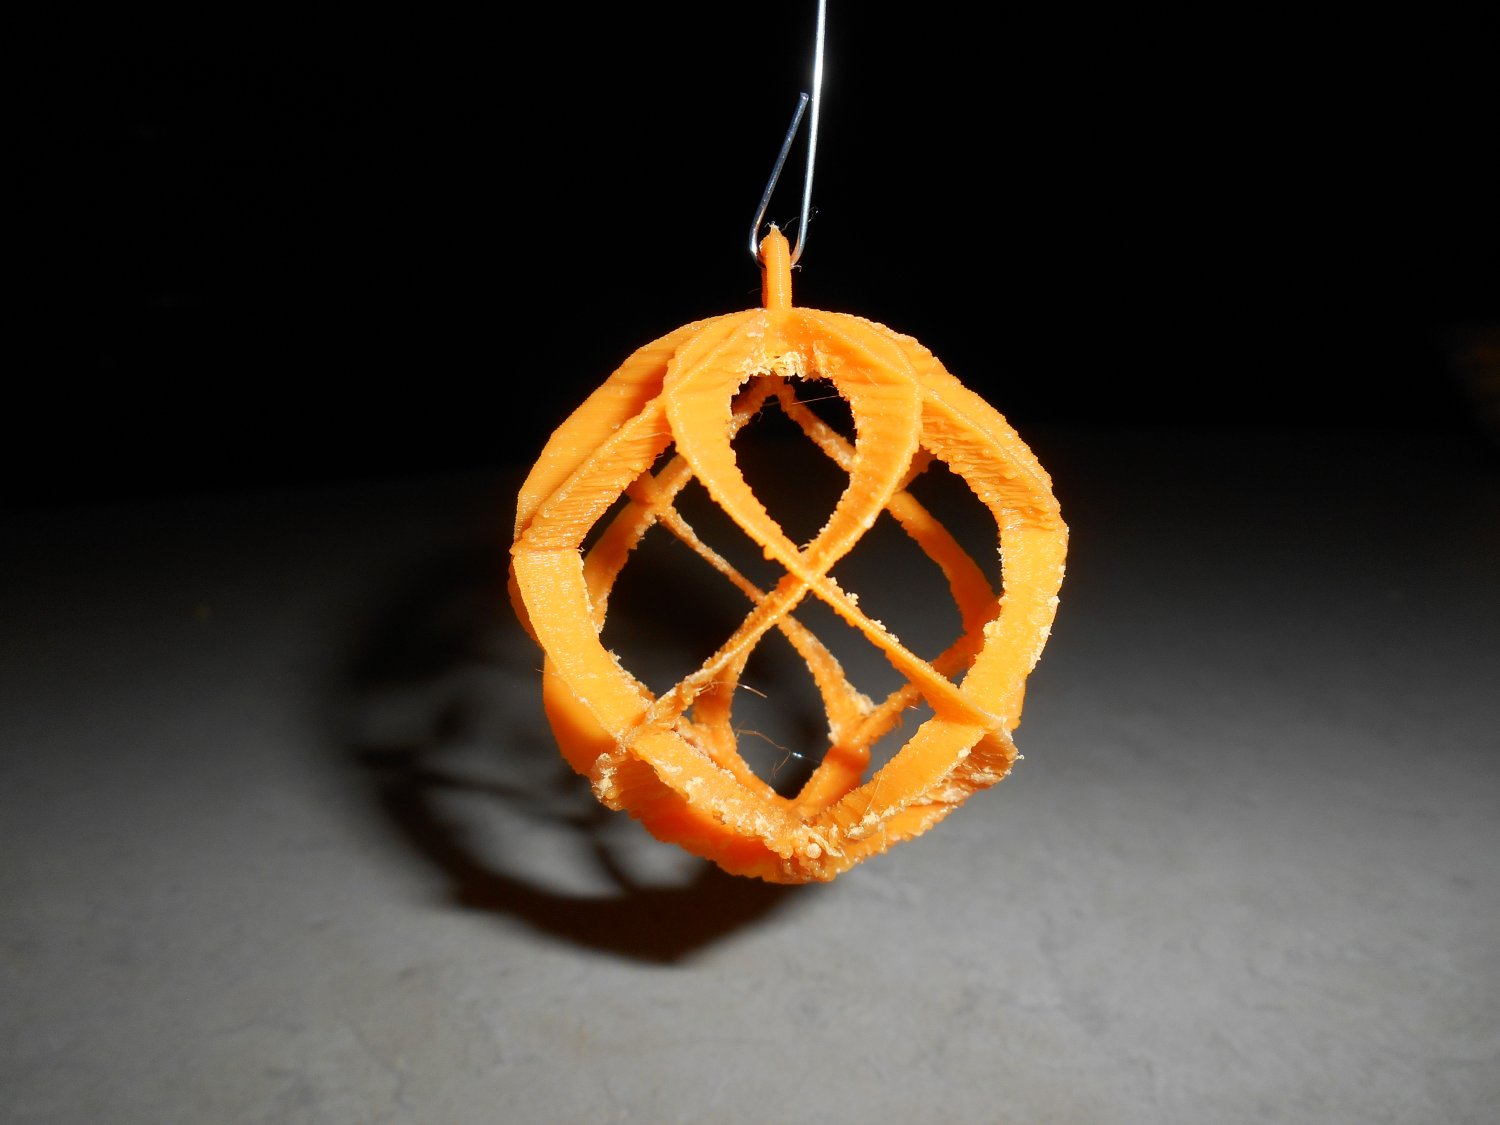
It came out kind of fuzzy but that’s typical for objects that have overhanging parts like this one. I wasn’t really wild about the flat parts of the twisty pieces. I decided I wanted to make one of my own out of rounded parts that were twisted. This is what I came up with.
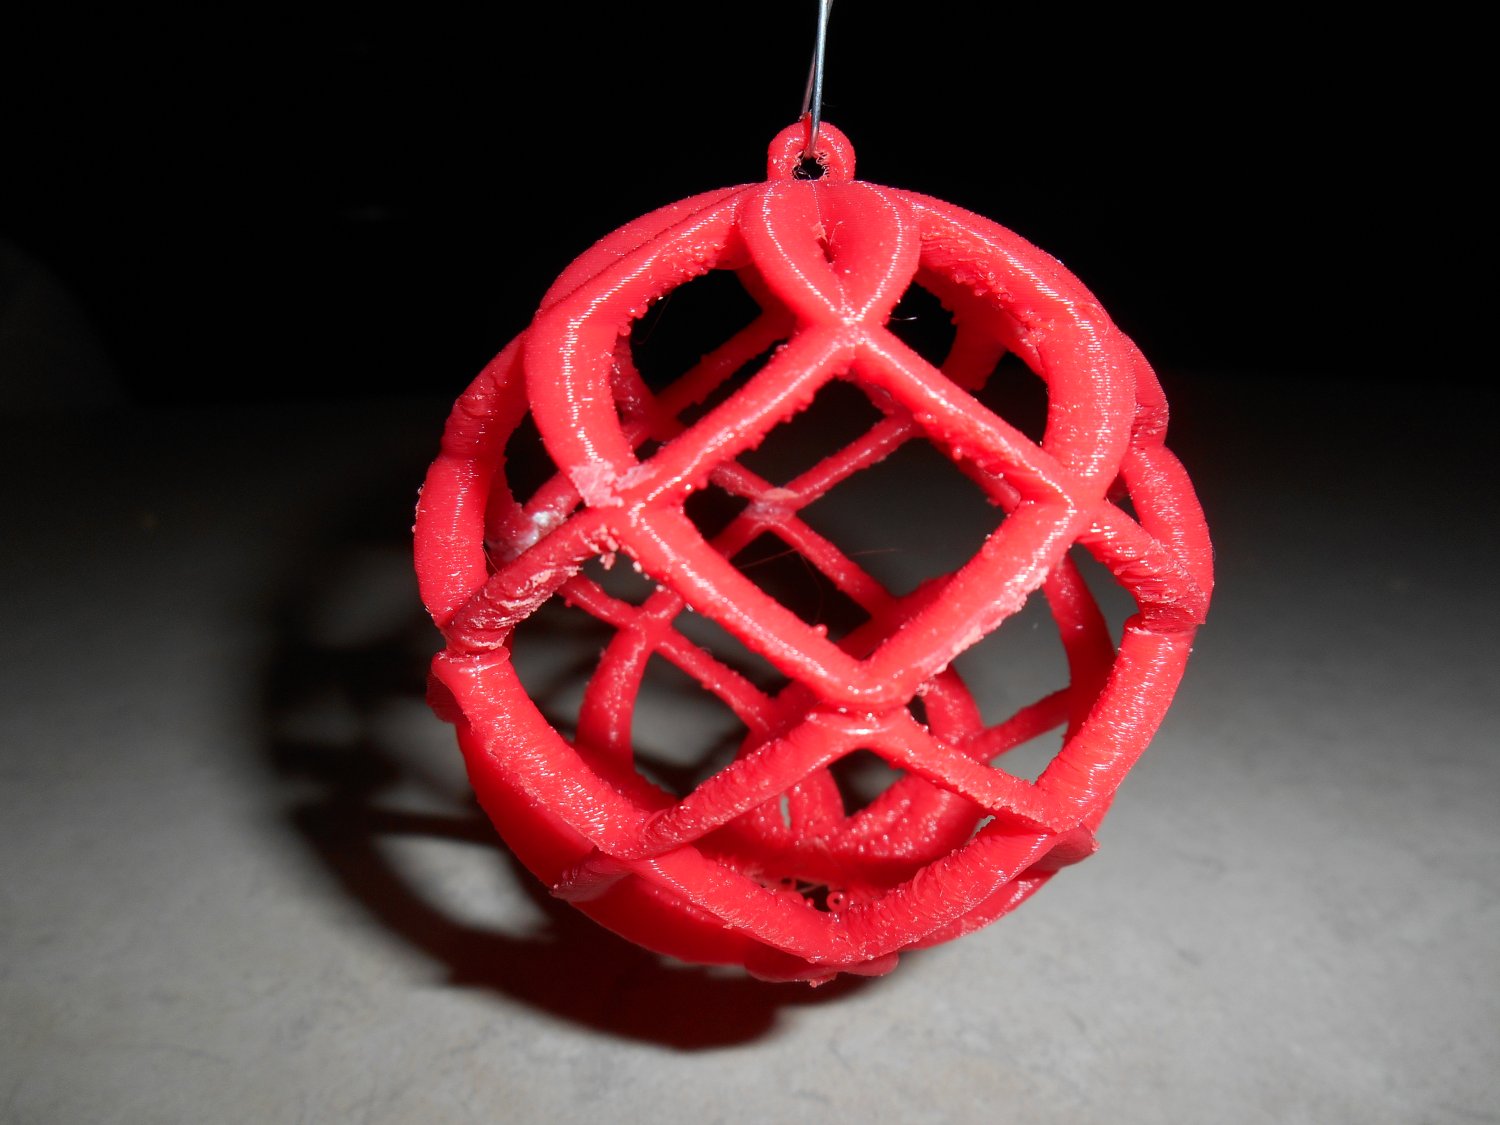
At some point I will post a complete tutorial on how I designed the shapes. This one was sort of a test [that was] 80 percent of the full-size of the model. Again it came out a little fuzzy. When I tried to make one that was larger about three inches tall it kept coming unstuck from the build plate. I also didn’t like the rough edges on the overhanging parts so I cut the model in two, printed the top and bottom halves separately with the curve on the top and the equator on the build plate. Then I glued the two pieces together. Here is a result a little bit cleaner.
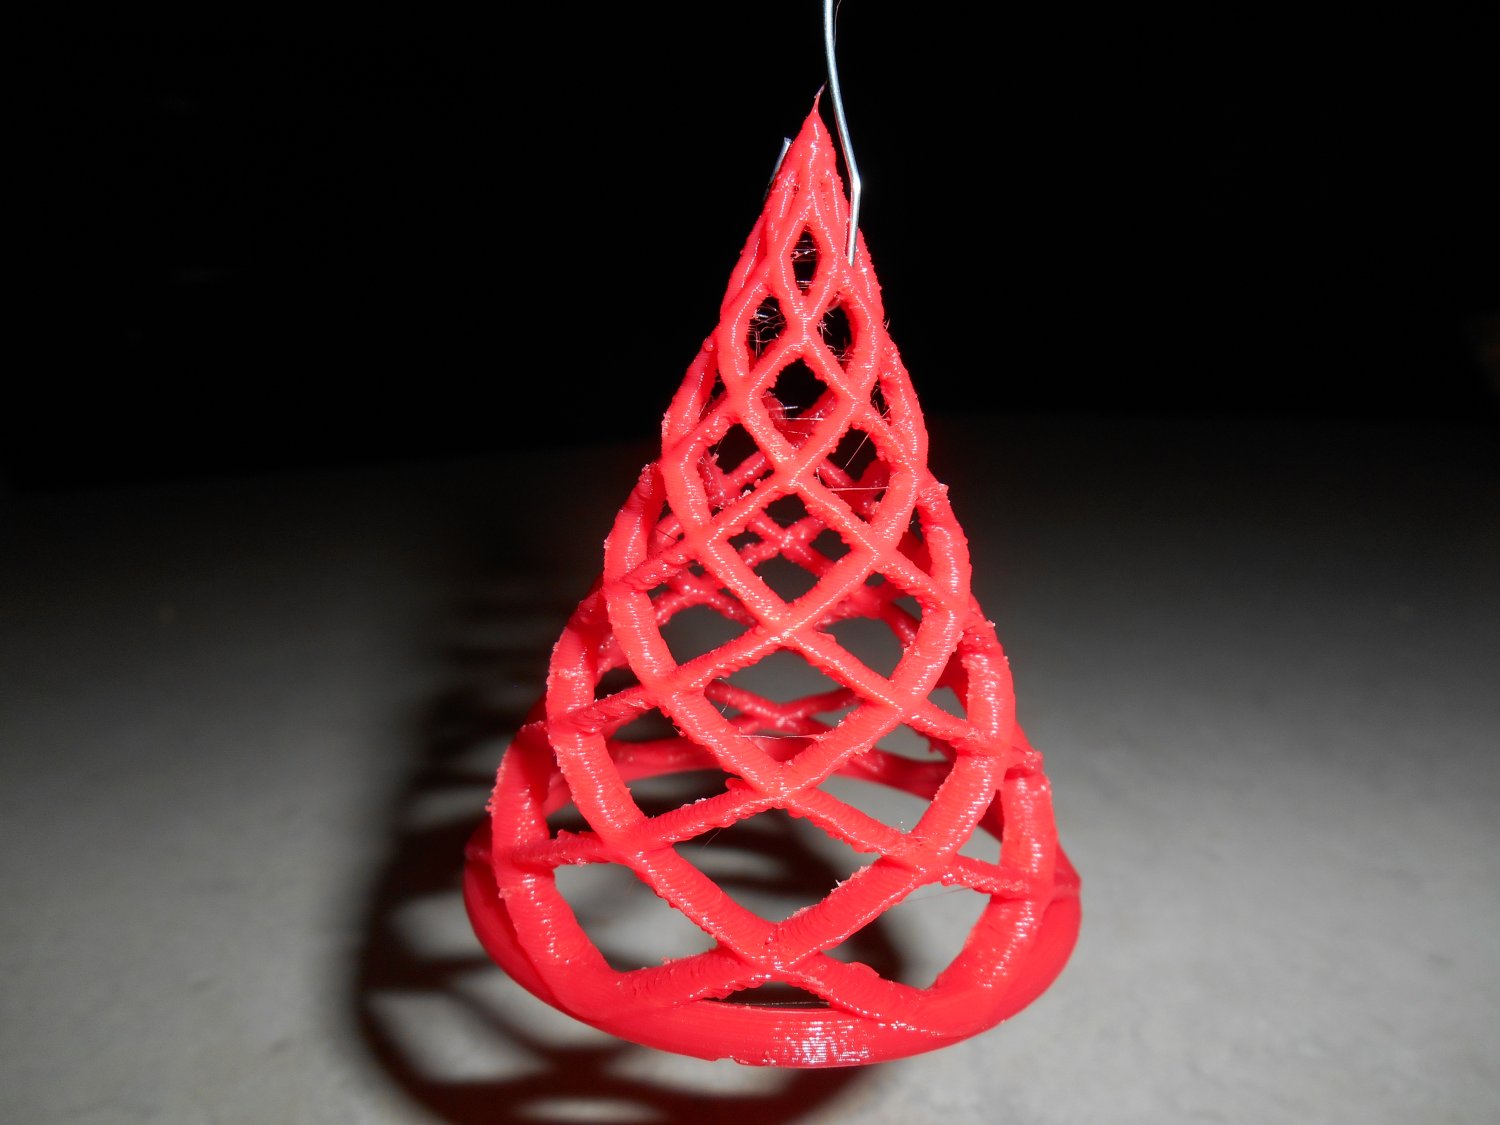
I really liked the twisty design so I decided to make a twisty tree as well. I think I like it even more than the ball.
And here is a link to the Twisty Tree Ornament on thingiverse.
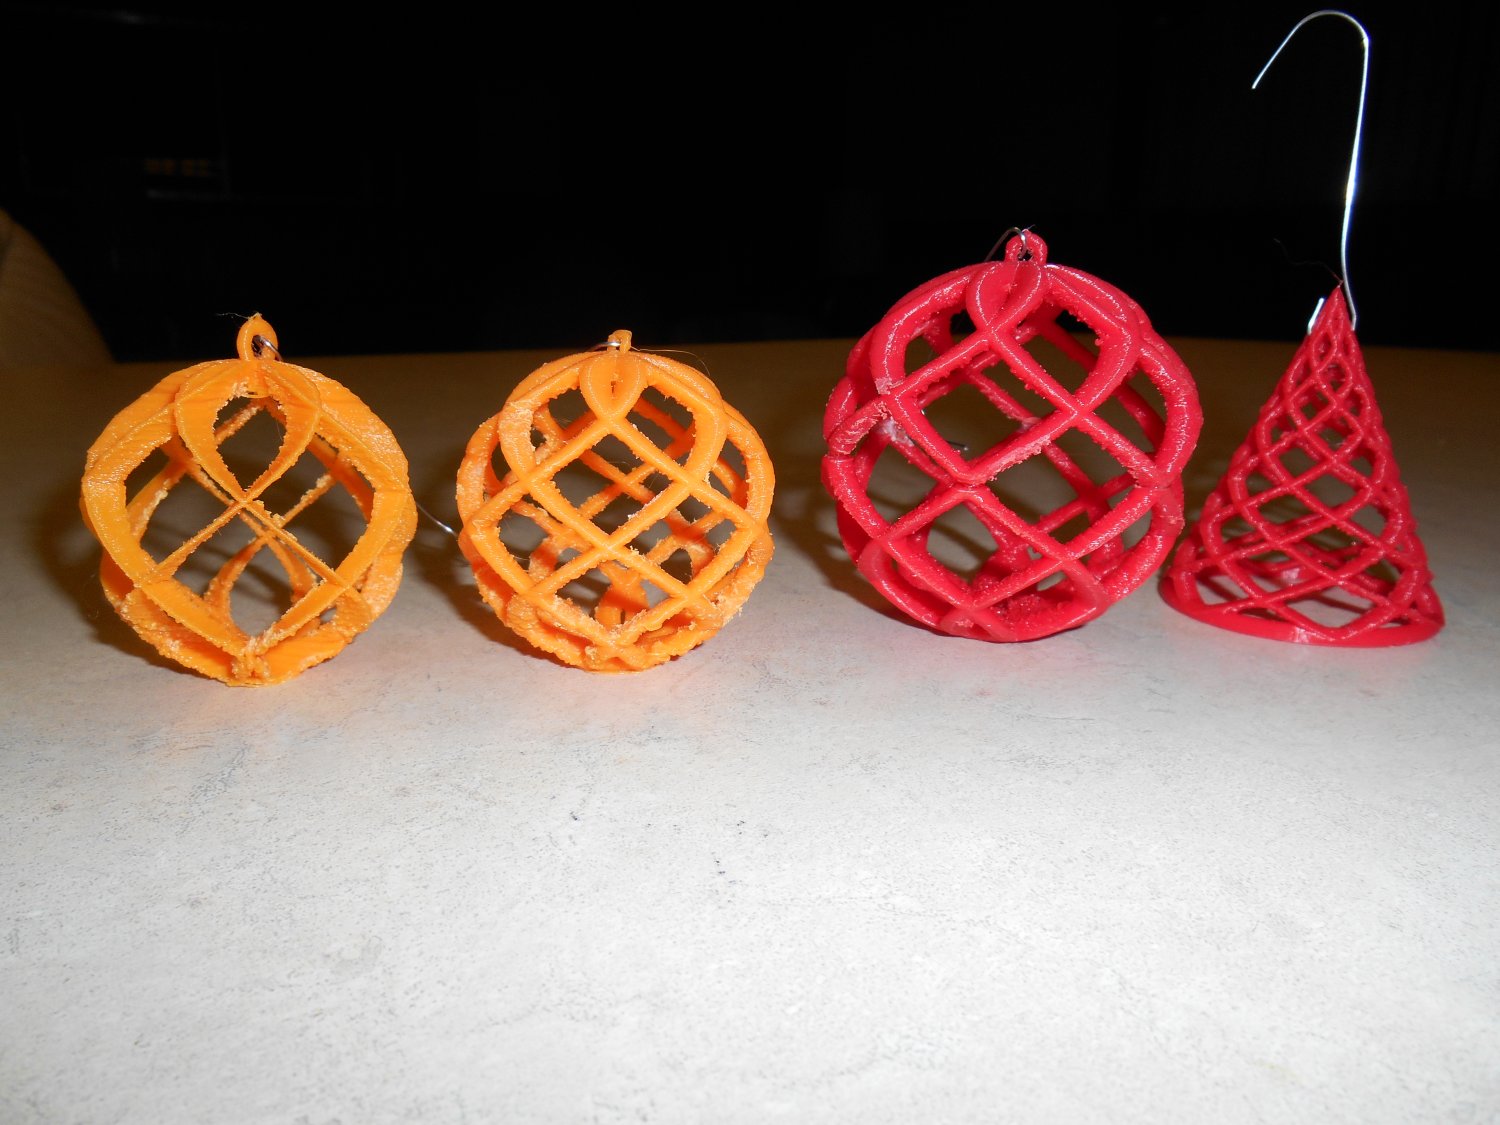
And here is a photo of the entire collection. As I mentioned before at some point I will post a tutorial on how I created them.
You can click on any of the images for larger versions.
Accessing iPhone or iPad would seem to be impossible for someone with a severe disability however iOS has a built-in feature called switch control that allows you to use pushbuttons to scan items on the touchscreen and select them. Bluetooth enabled switches for this purpose can cost $500 or more but I built one for well under $50 using parts from Adafruit.com. Here is a demo with me posting on my Facebook page using just three pushbuttons and the Adafruit Bluefruit Micro development board. When I get my new wheelchair I may also be able to use this feature using the joystick that I will use for driving the wheelchair. However after playing around with the pushbuttons I think I like them better.
I couldn’t help myself. As a birthday present to myself for my 60th birthday, I bought myself a 3-D printer. Is a Printrbot Metal Plus with a 10 x 10 x 10 build area. It will print PLA or ABS plastic. It has a heated printer bed and a 0.4 mm extruder nozzle.
The first thing you do when you set up the printer is you print a little square piece of plastic about 10 mm on the side and 3 mm thick. Look at the bottom surface of this part to see how it compares with one that was done at the factory. Unfortunately I had tinkered with some settings and did something wrong and on the first attempt to print, the printhead crashed into the print plate and started tearing up the Kapton heat resistant tape that covers the print bed. We peeled it off, salvaged part of the tape that was not damaged, and reapplied it in a strap across the middle. I ordered a new piece of tape that would cover the entire surface but it didn’t get here until several days later and I didn’t get around to applying it until weeks later. I got by because the objects I was printing would still fit on the smaller piece of tape.
For my first real prints, I downloaded some objects from a variety of websites such as Adafruit Learning System and Thingiverse. The first thing that I printed was a little bust of Yoda. Among the varieties of plastic I purchased was a color called slime green. I thought it would look good for Yoda. The original design would’ve taken over two hours to print and I want to see something quicker than that so I scaled it down and it only took a little over an hour.
Here is a YouTube video showing the print. It was posted on July 7, 2015
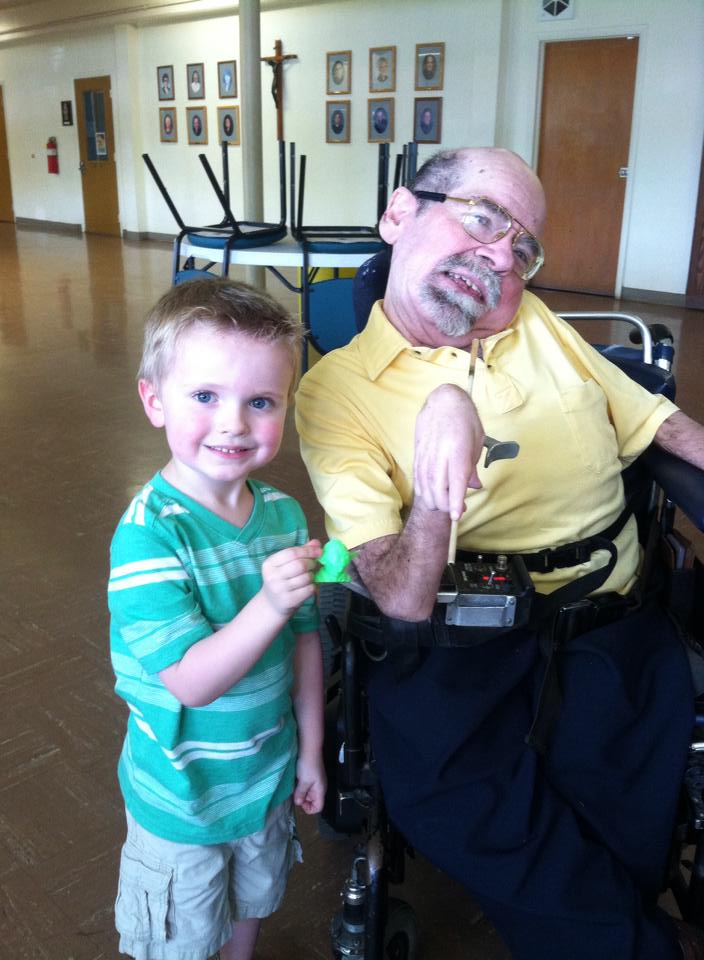
A few days later on July 12 at my 60th birthday party, I was showing off some of the objects I had printed. My cousin Angie told me that her little boy Jonathan was a huge Star Wars fan. I decided that he would give Yoda a good home so I gave him my inaugural 3-D printed object. Here is a photo from the party of me, Jonathan, and Yoda.
Note: although I uploaded this video on July 7, and I shared it on Facebook and Google Plus, I didn’t get around to writing this blog entry until mid-September. However to keep the sequence of events straight in my blog, I have predated this to July 13 which is the first day I could’ve actually written it if I had done so in a timely manner.
I’m a tiny bit sad to report the death of Pinoccio. Note that the missing “H” is deliberate. I’m not talking about Pinocchio the beloved character from children’s literature. I’m talking about “Pinoccio” (without the “H”) open-source semi-Arduino-compatible hardware and software platform. Actually to say that I’m reporting it is a bit of yesterday’s news. It was actually reported here in a blog post on their website dated March 30, 2015. The reason I didn’t see that blog post right away is that I had pretty much given up on the system several months earlier.
Here’s a bit of history… In late 2012 or early 2013 I became aware of this Indiegogo campaign titled “Pinoccio – A Complete Ecosystem Building of the Internet of Things” It was a small 1″ x 2″ Arduino compatible board using a chip similar to the one used by the Arduino Mega. This variety had a built in mesh radio such as used by the X-Bee system. It had a built-in LiPo battery, an RGB LED, a temperature sensor and a Wi-Fi backpack. You could connect to one of the units called a Lead Scout via Wi-Fi and then it would communicate to the other units over mesh radio which were known as Field Scouts. I quickly signed up at the $149 support level which would get me a Lead Scout and a Field Scout. Although the units were a bit pricey, if you added up what it would cost to buy an Arduino Mega, battery, charger circuit, X-Bee radio, and Wi-Fi module it seemed like a bargain at the time. They were seeking $60,000 in funding and end up raising over $105,000. Put this in proper context note that this was several months before Spark Core appeared on Kickstarter. Note that Spark Core has recently rebranded as Particle.io.
Had Pinoccio made its original delivery date of July 2013 they would’ve beaten everyone to market and would’ve been a major player in the Internet of Things movement. There were plans for a smaller version without the battery and sensors that would’ve been easier to embed into production products. There were plans for a variety of backpacks or shields including the one I was most anxious to see… infrared LED and receiver. My goal was to use it to create an Internet capable IR remote. I wanted to create an inexpensive alternative to the RedEye IR Remote from ThinkFlood. And it was a good thing I was planning such because ThinkFlood was shutting down as seen here.
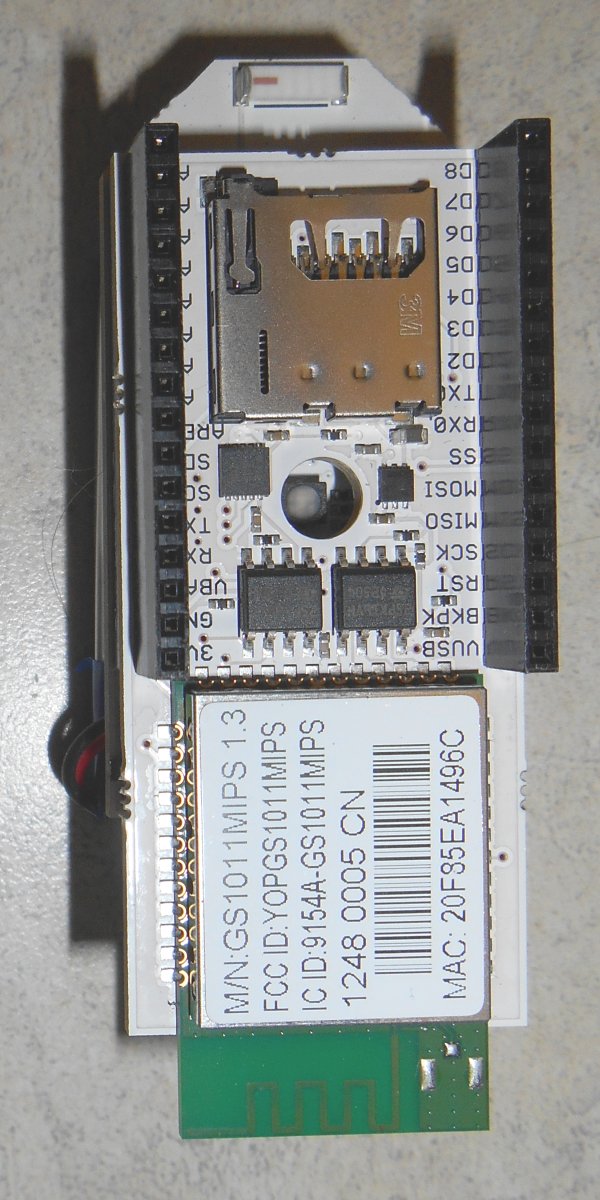
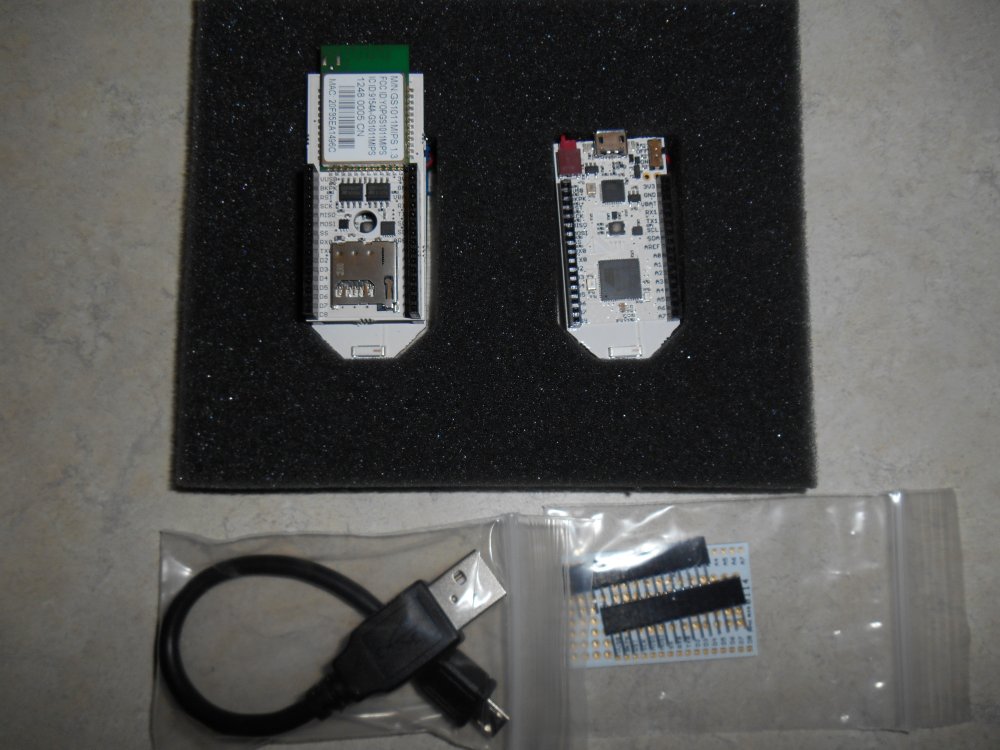
My Pinoccho boards upon arrival.
The folks from Pinoccio quickly learned the hard lessons of crowd sourced funding. Lesson number one is inevitably “If you’ve got a great idea it’s easier to raise money then it is to bring a product to market.” I won’t bother to recount the litany of things that caused multiple delays but the bottom line is that backers did not get their units until April 2014 a full 10 months past the initial estimated delivery. The reasons were the usual things: finding suppliers, finding someone to make the boards, setting up the business itself. It seemed that the main reason/excuse for delays was that “We want to get the software right.” Here is my blog post which gave my initial positive reaction to the devices when they finally arrived.
The software that we waited so long to finally get was indeed quite extensive. There was an Internet portal called hq.pinocc.io that allowed you to do many things without even writing any code. And it included an extensive script language that you could write small programs directly from the HQ application without having to use the Arduino IDE or do any C++ coding. They wanted you to be able to plug the thing in and do something with it right away. That ability is one of the key things that led to the success of the original Arduino. With a built in RGB LED and temperature sensor, you could do more than just blank the LED on pin 13 like you can with Arduino out-of-the-box.
However if you wanted to write your own applications, the learning curve at least for me was very steep. I had no experience in connecting devices to the web. I did know quite a bit of JavaScript programming, CSS, and DOM HTML programming which was useful. I had a little bit of experience with PHP however that did not apply in this case. What I did not have any idea how to do what is called “asynchronous communication” with Web servers.
I was taught as a programmer from day one that execution of a program started at the top of the main module and went step-by-step through the module sequentially unless modified by the if/then/else or some sort of loop structure. But asynchronous coding is something significantly different. You make a request to a Web server and within that request, you send it the code that you want to execute when it finishes the job. That seems simple enough. I figured it would call the code when it was ready and then move on to the next step. But it doesn’t work that way. You move on to the next step immediately after making the request and you have no idea when it’s going to complete that request and invoke your callback function. I would make a request from the server for a piece of information. My callback function would tell the server where to put that information in my program. Then I would try to display that information on the webpage. But it was never there. When I would insert debugging code to see why it wasn’t there, it was there. It reminded me of the paranoid poem about the little man on the stair.
“Last night I saw on the stair
The little man who wasn’t there.
He wasn’t there again today.
Oh how I wish he’d go away.”
I was being haunted by the returned data that wasn’t there 🙂
What I didn’t understand was that this callback function wasn’t a normal subroutine where you call it, it executes, and when it returns you carry on. You have to carry on immediately after the request and you don’t know how long it’s going to take for the Web server to return your data. So you have to put something in the callback function that tells your main program “Hey he finally got what you asked for. You can use it now. It’s really here.”
When you are collecting several pieces of data in a row and you don’t want to proceed until you’ve got them all, the nested callback functions can get pretty hairy. It took me a long time to figure out what I was doing wrong. It also took a lot of patience on the part of the people from Pinoccio in their support forums to walk me through my inadequacies is particular area of programming. I owe them a tremendous debt of thanks. (Humorous note here… When I dictated the previous sentence using my dictation software, it misunderstood me and said “I/O them…”. How appropriate for a “.io” system). Anyway they were most gracious and patient with me.
I did my best to pay back their kindness. I blogged everything I could about the device. I showed it off on the Adafruit Google+ Hangout Show-and-Tell. I blogged about how to get around some SSL certificate problems that cropped up along the way. And I did my best to educate them in the hardware requirements necessary to make an infrared backpack for the Pinoccio system. And ultimately I did get a working Internet-of-Things infrared remote that I used to operate my TV and cable box.
My cable box is located in the living room but I have an HDMI cable that runs into my adjacent office so that I can watch the same thing my dad is watching and living room. I can get on a webpage in the office and control the cable box in the living room. I used it every day for several months and it was a real godsend. I succeeded in replacing my defunct and unsupported RedEye remote.
I included Pinoccio support in my next public release of my infrared library IRLib. I began cleaning up my asynchronous webpage code and preparing to publish it to share with the world everything I have learned so that the next novice who came along would have a clear and simple tutorial to follow I would not have to bother the people in the support forum to learn the things I have learned the hard way.
One of the things that bothered me about the entire system was that it was totally dependent upon the website hq.pinocc.io servers were maintained by the Pinoccio organization. On occasion, their server would crash and I would be stuck with a useless system. I asked them what do we do to remove that dependence. The old RedEye remote system was accessed directly to the local IP address of the device itself. It also included its own Web server in the device. In contrast the Pinoccio system required me to make my own webpage to control the device (as great as HQ was it wasn’t sufficient). That meant I had to install a Web server on my PC. I can only control the system from that PC unless I uploaded the webpage to cyborg5.com which I didn’t want to do. Setting up WampServer on my PC was much easier than I anticipated. That allowed me to host my controlling webpage with no problem.
Furthermore my webpage could not communicate with the device directly. It had to go through their servers. My controlling webpage went to a URL on their server and their server connected back to the device itself. The whole point of Pinoccio, for me at least, was to replace the defunct out of business RedEye Remote. What was I going to do if Pinoccio ever folded? They assured me that they were working on a system that would allow direct connections without going through their server system. And in the end they did so.. They developed a system where you could plug one Scout into a PC and have it communicate directly with the other Scouts using the mesh radio. You didn’t need the Wi-Fi at all. They called it a “Bridge Scout”. While that was of suited my purpose, still wouldn’t have given me all of the capabilities the device should have had. There supposedly is a way to set up one’s own server that would duplicate their part of the infrastructure. I believe them when they tell me that. However doing that myself would required another steep learning curve that I didn’t really feel like attempting. It would require more than I can get out of WampServer. It involved node.JS and a variety of other things that were beyond me.
Unfortunately somewhere along the way the device got a bit glitchy. There were constant software updates some of which I kept up with and some I did not. After not doing updates for several months, I finally decided to do an update in hopes of fixing the glitches. The end result was my device quit working altogether. I spent a couple of weeks presuming that the problem was an adverse interaction between my infrared code and their systems software. It involved going onto GitHub and figuring out which version of the software I had been using that was working somewhat well and then individually applying each and every update that had occurred over the period of several months. I finally found the patch that was causing my code to crash. In the end it was not an adverse reaction between my infrared code and their system. I was able to whittle it down to an example that did not include my IR code at all.
Somewhere in the midst of all this, I ended up “bricking” my lead scout. Somehow during a crash, the boot loader was overwritten. They talked me through a system wherein you could use one Scout as an ISP to restore the boot loader on a broken Scout. Initially that process did not work because I tried to do it with the Wi-Fi backpack still installed. Somewhere along the way while adding and removing the Wi-Fi backpack without disconnecting the power, I permanently damaged the Wi-Fi backpack. That meant that the so-called “Ecosystem for the Internet of Things” was no longer Internet capable. A replacement Wi-Fi backpack would cost $79. I was able to get the system running somewhat using the bridge Scout they described where you had to keep one unit plugged into a PC to communicate with another unit. However I had become frustrated with the whole thing and needed to get away from it for a while.
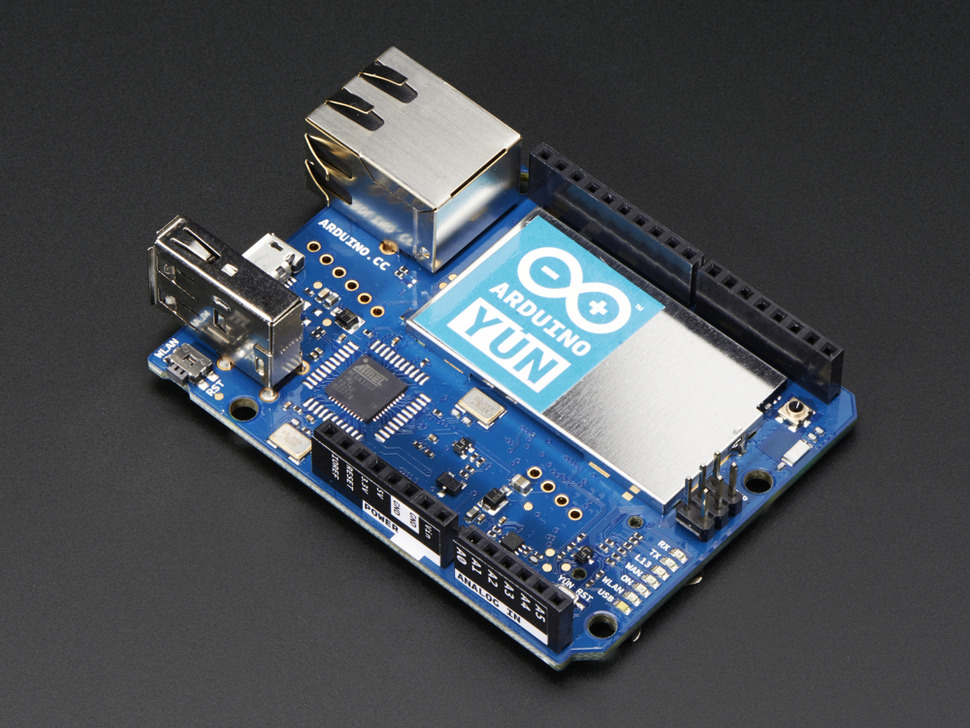
I ended up ordering an Arduino Yun from Adafruit.com. I immediately fell in love with the device. It consists of a powerful microprocessor running a minimal version of Linux and an Arduino Leonardo in one device. The communication between the Leonardo and the Linux was well defined and easy to use. The Linux portion did include its own Web server. You could also update the onboard Arduino sketch and the associated webpage using the latest Arduino IDE and do so wirelessly for Wi-Fi. That ability to update wirelessly was something that Pinoccio had promised from the beginning but never did fully implement at least from a users perspective. They did allow you to update system software wirelessly but not user programs at the Arduino level.
Although I did have the Pinoccio experience under my belt along with the experience of doing asynchronous callbacks to Web servers, setting up my IR remote on the Arduino Yun took me only a day and a half rather than the weeks and weeks of frustration that I had with Pinoccio. One of the things that was probably the nail in the coffin of Pinoccio for me personally was the fact that I could buy an Arduino Yun with its embedded Linux, Wi-Fi, Arduino Leonardo, and built-in Web server with no external infrastructure needed for about $75. That was four dollars less than the Wi-Fi backpack alone for Pinoccio.
My intent had been to take a break from Pinoccio after I got the other system up and running. I still felt like I owed them those tutorial blogs to help other Pinoccio users not have to go through the blood sweat and tears that I’ve been through. But I got distracted with other projects and never was able to do it. Now of course there is no more Pinoccio. Their servers are shutting down at the end of the month and anyone who hasn’t figured out how to launch their own server or who is content with using bridge mode is going to be out of luck.
Ironically my old RedEye Remote has in some ways outlasted the Pinoccio. Even ThinkFlood shut down over two years ago, you could still use their device as long as you didn’t need to update the software. I’ve been using mine as an Internet remote to control my bedroom TV and cable box in the same way I’m using the Arduino Yun for the living room. However I recently purchased a new TV in the bedroom and I cannot update the RedEye with the new codes. I had to order another Arduino Yun.
I had a bit of a scare because the Yun has been out of stock at Adafruit for a couple of months now. Fortunately I found one at my second favorite supplier SparkFun.com. I’m pretty sure that the shortage is a consequence of the trademark disputes between Arduino.cc and their previous hardware manufacturing company which has now rebranded itself as Arduino.org. Is my belief that Arduino.cc should and will win the dispute. And I’m absolutely ecstatic over the new announcement that Adafruit will become the US manufacturer for Arduino.cc. I’m confident that both Arduino and Adafruit will be around for a very long time.
In the end I think I’m going to miss Pinoccio. I was quite fond of the little fellow and a bit disappointed he never really achieved his full potential. I don’t regret any of it however. I learned a lot of useful programming. And I learned some lessons about crowd source funding. And it serves as a cautionary tale about Internet of Things systems that are too closely linked to their infrastructure. I think that as IoT continues to grow that’s going to be an important lesson for everyone.
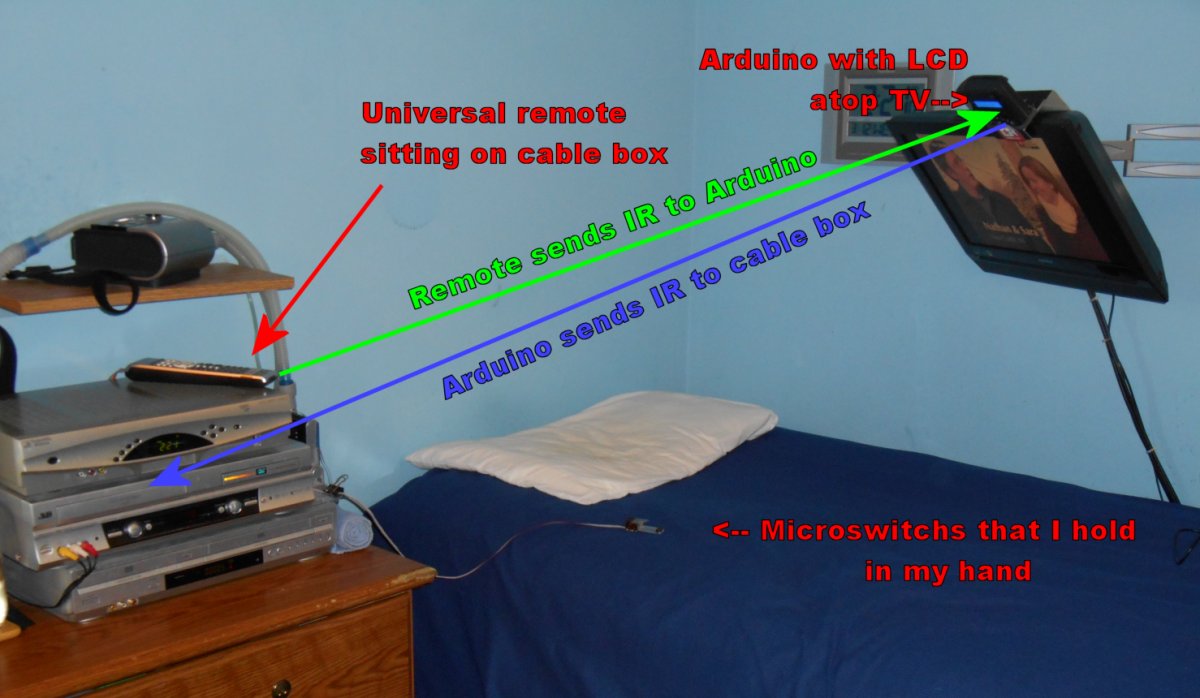
In previous blog posts I’ve described how I am able to operate my TV, DVR/cable box, VCR, DVD player using a custom IR remote with just four buttons. The project has gone through several versions. Originally the buttons were connected to a standard TV remote which would send IR signals to an Arduino box on top of my TV. The Arduino has a small LCD screen with just two lines of 16 characters. By using the buttons like arrow keys I can scroll through symbols on the screen to select dozens of functions. The Arduino box then send IR signals back to the TV, cable box whatever. Here is how the original system looked… (You can click on any image in this blog to see it larger.)
Original “Remote-Controlled Remote-Control” System
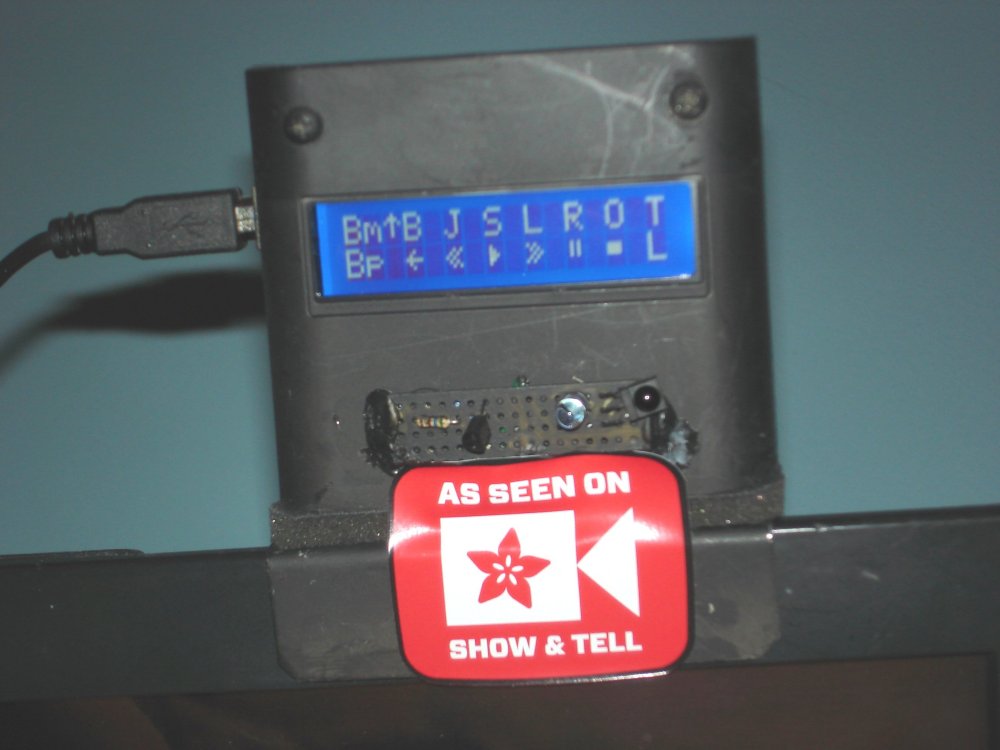
Here is a close-up look at the menu box on top of the TV.
Arduino-based device with LCD menu sits atop my TV probably displaying an Adafruit “As Seen on Show & Tell” sticker.
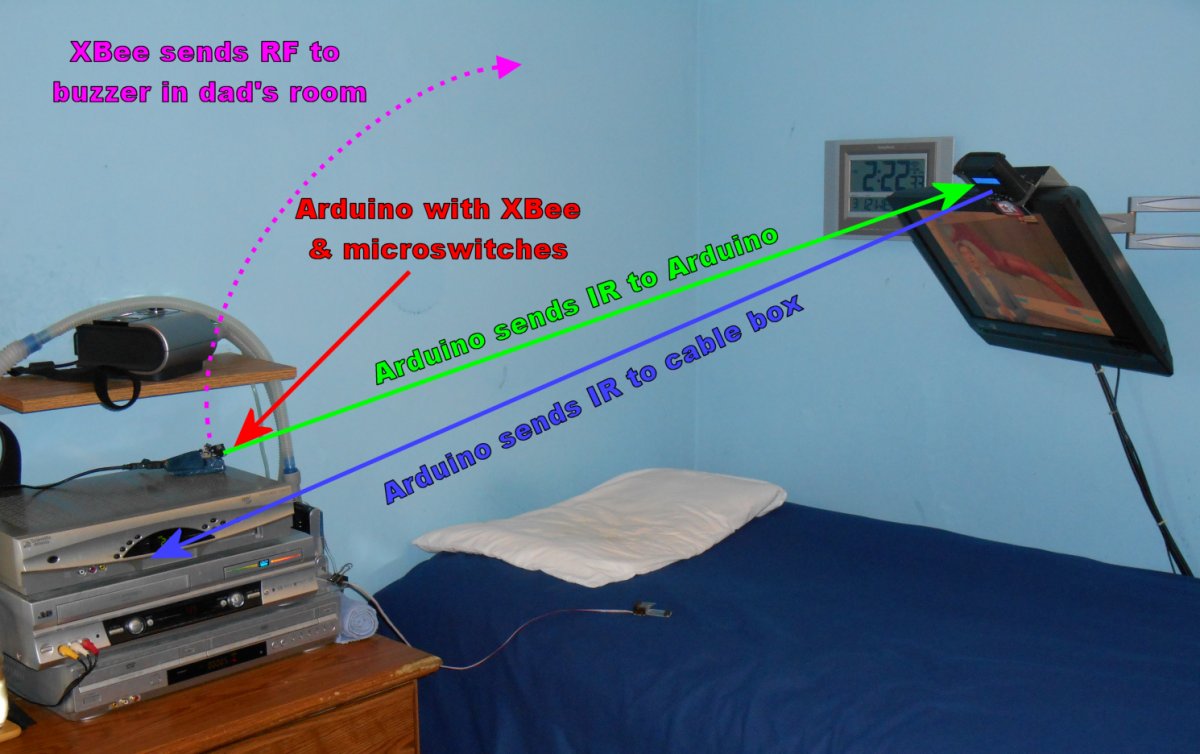
At one point I needed to add a call buzzer to the system that used RF signals that would reach all the way to my dad’s bedroom. Since I was adding an X-Bee radio system I decided I would use RF signals to avoid conflicting IR signals bouncing around the room. The buttons were then connected to an Arduino Micro with an X-Bee radio. It sends RF signals to the Arduino on top of the TV as well as to another Arduino in my dad’s room which has a buzzer in it. If I push single buttons, it scrolls the menus on the Arduino atop the TV. If I push multiple buttons it triggers an alarm that wakes up my dad. Here is how that updated RF system looked…
Unfortunately I seem to be spending more time in bed than I wish I was. My sinuses are mess which causes drainage and coughing spells and congestion in my lungs. The only thing I can do if he gets out of hand is to lie down so that I’m not fighting gravity trying to call things up. Once I’m in bed is such a hassle to give me put back together again that if I have such a spell in the evening I generally just don’t bother to get up again and spend the rest of the evening in bed.
I have a laptop computer that we would occasionally roll in on a bed tray so that I can get online or do other computer things while lying down. But we had to prop the laptop up on a stand so that I could see it. I had to stuff an extra pillow under my head. It was just a big hassle.
I mentioned that I had VCRs in my bedroom. You can see them in the photos above. The stack of devices on the dresser is the DVR on top of 2 VCR/DVD combos. I’m embarrassed to admit that considering how technologically advanced I claim to be. But I was using the VCR every day. I like to watch politics programs on MSNBC. Typically it’s “The Last Word with Lawrence O’Donnell” although I occasionally watch “The Rachel Maddow Show”. I severely miss having Keith Olbermann doing politics. Anyway I record Lawrence O’Donnell every day onto an eight hour tape and when it fills up I have my dad take it to my office where I watch it on a VCR there. (We used to call that “Nike networking”. Copy it to media, put on your Nikes, and walk it over to the other location.) I generally just have it on in the background while I’m doing other things. But how technologically backwards is that? Recording onto a VCR and then physically moving the tape to a different room. I was sorely ashamed. There had to be a better way.
Speaking of technologically backwards… Fortunately Bright House still has about 50 channels that are available as analog cable so it still possible to record them using a VCR. It beats paying extra for their whole house DVR service which comes at quite a premium.
Anyway onto my alternative… I have a small USB device that is in NTSC/ATSC tuner that allows you to connect it to a cable or antenna and watch TV and/or record TV on your computer. It is a Hauppauge WinTV 950q. I thought perhaps I could connect it to a Raspberry Pi and record my programs and then use Wi-Fi to copy them to another Raspberry Pi in my office where I could watch them. Unfortunately without doing a lot of custom coding that I didn’t care to get into, the Raspberry Pi would not support analog recording. I could get it to record over the air ATSC digital broadcast but the Pi either wasn’t powerful enough for didn’t have the right drivers to make analog work. You have to be able to encode MPEG video on the fly. While the Raspberry Pi version 2.0 might be powerful enough, I didn’t really want to mess with it.
I did have in fact a superior alternative. I could use my laptop. You can easily record digital or analog using the USB tuner. What if I just got rid of the VCRs and set the laptop next to my bed. I could run an HDMI cable to my regular TV, put my dictation microphone on my pillow, and have complete access to a powerful PC on my TV screen and it could serve as a custom DVR as well.
The main problem is that the TV I have mounted on my wall only has one HDMI input and I needed 2. One for my cable box for watching TV and the other one for the laptop. Fortunately in my junk drawer I still had a RadioShack HDMI switch. I purchased it in about 2005 when I had my very first HDTV. My first HDTV only had one HDMI input because in those days HDMI was brand-new. I used it to switch back and forth between my cable box and my DVD which wasn’t even Blu-ray. The DVD player in those days had digital up conversion that made standard DVDs look almost HD. The RadioShack switcher would respond to an IR remote. You would simply hold down a learning button while sending it a signal. Then anytime it received that signal again it would switch to the appropriate input. So I would be able to easily switch back and forth between TV and laptop.
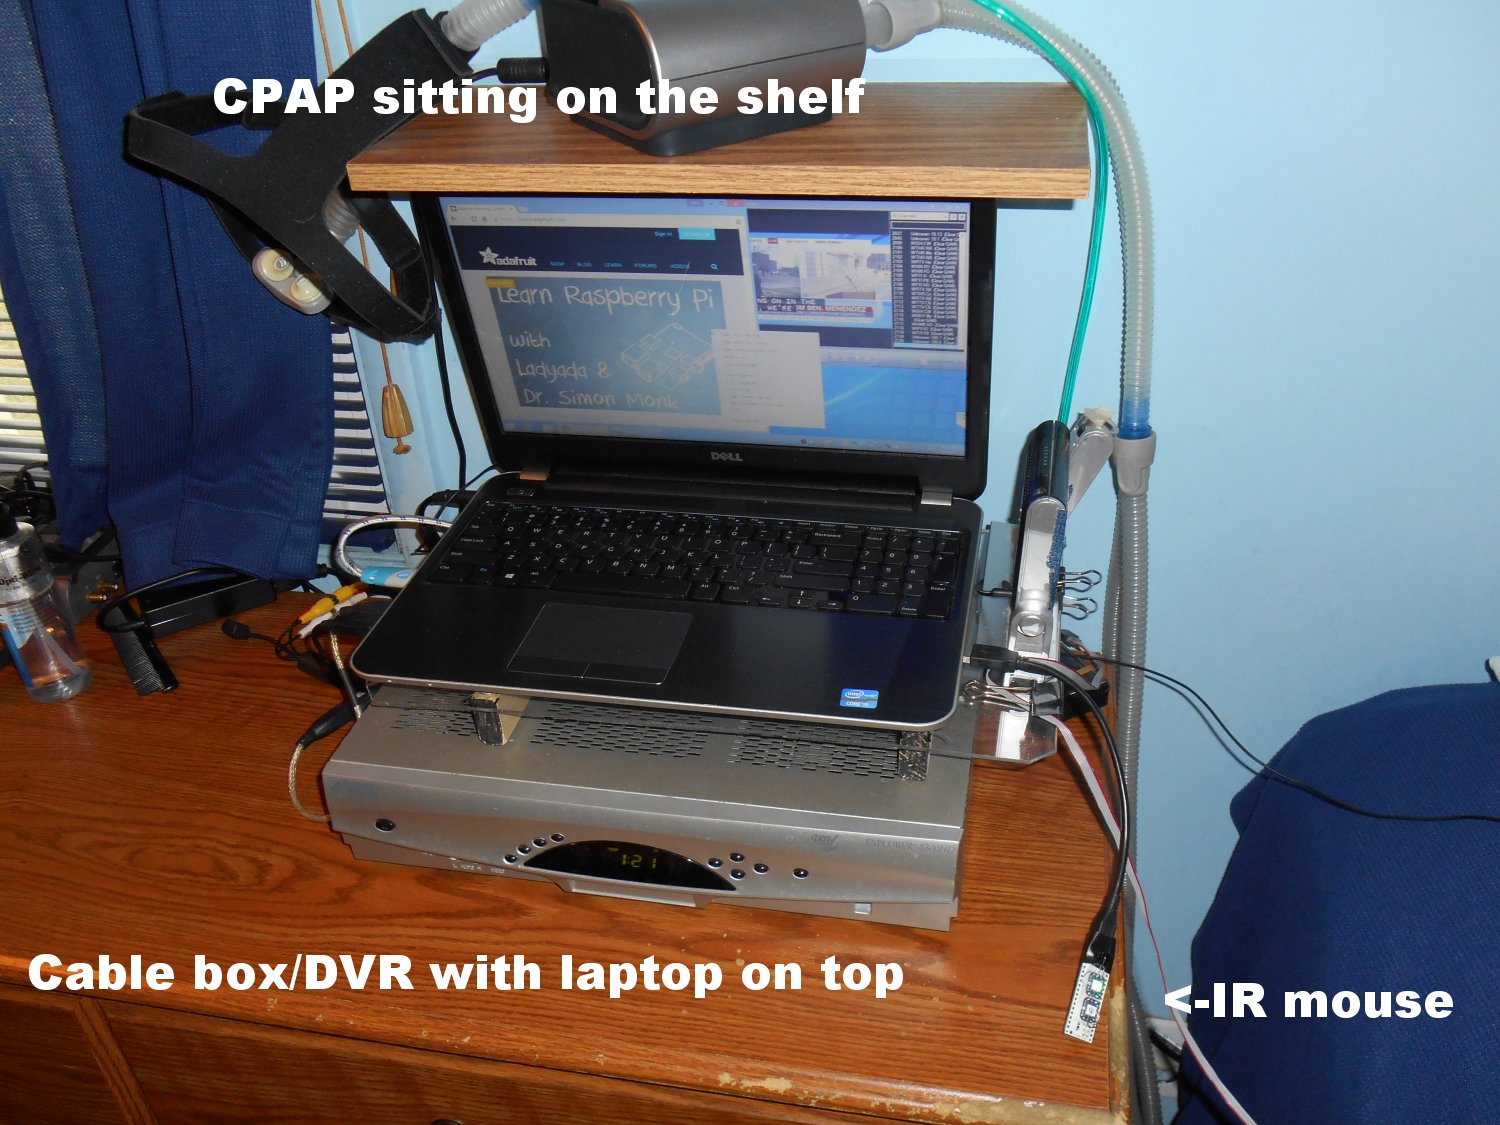
Here’s what it looks like now. Because the cable box has lots of vents on top of it, we had to build a little shelf to raise the laptop up a couple of inches so that the box doesn’t overheat. I set things up on the laptop so that closing the lid does not put it in standby mode. 99% of the time I keep the lid closed and only use it through the HDMI on the TV. The USB TV tuner works just great. And then I had one other brainstorm…
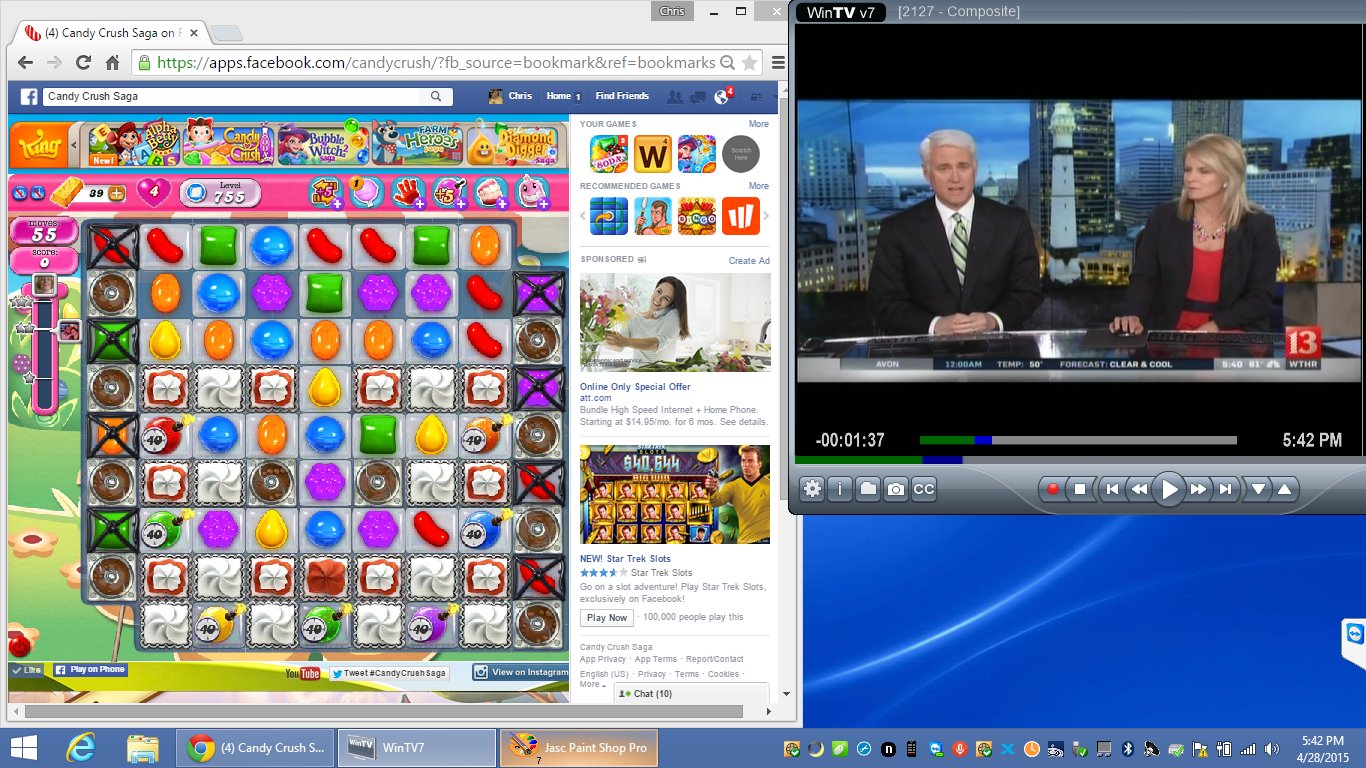
In addition to a coaxial connection to which you can attach cable or antenna, the USB tuner also has a place to plug in an adapter with Red, White, Yellow RCA composite cables. By connecting them to the cable box I can then copy things from the cable box onto the TV tuner/laptop. That’s one of the nice things about the old VCR was that if I did record something on the cable box that I wanted to keep long-term, I could always make a low definition VCR recording of it for posterity. This would preserve that capability and add one other capability. There is a program that allows you to watch TV on your PC through the USB tuner. So if I’m using the laptop, I could put the TV program off in the corner of the screen and watch my cable box low definition through the component cables. Then on the rest of the screen I can log into Facebook, play games, write blogs whatever. It essentially made my laptop screen a-picture-in-picture capable TV with the TV in the small window and the laptop screen in the remaining area. Here is what it looks like on my laptop where I can watch TV and do other things at the same time.
Screen grab from my laptop shows me watching the news through the USB tuner while playing candy crush.
Here is an overview of how everything communicates together.
IR and RF communication between my various devices.
I thought everything was going to work just great. All of the initial tests worked perfectly. But then I started having audio glitches. For some time, I had been having problems with audio not working between the TV and the cable box. You had to turn on the TV first and then turn on the cable box in order for the HDMI to sync up properly. However when I added the HDMI switch, for some reason it wouldn’t work properly. It probably had something to do with the HDMI switch being on all the time. Whenever it would glitch using direct connection, I could usually power things off and on and get them to re-sync but because I couldn’t completely powerdown the HDMI switch, I could not get it to work properly.
I didn’t really like using the HDMI switch and the TV was getting kind of old. So I just went over to Best Buy and picked up a new Samsung for the bedroom that had 2 HDMI inputs. Until then I had to watch TV using the USB tuner through the laptop. That was the only way I could get audio. But of course I also had to get another very long HDMI cable. While we were installing the second cable, my dad noticed that the original cable had gotten pinched beneath the bed wheels and had been damaged. That may have been the source of the audio problems to begin with. So it took another couple of days to get yet another cable which meant another couple of days of only watching low definition TV through the laptop.
Just as I got everything hooked up properly with the new TV, no HDMI switcher box, 2 brand-new cables, I hooked it all up and the HDMI on the cable box quit working altogether. I tried using different cables. Tried the old TV. Tried with or without the HDMI switch. Basically the cable box was fried. I could still get analog audio and video through the USB TV tuner and the laptop but HDMI audio was fried. I probably damaged the box by using the damaged cable. Something probably shorted out and ruined the cable box.
Unfortunately my DVR/cable box is in a permanent state of near overflow. Have you ever heard of the phrase “floating checks”? That’s where you write a check from one bank account to cover an overdraft in a different bank account and then you write a check from that bank account to cover the overdraft in the first one. Well, I practice a similar procedure “floating recordings”. When I run out of space on my DVR, I look at the movies I have recently recorded and look for another airing of that same movie a few days down the road. I then erase the movie, schedule it for re-recording as far in the future as I can, and then use the free space to record something today. I keep doing that over and over until the movie isn’t being shown anymore. Then I have no choice but to watch it or give up and delete it permanently. The bottom line is my DVR is always very, very full.
I know of no cable company that allows you to transfer recorded programs from one DVR to another. So when your box goes bad, you are screwed. I could still watch the programs in low definition. I could even copy them to tape on the VCR. But it would take me forever to catch up and in the meantime if I was ever going to get anywhere, I had to stop recording new programs.
I finally came up with a brainstorm. We would get a new replacement cable box and I would move the broken one to my office where I could either watch programs and/or copy them to the VCR in my office. New programs would be recorded on the new box so that the old one wouldn’t get any fuller. Eventually I would get caught up and turn in the box.
We already have two DVR’s. One of them in the living room and the one in my bedroom. The one in living room is a newer model that has more capacity but it still seems to fill up with ease. Both of the DVR’s are limited to 2 programs at once each. So you can record two programs simultaneously in the living room, two in the bedroom. But that’s it. You can watch recorded programs while recording 2 programs or you can record one and watch one. Even though we have a total of four streams between the two, it’s only two in the living room and two in the bedroom. Recording conflicts are a constant hassle both places.
Fortunately Bright House is now offering a premium DVR. It has 1 TB hard drive which is double the capacity of their previous big DVR and probably quadruple the capacity of the one I had in my bedroom. But the really great feature is allows you 6 streams of HD simultaneously. That means you can record five things at once and watch a sixth. After talking it over with dad, we agreed that a few more dollars a month for this DVR would be well worth the price. He went to Bright House headquarters and picks up a new enhanced DVR. We put it in the living room. We moved the living room DVR to my bedroom. And we moved my bedroom DVR to my office where I would watch down its content and/or record it to tape.
Before moving the damaged DVR to my office, I tried disconnecting the coaxial input cable to see if I could still watch recorded programs with the cable disconnected. I was able to do so successfully. So we moved everything to the office, connected it to the office TV and VCR and tried to turn it on. It wouldn’t work. It would not load the software without being connected to the cable. When I disconnected it and tested it in the office, I did not unplug the power so it didn’t lose its software. It would indeed work without being connected to cable but not after the power had been turned off and on. The problem is I don’t have cable in the office. The only other place I could get to it easily is in the kitchen at our bar between the kitchen and the family room.
So we disconnected everything, dug out one of my old VCRs that I had just put away, and reconnected everything in the kitchen. I then spent the next several days watching some programs while eating lunch at the bar in the kitchen and copying other programs to tape. It only took me about three or four days and 4 eight hour VHS tapes. Some movies I was able to “float” by erasing them from the old broken DVR and re-recording them on the new one as they were scheduled over the next several days.
Finally everything is working perfectly. I can use my laptop and watch TV easily in bed. We adore the new six stream DVR in the living room. You never have to worry about recording conflicts. Only one time in the past two or three weeks have we even come close to having five simultaneous recordings and we could have easily avoided that if we had dried. But the point is we didn’t have to juggle things. Five was enough. The large capacity drive is great as well although my theory is it doesn’t matter how big your hard drive is, eventually you’ll find a way to fill it up. Were only about 30% on this one and we have a ton of stuff recorded already. I don’t think we’re going to run out. If we do, shame on us.
One final modification to the whole system involved the mouse on the laptop. As I mentioned in other blogs, the voice control software I use Dragon NaturallySpeaking doesn’t work very well with the mouse. On my desktop computer I supplement the voice control by using an IR remote control mouse that I built using Arduino and sometimes a mouse control app on my android phone (formerly on my iPod touch).
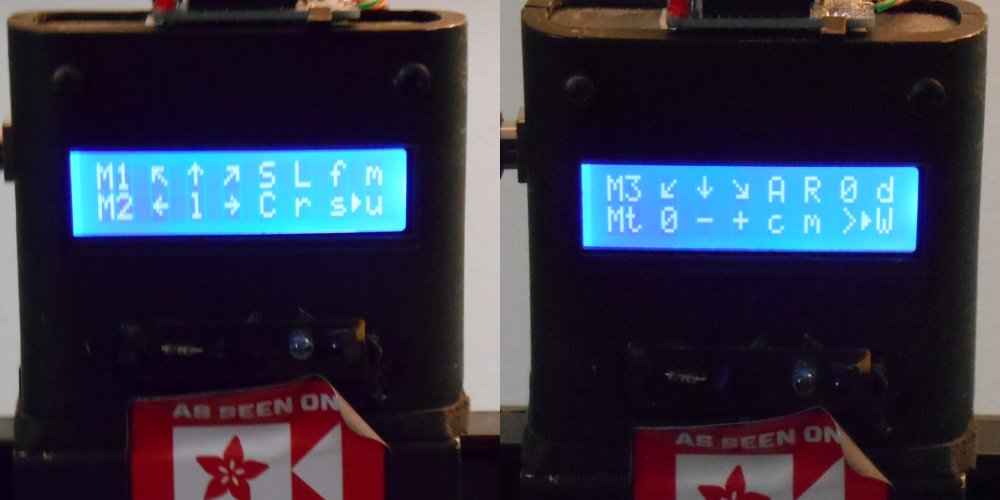
While using the laptop in bed on the bed tray before we set up this system, the voice control program would occasionally hang up or I would have trouble using the mouse. On my desktop machine, if the voice control hangs up, I can get it going again using the mouse alternatives. But in bed I did not have those alternatives. Although wait a minute… I do have an IR remote. The Arduino box atop my TV is an IR remote. All I had to do was reprogram it to use the codes for my IR mouse device. I also took the opportunity to remove all of the software I had put in it for controlling the VCRs and DVD players that I no longer needed. You are a couple of images of the menu screen that shows the new mouse commands.
The screen can only show 2 lines of text at once. You can scroll it up and down. The image on the left shows the first two lines of the mouse control section. The “M1” and “M2” at the start of the lines just tell me it’s the first and second line of the mouse control section. The arrows next to them move the mouse up, left, right, or diagonally. The “l” in the center means “left click”. If you look at the image on the right, you can see the sections for moving the mouse down and diagonally. Just to the right of all of the arrow commands you will see a capital “S”, “C”, and “A” which correspond to Shift, Control, and Alt. The “L” means “hold the down the left mouse button” and the “R” means hold down the right mouse button. Also “r” lowercase means simply click the right mouse button. The “f” and “s” make the mouse move faster or slower. The “u” and “d” options move the scroll wheel up and down. The “W” presses the Windows key. The “m” on row “M1” changes mode from mouse mode to keyboard mode. That makes all of the arrow selections control the arrow keys on a keyboard rather than mouse movement. The row labeled “Mt” is mostly TV commands. The “0”, “-“, and “+” control mute, volume down, and volume up. The “c” and “m” switch the HDMI switch to either “cable box” or “monitor for laptop”. The “>” symbol performs a Win+right arrow. Which will dock your currently open window to the edge of the screen. A command I use quite often.
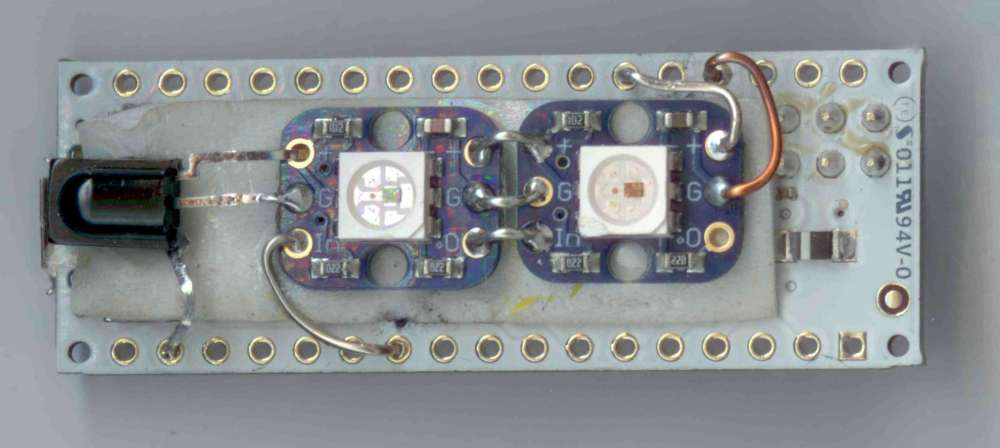
Arduino Micro configured as IR mouse as used on this laptop and in my tutorial for Adafruit.
Although on my desktop PC I use this larger Arduino with a 20×4 character LCD screen, on my laptop I use this tiny Arduino Micro with just a couple of neopixels as indicators to tell me if I’m dragging the mouse or holding down the shift key or other functions. Unfortunately I can’t see those indicator lights the way I have things set up so I’m going to have to come up with an alternative to that. But I really have some ideas.
Prior to this new set up, the only time I ever used laptop in bed was if I had to lie down early from a coughing spell. However now that it was easy to get to, I’ve been using it more and more. When I initially lay down I have no trouble using the dictation software. I usually go to bed about 9:30 or 10 PM and watch TV. Then at about 11 PM I change into my pajamas and put on my CPAP respirator. It’s a mask that covers my nose and puts air pressure into my lungs to keep them inflated and prevent apnea. I typically watch more TV from 11 PM till about 12:30 AM or 1 AM with the CPAP on. However I had never used the laptop and the dictation software with the CPAP on before. It turns out that with the machine blowing air up your nose, one does not talk as plainly as one normally does. The dictation software doesn’t understand me nearly as well with the respirator on. Words such as “nine” come out as “dine” and “mike” comes out as “bike”. You can’t stop the air from rushing out of your mouth when you have the CPAP on and try to talk. So all of the soft sounds come out hard. That means being able to use the IR mouse is much more important when I have the CPAP on than normally.
Windows has a built in accessibility feature that pops up a keyboard window so that you can click on it with your mouse as if you were typing on a real keyboard. Most of the time I don’t need it. Late at night I’m either just browsing Facebook or crushing some candy. I don’t really need to do typing and the dictation software does work somewhat if needed.
Overall it’s been a real blessing to be able to continue to do productive work while in bed especially on those very frustrating days when I have to spend more time in bed then I want to spend there.
Among the things I’ve worked on in bed is writing a tutorial for the Adafruit Learning System on how to create an IR controlled mouse using an Arduino Micro. That is the same device I’m using on the laptop for mouse control. Adafruit is where I purchase all of my electronic parts. They describe themselves as not being a store for selling electronics. Rather they are a tutorial website with a really big gift shop. When I showed off the project at a recent Adafruit Show-and-Tell video chat on Google+ they thought it was most interesting that I actually used the IR mouse to write a tutorial on how to create an IR mouse. Here is the video from that presentation.
Had a scary moment yesterday when I thought someone had hacked my computer.
I’m sitting here at the PC searching some website or doing Facebook or I forget what I was doing. Suddenly my mouse started going crazy. Begin jumping all over the screen wildly and I couldn’t control it.
I don’t ever really use an actual “mouse”. There is one connected to my computer in case somebody else needs to use it but I never touch the thing because of my disability. I actually have three different ways of controlling a virtual mouse. Most of what I do on my computer is dictate using voice recognition software called Dragon NaturallySpeaking. It has a variety of mouse commands such as “Move Mouse Up” or any other direction. You can also “Mouse Click” or “Mouse Double Click” or “Right Click” by simply saying those words with a pause before and after so that it knows that you’re not actually dictating. It also has commands for dragging the mouse which I bit difficult to use and you can move the mouse using a grid system that I won’t bother to describe here.
Additionally I have an Arduino Leonardo microcontroller configured as a USB mouse and keyboard emulator. It has IR receiver that lets me use my TV universal remote to send infrared signals and control the mouse that way. Details can be found here.
Also I have a special driver loaded on my PC the connects to an app on my android phone (my iPod touch prior to that). I can use my stick in my mouth to drag around on the app and click on buttons to control the mouse.
I desperately tried to shut down all the programs I was running to do a reboot but it was difficult to do with the mouse jumping all over the place. I couldn’t click on anything because the mouse was never in the position I wanted it to be in. None of my three methods of mouse control could override this erratic behavior.
Just as I was ready to close my last window, I happened to look over at my actual mouse lying on the desk. Except it wasn’t lying on the desk. It was lying on top of a bunch of junk piled on my desk. Most of them were cables clumped together in a tangled mess. Sunlight was pouring through my office window and reflecting off of the desktop, the cables, and other shiny objects lying in the pile. I finally figured out what the problem was.
I got hatcked by the sun!
Although the original design for the computer mouse had a little rubber ball in the bottom of it that had to actually touch the surface of a table, all modern mice are optical mice. The original optical mice simply had an LED and a photosensor and could only be used on specially designed mousepads that had a herringbone pattern on them. But the latest optical mice actually have a tiny camera that focuses on the surface of whatever you are dragging it across. It can detect the movement of microscopic textures as the mouse moves and from that determine the direction in which you are moving the mouse. In this case the mouse wasn’t moving but the sunlight bouncing off of the table and other junk beneath the mouse was flickering and tricking it into thinking that it was being dragged across some surface. As I was attempting to close the last window and reboot, the sun went behind a cloud and the mouse stopped moving.
I had my dad come in the office end mouse firmly on the table. There’s been no further incidents of “hacking”.
So not only did I get hacked by the sun… The hacking was stopped by a cloud 🙂