When I first got my Printrbot Metal Plus 3D printer I had lots of difficulty getting the prints to stick to the build plate. I didn’t want to use blue painter’s tape because I already had Kapton tape on the plate and I wasn’t sure if perhaps I would someday be needing to print ABS which requires the heated bed. I didn’t think that would work very well with painter’s tape.
As it turned out I’ve never used ABS. I’ve only been printing with PLA and occasionally T-Glaze. I’ve been getting pretty good adhesion by using Elmer’s glue stick on top of the Kapton tape and heating the bed to 70°C. But before I came up with that solution I invested in a “zebra plate” from PrintInZ. This is a plastic print bed insertion that offers great adhesion with no tape and no heat for PLA. It is supposed to be good for ABS as well with heat. I purchased one of their plates at approximately 10 x 10″ which is the size of my bed. Unfortunately I didn’t realize that the way that the Printrbot bed is mounted there’s no way to use those large springy document clips to hold the plate in place as seen in this screen grab from a PrintInZ YouTube video.
The rails on which the print bed slides are located all the way to the very edge on each side of the print bed. There is an aluminum plate at the front and back of the print bed but even if you can get a clip over the edge of it, it would not clear the frame of the printer when the bed was all the way forwards are all the way backwards. There simply was no good way to get the plate to stick.
The company has a new product called a PrintInZ Skin which has an adhesive back on it. But one of the nice features of the plate is that if a part sticks too well, you can remove the plate and give it a slight warp and the part will pop off. Also the plate has a core consisting of a thin sheet of copper that will trigger the capacitance proximity sensor on the bed leveling system. The skin does not have a copper core and is probably too thick for the proximity sensor to be triggered on the metal bed beneath it. They do not recommend using it for that type of bed leveling.
Although I was getting reasonably good results with Elmer’s glue stick, it was a pain to have to reapply it and to clean it up after every print. I kept seeing more and more great reviews for the PrintInZ Plate so I finally had to come up with some system to easily mount and easily remove the plate.
We inspected the underneath side of the black aluminum plates at the front and back of the build plate. We determined that if we avoided the slide rails on each side and avoided the belt on the left side that we would be able to safely drill into the aluminum and bolt in some brackets that would hold the plate in place.
This photo shows the rear of the build plate where we put in some 1/4 – 20 screws with a spacer on top and a washer. You need to drill a hole slightly smaller than the 1/4 inch diameter and then use 1/4 inch thread tap to cut threads into the aluminum. That way you do not need a nut on the other end. You can screw directly into the aluminum plate.
The screw on the left side of the machine (shown on the right here from the back) is halfway between the mounting rail and the belt. The screw on the other side is just inside the rail but we probably should have moved it a little farther towards the center. There is a microswitch inside the machine that limits the Y-axis travel and if the screw is too long it will hit that switch. You also of course need to make sure that the screws do not go so deep that they catch on the lip of the frame of the machine. As long as the power is turned off, you can manually slide the build plate forwards and backwards to ensure that the screws do not catch on the edge of the frame.
We accidentally drilled the rear holes too close to the build plate so that the spacer would not fit. We had to grind a flat side on the spacer to get it to go in. If you drill your holes out a tiny bit from the build plate and use a slightly larger washer you can avoid that problem.
On the front we could’ve done the same thing but we wanted to make it easy to remove the plate in case we needed to warp it to remove a piece. Instead we took some scrap sheet metal (actually we cut up an old license plate) and fashioned some brackets. We drilled the holes very close to the front edge of the black aluminum plate that is at the front of the build plate. The brackets have slotted holes. We used 1/4″ – 20 wing screws to hold the brackets down. The brackets have a slot in them so that you could loosen the wing screws about one turn and slide the brackets forwards away from the build plate. Again on the left side we are halfway between the left rail and the drive belt.
One problem is that when the printer does the automatic bed leveling procedure, it touches down in three far corners of the build plate. It starts with the back left and then goes to the front left and finally the front right. We had hoped that the brackets were small enough that it would clear everything when it did the Z probe sampling. Unfortunately on the left side, the probe barely touched the left bracket. If we had drilled that hole just a couple of millimeters to the right or had put it to the right of the belt completely then it would’ve hopped over the bracket as it traveled from the left front corner to the right front corner. On the right side, the nozzle and the Z probe cleared the bracket but a tiny corner of the fan shroud touched the bracket. Again had we move the entire thing a fraction of an inch to the left it would’ve cleared.
There is a possibility that depending on the height of the screws and washers in the back, that the fan shroud might also clip them. You need to ensure that anything you print doesn’t come close to the far corners of the build plate. It reduces the size of your printable area but it is rare that you would have to build something that reaches all the way to the four corners of the plate.
Rather than re-drill and re-tap the holes we decide to fix it with software. We decided to only limit the front edge because the automated bed leveling required it. We did not artificially adjust the software to clear the back edge. We will just be careful never to print anything back that far. There are two places that you need to adjust the software. You need to adjust the firmware in the Printrbot itself. And then you also need to adjust the printing software you are using to tell it that your build plate is slightly smaller than expected. We use both Cura 15.04 and Simplify 3D software to drive the printer. We will describe what needs to be changed.
First to adjust the firmware we loaded Cura and called up the control panel. There are G-code commands that you need to type into the control panel. First type the command “M501” which will give you a printout of the current settings. You might want to drag your mouse across them and do a cut-and-paste and save the values just in case you accidentally mess something up. Here are the values that I had.
Note you can click on any of these images for larger versions.
We are only interested in the last two items. The value “M211” is the maximum position and we will want to reduce the Y value to 244 instead of 254. Type in the commands…
M211 Y244
M500
M501
The first command changes the value. The “M500” saves the value. And then the “M501” displays the results again to verify it.
The other thing we need to change is the bed probe offset value M212. As you can see I had my Z value set at -0.70. This value sets how high off the print bed your first layer is set. I wasn’t sure how the Z probe would measure the copper plate embedded in the PrintInZ compared to the plain print bed with a Kapton tape over it. So I sent the value higher to about -0.30 and printed the small 3 mm test piece. I then lowered the value a couple of tenths at a time until the print looks good. As it turns out my original value of -0.70 was okay but there was no guarantee that it would’ve been. I suggest you do the recalibration. As before you would type
M212 Z-0.30
M500
M501
The other commands save and re-display the values.
Now you need to tell Cura that your print bed is smaller. On the menu at the top click on “Machine-> Machine settings…”. Change the Maximum Depth from 250 down to 240. I would’ve expected these values to be 254 rather than 250 but these are the recommended settings from Printrbot.
I also use Simplify 3D for printing. To adjust the settings click on the “Edit Process Settings” and under the tab labeled “G-Code” change the “Build Volume” in the Y-Axis from 254 down to 244. The default 254 makes more sense to me than the 250 in Cura. On the other hand one time I tried to print an object extremely close to the maximum X-Axis value and when it was drawing the rim before the print it reached the limits and the machine made a grinding noise. So you might want to think about changing all of these values to 250, 240, 250. After change in the value, click okay.
I’ve been able to successfully print using either printing software and I’m extremely satisfied with the PrintInZ Plate build plate. It really works very well as advertised. I highly recommend it.
Here is my appearance on the Adafruit Google+ Show and Tell on Wednesday, January 4, 2017 to describe this project.
We are pleased to announce a new version of IRLib library for receiving, decoded, and sending infrared signals using an Arduino. This represents months of work and is a major restructuring of the code to make it easier to include only those protocols that your application actually uses. Unfortunately the restructuring is so significant that it is not backwards compatible with our original IRLib1. It is however relatively easy to update your applications to use the new libraries. We will continue to leave IRLib 1.x in its original repository on GitHub. We have created a new repository https://github.com/cyborg5/IRLib2 for IRLib2. There will be no new updates to the original version of the code. Because we have changed the name to IRLib2 it is possible to have both versions available in your Arduino libraries folder at the same time without conflict.
Also included is a new feature called “auto resume” which ensures that you can continue receiving a second frame of data while processing the first frame.
The users manual has been expanded to 117 pages and not only includes the complete reference to all classes, methods, and variables that we had before, it also contains a new tutorial section which thoroughly explains all of the sample sketches. And finally we have the long-awaited tutorial on how to create new protocols for the library. You will also want to check out Appendix A which explains the changes between IRLib1 and IRLib2 as well as my rationale for the restructuring and the need to make it no longer backwards compatible.
The users manual is available in Microsoft Word, Adobe PDF, and EPUB formats in the GitHub repository. We will no longer be maintaining online HTML version of the documentation because it was too difficult to split into individual webpages and maintain it for this blog. However the supplied formats should be sufficient for all users.
Although we have thoroughly tested the code, it technically is version beta 0.1. If no major bugs are reported in a month or two we will upgrade it to official version 2.0 release.
We can’t wait to see what all of you will do with IRLib2. Please let us know how you are using the code.
I’m obsessed with the hit Broadway musical Hamilton brilliantly written by Lin-Manul Miranda. It took me two weeks to memorize lyrics to the opening number “Alexander Hamilton” only to discover that my lung capacity wasn’t big enough to actually sing the song at a reasonable pace without needing to stop for a breath midsentence every other sentence.
My other hobby is tinkering with maker projects, open-source hardware, open-source software, 3-D printers, Arduino, Raspberry Pi etc. My hero of the open source maker community is Adafruit Industries founder Limor Fried goes by the nickname LadyAda. It occurred to me somewhere along the way that her life of bucking the system, being a self-starter, hard-working leader and pioneer. There is even a hurricane in her story where hurricane Sandy shut down New York for several days but she kept the business going.
If you browse around YouTube you can find dozens of Hamilton parodies devoted to a variety of people from German Chancellor Angela Merkel to Mr. Spock and some extremely raunchy ones about Donald Trump which I enjoyed. So I couldn’t resist creating a parody of my own devoted to my favorite maker.
I thought about trying to turn it into a YouTube video myself. There are karaoke versions of the music available that people have been using to create parodies. But as a 61-year-old white guy with limited lung capacity, my rapping skills leave a lot to be desired. So I’m just going to publish my lyrics and hope that you could re-create the rhythm in your head that I use when I sing it (badly) to myself.
I apologize in advance if I have exaggerated or misrepresented any real events depicted in the song.
If you never heard Hamilton or if you don’t know anything about Adafruit industries and founder Lady Ada this will make absolutely no sense to you. But if you know about both, I think you will enjoy it.
[PHIL T]
How does a pink haired, female, engineer from Israel and MIT,
dropped in the middle of a New York Soho factory
unfunded but undaunted
Go on, to sell, all the parts that makers wanted?
[TONY D]
This open source venture without a venture dollar
Got a lot farther by working a lot harder
By being a lot smarter
By being a self-starter
They say, her favorite coding language is solder
[NOE RUIZ]
And every day while boards were being soldered and carted
Away by UPS, she struggled to keep the stock up.
The maker movement was what she longed to be a part of
The staff worked so hard to fill out every order.
[PEDRO RUIZ]
Then a hurricane came, and Sandy was its name
The staff saw their paychecks drip, dripping down the drain
But she said “Guys do not worry because I feel your pain”
She dug into her checkbook and paid them all the same.
[PHIL T]
Well, the word got around, they said, “This girl is insane, man”
“When selling open-source there is nothing you can gain”
But it turns out education is the nature of her game.
And the world is gonna know your name. What’s your name, girl?”
[LADYADA]
Lady Ada Limor Fried
My name is Lady Ada Limor Fried
And there’s a million things I haven’t done
But just you wait, just you wait…
[BECKY S]
Long ago in her dorm when Mosfet was a kitten
She threw parts into bags and she sold her first kit and
The laser cutter’s stinkin’ up the place, the scent thick
[MAKERS CHORUS]
She bought a HEPA filter so she wouldn’t get sick.
[COLLIN]
She hooked up with a guy named Phil and Phil is still there at her side.
When he speaks of her, you can hear his voice is filled with so much pride.
He’s always sayin’ “She did it all by herself”
Meanwhile tools and parts and kits and boards are flyin’ off the shelf
[PHIL T]
Some say that she’s no engineer. She’s just a face that cute.
But we who know her well know she is so much more astute
She’s always working… Designing her next cool breakout board
A clean design that sells at prices makers can afford.
She’s always reading every datasheet she can get her hands on
Plannin’ for the future see her now and she stands on
The cover of Wired magazine.
A female role model like you’ve never seen.
[MAKERS CHORUS]
If Lady Ada did it, any girl can
If Lady Ada did it, any girl can
If Lady Ada did it, any girl can
[WOMEN]
Lady Ada…
[MEN]
Lady Ada
[LADYADA]
Yes you can!
[MAKERS CHORUS]
Lady Ada Limor Fried
How we love buying parts from you.
They are always top-notch and they always arrive on time.
Lady Ada Limor Fried
When America buys from you,
Do they know what you overcame?
Do they know you rewrote the game?
The maker world won’t be the same, oh
[PHIL T]
She’s streaming live on YouTube
From the Desk of Lady Ada
She’s working on her next design
Don’t ask… It’s still in beta.
We surveyed all her colleagues now let’s listen to the data.
[COLIIN]
I teach with her
[NOE & PEDRO RUIZ]
We printed her
[TONY D]
I code for her
[BECKY S]
I sewed for her
[PHIL T]
And me… I’m the lucky fool that married her
[MAKERS CHORUS]
There’s a million things she hasn’t done.
But just you wait
In this installment, I cover the fourth week of working on my new wheelchair. We will solve one problem and immediately create another one.
Free at Last
Our story is now up to Monday April 18, 2016 exactly 3 weeks since my new wheelchair has arrived and I still haven’t been able to drive it myself yet. It was my own fault because in an attempt to reprogram it, I accidentally disabled the joystick and locked myself out of the programming. Today was the day that the technician was supposed to come and fix it but I didn’t have high hopes. I’ve faced so many disappointments that I try not to get too psyched up.
The technician who arrived was Aaron and he was one of the 2 guys who had delivered the chair weeks ago. I had thought that the guy I had dealing with Patrick also did repairs but according to Aaron, Patrick is really just a salesman and Aaron is the repair man. He had with him a small black box with a cable coming out of it that looks like this one that I found on eBay. They call it a programming dongle. It is supposed to let you get into various programming modes that cannot be reached just by pushing the buttons on the display module.
There is a cable running from the display unit to the controller box on the back of the chair and it has a jack and plug in the middle of the cable. You unplug it and plug this box in line where the cable comes apart. The hope was that simply plugging it in would free things up and allow him to enter programming mode again. Unfortunately that didn’t work. So he got on the phone and called Sunrise Medical technical support. We waited several minutes on hold until we got a live person and then they had to transfer us to the right person to answer the question which meant several more minutes on hold. When we told the guy what the problem was he basically said we were screwed. He said if plugging the dongle in didn’t free it up then he would need the diagnostic tool. There’s apparently another handheld module that dealers have called a diagnostic tool. It has its own little LCD screen and buttons that not only allows you to reprogram a wheelchair perform diagnostics as well. Aaron had already told me that they only had one of those such devices to pass around between 7 different repair technicians and currently it was broken. The guy on the phone said if we could hook the dongle into a PC we might be able to get it to reset the software. So we hung up from him and tried to decide what to do next.
Aaron didn’t have the cable necessary to connect the dongle to a computer. He would have to go back to the office to get one. Of course why he was sent out to reprogram a wheelchair and didn’t have the proper cable is a question we never answered. Anyway I had seen such cables online during my research. They had USB on one end but I didn’t know what they had on the other end. I presumed it was some sort of weird connector like the one you can see in the photo that connects all of the various parts of the R-net wheelchair control system. Then I happen to see the end of the dongle and immediately recognized the jack was a standard USB “A” style jack. These are the full-size square USB jacks that you find on some computer printers and scanners. They were the original USB before they made micro and mini USB jacks. I said “is that where you plug in the computer cable?” And he said yes. I’ve got a whole box of those and every other kind of USB cable you can think of. I also had plenty of computers available and I knew where to find the software we needed online.
As it turned out he did have his own laptop with the proper software already installed. I provided the cable and we hooked it up. The software didn’t see my wheelchair as being connected. When you would plug the USB cable in, windows would make the usual noise that you hear when you plug a USB device into a Windows PC. But the software had a status window that said “no connection”. We made another call to Sunrise Medical Support and went through the same two-step waiting on hold process that we had been through previously. One of the problems was that Aaron wasn’t that familiar with the software and thought perhaps there was something he should have been clicking on to get it to connect. We finally got through to the support guy and explained the problem. We were doing everything right so it had to be a driver problem.
Before the guy on the phone could explain what to do about drivers I said “I’ve got this”. I instructed Aaron how to call up the Windows Device Manager window and sure enough under USB devices was “R-net Dongle” with a little yellow triangle next to it. I told him to right-click on it and it said “this device is not operating properly”. No shit. I had him click on the “Update Driver” button and it asked did we want to specify where to look or have it look online itself. If I had to bet money on it I thought we would have to go to a website to find the proper driver and install it ourselves. For such an obscure device I didn’t think it would do an automatic update but I figured we would give it a try. Meanwhile the guy on the phone was trying to figure out where to tell us to go to download the driver when much to everyone’s surprise the computer said “Installing new driver”. A minute or two later it completed. We went back to the software and sure enough it said “connected”!
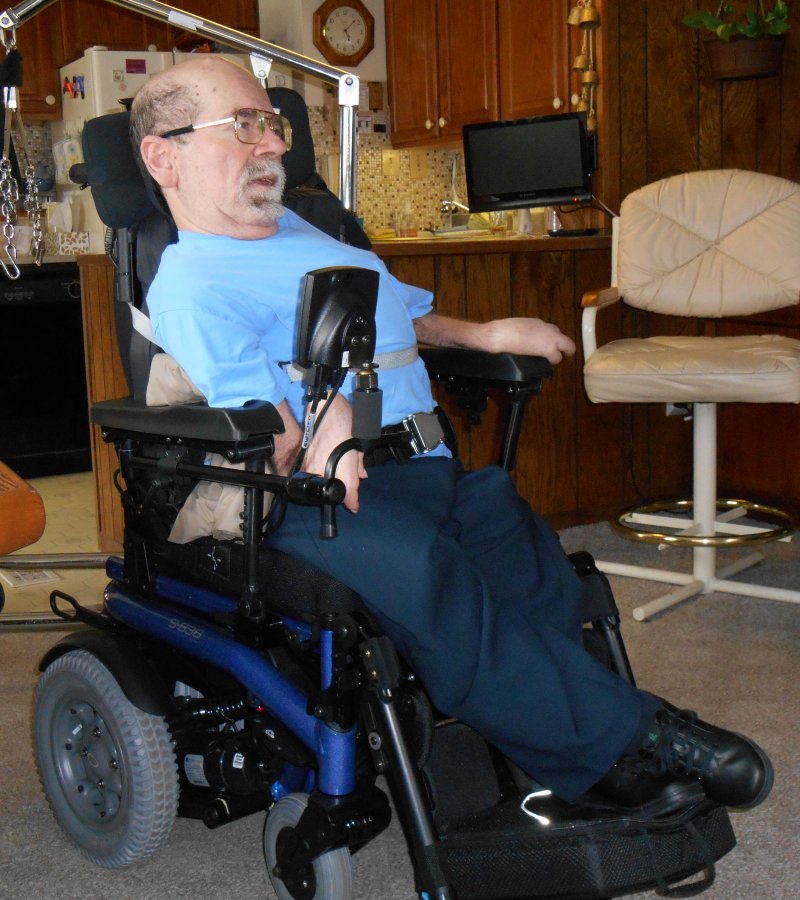
Then the guy on the phone walked Aaron through what to click on to reset the factory defaults. That all went very smoothly and when it was done, the joystick worked perfectly. I asked Aaron if we needed to calibrate this joystick and he didn’t think that we needed to. At some point I’m going to get ambitious and go through the joystick calibration procedure in the manual but for now the joystick seemed to be working. We put my newly 3-D printed homemade collar around my neck and at 3:50 PM on Monday April 18 I finally got to drive my wheelchair for the first time. Here is a video I shot a few minutes later after Aaron left.
It was 328 days since the salesman and I first began working on the purchase of a new wheelchair and I finally was able to drive it. As I said in the beginning, it had also been three weeks to the day since the chair had arrived as well.
Happy Birthday to Us
Not only was April 18 the first day I could drive my wheelchair, it also happened to be my dad’s 82nd birthday. It felt like a double birthday to me. Normally we would go out to dinner to celebrate but we weren’t yet ready to have the wheelchair in the van so we decided to get carryout from the Golden Corral Buffet. It’s an all-you-can-eat buffet but neither dad nor I have a big enough appetite to make it worth the money. You can however go in and fill up Styrofoam containers with food and then they weigh it and charge you by the ounce. He can fill up a couple of containers with enough food for both of us and the cost turns out to be barely over half of what it would cost if we both went into the restaurant in the all-you-can-eat system.
My favorite is their rotisserie chicken. I think they must brine it before cooking or something to get the flavor of the spices to soak in. I absolutely love it. I have a lot of trouble eating skin whether it is fried or baked chicken and a lot of the time that’s where all the flavor is. But here the flavor goes all through. Unfortunately this particular day they didn’t have the rotisserie chicken so dad just got me a slice of pizza, some large steak fries and a large brownie.
While dad was going to get the food, I put together the YouTube video of me driving the chair that is embedded above here. While he was gone I also just drove the chair all over the house. I almost felt like dancing so I put on some music. I didn’t exactly drive in time with the music but I just wanted to celebrate a kind of birthday of my own. It was the rebirth of my mobility.
What’s Skew?
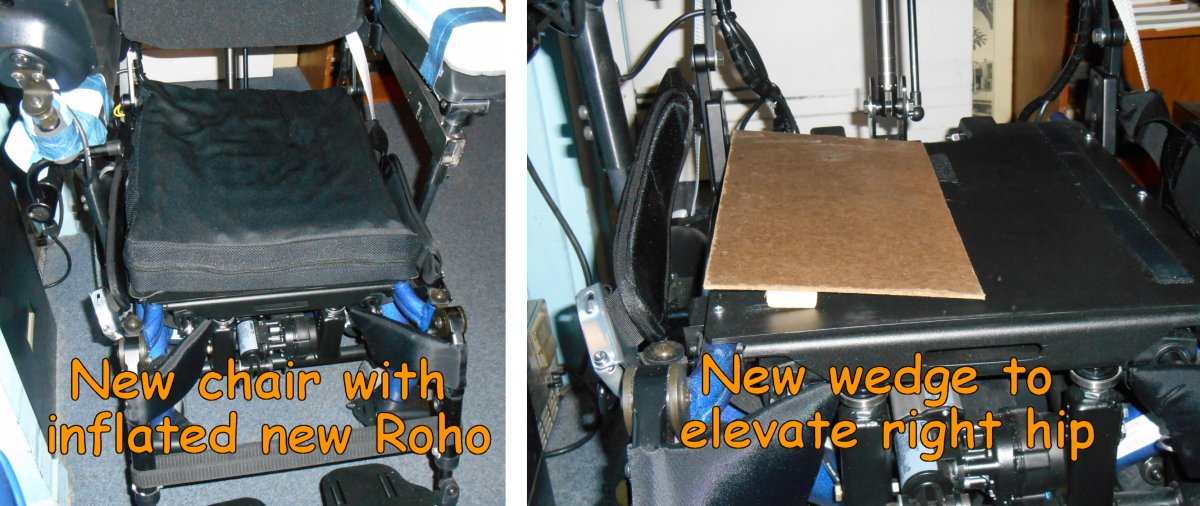
We had discovered that when I go into the van it’s too difficult for me to lean forward to duck in the doorway like I previously did in my old chair. I sit about an inch or so higher in this chair than in the old one and I just can’t duck far enough. We had discovered however that if you remove the headrest and I tilt my head backwards, I could just barely make it into the van. I have to be perfectly centered however because on the right side there is a brace on the lift on which I could hit my head. When I lean my head back, my neck hits of the top of the backrest of the wheelchair. If we could lower the backrest slightly, I would be able to tilt my head back further.
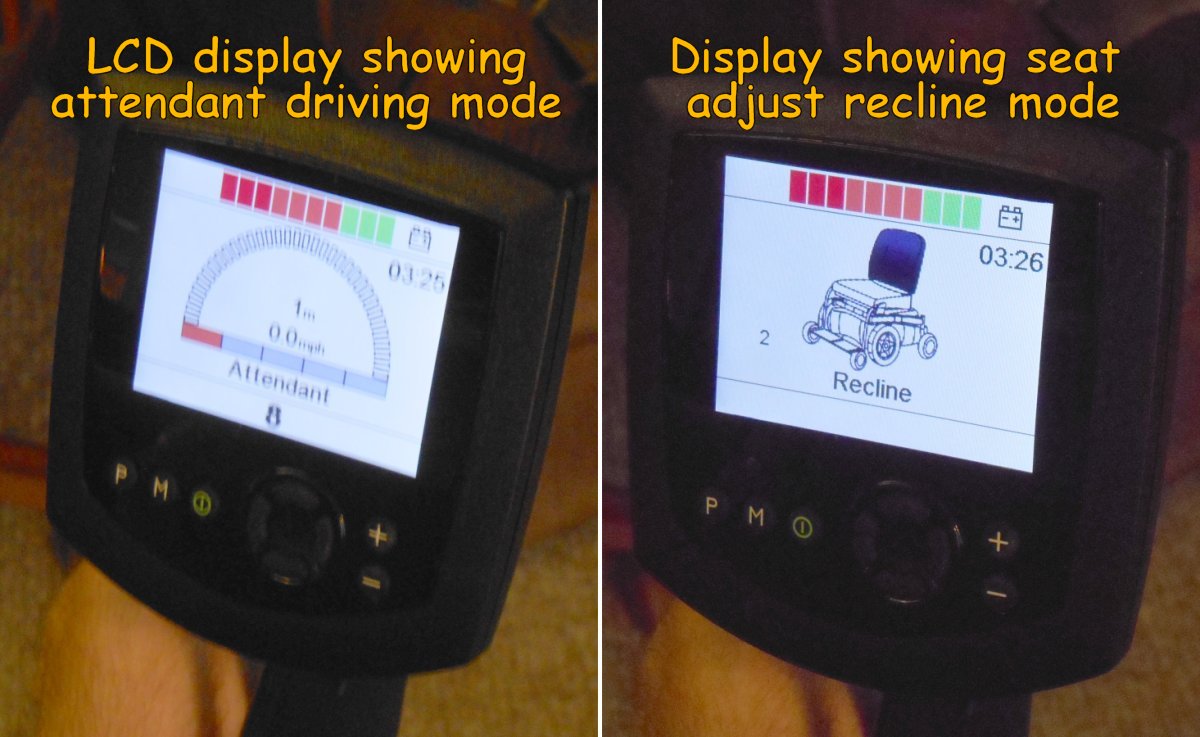
I had originally anticipated that to get in the van I would simply recline the wheelchair and not have to worry about ducking. However the process of reclining isn’t quite as straightforward as I hoped it would be. You switch the chair out of driving mode into seat positioning mode and then you have to select which seat function you want to adjust. You have to select whether it is recline, tilt, combination of both, or footrest adjustments. In broad daylight the LCD display screen washes out and you can’t see what you’re doing. Also in order to recline we need to adjust my seatbelts because as I start to lean back, my chest belt tries to tighten up on me. It was just more complicated than we had hoped. Taking out the headrest, laying my head back, driving in, and putting the headrest back in place seemed a lot simpler. But to make it safer we really want to lower the backrest so I could lean my head back further.
One of the things that makes this chair so complicated is that it is so adjustable. It used to be they made wheelchairs in perhaps two sizes and then it was up to you to come up with cushions or padding to make you fit the chair. These days the chairs are insanely adjustable and that along with the tilt and recline mechanisms it makes them insanely complicated.
There is a procedure in the user manual that shows you how to remount the backrest into a lower mounting hole. We had talked to Aaron about the possibility but he said it couldn’t be done in my case because it would mess up the skew mechanism. That left me with a question “What’s skew?” (To which the comedian in me would reply “Nothing… What’s skew with you?”)
The reclining mechanism is quite complicated in that it has 2 actuator motors. One of them does the actual reclining. The other one slides the backrest down slightly as you recline. That keeps the backrest stationary relative to your back as you lean backwards. I would have to create a complicated animated illustration to fully explain why it does that and at this point of the story we really weren’t sure how or why it worked. It is this second sliding mechanism that is known as the skew mechanism. When they delivered the wheelchair it had a backrest cushion that reached all the way down to the seat. We concluded that it was this tall cushion that was the reason he said it could skew properly. We had already replaced it with a shorter backrest cushion that had plenty of room to slide up and down. There was another set of mounting holes that would allow us to lower the seat. It might’ve been just as easy to get out the sawzall and cut an inch off the top but you hate to do that if there is an adjustment that will work. Also we weren’t really sure we needed it. I did fit through the door. It just didn’t have any margin for error. We also still had the option to simply recline the chair. The skew mechanism turned out to be one of the reasons why the safety belt was messing up during reclining. Perhaps reclining was a better solution after all. We later found a way to remount the safety belt so that it didn’t get affected by the skew.
As you have probably seen after reading these blogs or my recent essay on my choking and swallowing difficulties, I have a tendency to tell every single detail of any story. But I’m going to spare you some of gory details of this one. The short version is that dad tried to follow the procedures of the manual to disconnect the actuator, disconnect the seat hinge, reposition the seat hinge, and reconnect the actuator all in a lower position. He started working on it the evening of the 18th after I was in bed. He spent hours trying to do it that night and the next morning. We finally had to give up and put things back the way they were. That is almost…
On paper, the process seems pretty simple but in addition to the hinge and the recline actuator that need to be moved, there is a gas filled cylinder that looks like a shock absorber but is actually a very stiff compression spring. He could not get the spring compressed sufficiently to get it connected the proper hole. When he gave up and put it all back together, the spring was one hole lower than it should’ve been. It simply would not go back in the proper hole. The mechanism still seemed to work smoothly after he put it back together so we just gave up on it.
The Tortoise Beat the Hare
I had a sleepless night that night. Part of it was excitement over the day’s events. Part of it was the noise of dad banging on the bolt trying to get it back in as he was adjusting wheelchair 🙂 Anyway I slept in until 1 PM on Tuesday. We canceled the home health aide and dad got me dressed and I had a small snack about 2:30 rather than eating lunch. As he was stressing me, dad explained everything was back together but a new problem had arisen.
The chair wouldn’t drive except at the lowest speed. A little orange icon in the shape of a tortoise had popped up on the LCD display. The speed control shows icons of either a tortoise on one end or a hare on the other end. Apparently those are the new universal symbols for slow or fast. If you would set the recline angle of the chair up 100% vertical, the tortoise would disappear and you could drive at any speed you wanted to. But if you recline even a couple of degrees, the tortoise would pop up and you would be limited to the lowest speed setting.
Is a safety mechanism to keep you from driving the chair rapidly while in a reclined position. If you recline very far, the tortoise turns red and you cannot drive at all. We had seen it before but it usually didn’t kick in until 20-30 degrees or so. However my comfortable seating position is about 5 degrees reclined. Something that we had done along the way had messed up this mechanism.
So in this little fable my dad and I have been the hares. A couple of weeks ago I had rushed like a jack rabbit into changing the programming and messed things up. Dad had rushed into the mechanical adjustments and apparently messed things up as well. And we were now being beaten by a damn little tortoise icon. I guess the Aesop fable was right. The tortoise beat the hares again.
Is an earlier installment I had described my dad and I were like Liam Neeson in the “Taken” movies who were dangerous because we “possessed a particular set of skills”. As it turns out we both should’ve been listening to another deep-voiced badass movie character Clint Eastwood in the second “Dirty Harry” movie when he famously said “A man’s it got to know his limitations.” Or perhaps it was like Tom Cruise in “Top Gun” getting chewed out by his commander Stinger when he said “Son, your ego is writing checks your body can’t cash.” Whatever fable or movie was appropriate to the situation, the score was even. Dad and I had both screwed up.
Actually at this point we weren’t completely sure that he had done anything wrong. We had unfortunately violated my mother’s proverb that I spoke of earlier about “don’t feed the baby 2 new foods”. There was a possibility that resetting the software that we had done with Aaron earlier in the day had reset the calibration of the tilt sensor. I was pretty sure that the chair had been driving normal speed when I drove it around that evening but we really weren’t sure whether it was the software reset or the change of the mechanics that was the root of the problem.
I sent an email to Aaron and I also posted messages on the wheelchairdriver.com discussion forum. The people online said that the sensors are pretty flaky and have been known to give out at inappropriate times such as when you are a mile from home and suddenly your wheelchair starts going a tortoise pace because it thinks you are reclined when you are not. The bottom line from them was it could be software or it could be hardware they couldn’t tell for sure.
Rather than tell the remainder of this story chronologically day-by-day as I have been doing, I’m going to finish out this topic because we did not get this resolved until eight days later on Tuesday April 26.
The email reply I got from Aaron basically said what everyone else had said. It could be software… it could be hardware… he didn’t know. So I wrote back and said “So what do I do to resolve this?” I never heard back from him. I spent a lot of time over the next several days trying to research how the sensor works, where it’s located, does the software calibrate it? I tried sending email to Sunrise Medical who manufactures the chair. Experience had shown me that Aaron couldn’t do anything without calling them. Maybe I could get some answers directly. I did get an initial reply. They said they needed to know the serial number on my wheelchair before they can answer any more questions. I sent it to them with more information about the problem. I never got a reply.
On Monday April 25th we finally called National Seating and Mobility to get them to officially send Aaron or some other technician out to look at it. Apparently he wasn’t going to reply to my emails unless I got his office involved. They gave me the same story of either bring it in or wait another week until we can send someone. Rather than wait another week dad took it in the following day. They tried a couple of different things to no avail but eventually went back to work on putting the spring cylinder back into its proper hole. It took two guys to do it which was why my dad had spent so many hours trying to do it himself. For some bizarre reason it fixed the problem. The technicians couldn’t believe that that was the problem and neither could we. There’s nothing electronic connected to that cylinder. There must be some sort of pressure sensor in the actuator motor that could tell that the spring was not set properly and that was messing things up.
During the entire week that the speed control was messed up, I chose not to drive the chair myself. It was too difficult to drive at that speed and I was having some other issues with my joystick mount that I will describe later. So even though I did get to drive the chair for a single day three weeks after its arrival. I did not really have the chair fully operational until exactly 4 weeks and one day after its arrival.
In the end, the seat was back where it was originally and all of that adjustment was for nothing. And for reasons which I will explain later… I’m still going to have to recline the wheelchair to get in the van. All of that adjustment was for nothing. The reasons why I have to recline is a story for an entirely different blog.
Showing Off
Adafruit Show-and-Tell sticker I earned for this presentation.
Despite the fact that the tortoise had sent this hare sadly strolling away with his tail between his legs, I want to celebrate and show off that the chair was working even if it wasn’t completely up to speed. Every Wednesday night my maker supplier Adafruit Industries has a weekly online video chat where people show off their electronics and other maker projects. A few weeks earlier I had shown them a sort of work in progress version of my joystick mount. That was back when we were just making modifications to the mount that had the cloth strap. This was the new completely redesigned built from scratch system. And rather than just show a slideshow of pictures, this time I could actually demonstrate the project myself. I was going to drive my wheelchair live on the Internet for hundreds to see.
I did some tests to see what would be visible on my WebCam. I could park in front of the camera and then back up the chair and do some small maneuvers and then pull up to the computer again. The demonstration went really well and they were impressed. One of the hosts of the show Phil Torrone was very impressed. He said that so many of the 3-D printer projects that they encounter are somewhat trivial trinkets. They are typically little knickknacks or toys or perhaps they are just enclosures for electronics projects. Indeed that’s the majority of what I’ve done with my 3-D printer. However this was a project that really did something useful that would be difficult to do without a 3-D printer. The fact that the commercially made devices would not meet my specific needs but that I could create something with a 3-D printer was a much better illustration of what 3-D printing was all about.
The guy who presented after me also had an inspiring project to show. He was getting treatment for a brain tumor and he has some sort of electronic device wired into a cap that he had to wear on his head. The electronics were stored in a backpack. For various reasons from time to time he would shut the device off but he would occasionally forget to turn it back on again. There was a little blue light that would be on anytime that the device was operational. He built an electronic gadget with a color light sensor that would detect whether or not the light was on. If it was off for too long of a time period, it would ring an alarm. Here was an electronic medical device probably worth thousands of dollars and it didn’t have an alarm function. This guy build one himself out of parts purchased from Adafruit.
Here is the video on YouTube. My section starts at 5 minutes 10 seconds into the show. The guy with the alarm on his cancer equipment is immediately after me.
After the group show-and-tell, they also present an hour-long live streaming program called “Ask an Engineer” which includes maker news, tips, and a Q&A section where you can ask engineer and Adafruit founder Limor “Ladyada” Fried your engineering questions. But part of the “Ask an Engineer” show begins with a recap of the previous “Show-and-Tell” program. In that program they also reiterated their appreciation for my use of 3-D printing to solve a real problem. You can see the “Ask an Engineer” program here. That link takes you to the 11 minute mark where she described my project but if you bother to watch it you might want to skip ahead to about 14 minutes where they comment further. I’m writing this blog on May 3rd and as of this point the Show-and-Tell has been seen over 1000 views and the engineer show has been seen on YouTube over 2000 times. The show also streams live on periscope, twitch, u-stream and other platforms. Of course I always tell people they can visit this blog for more information.
Promoting my work on the Adafruit programs has led a number of people to contact me about my projects. I know of three or four people who were building specialized infrared remote controls for their aged or disabled friends and family. They have contacted me for advice and I’ve really enjoyed helping them with their projects. Perhaps sharing my wheelchair stories will also help other disabled people who are makers or firms of makers
I was going to continue telling the story of some design modifications that I’ve made on the joystick mount while I was waiting on the reclining problem to be fixed however I think this is a good place to wrap up this edition. In the next installment I will talk about some modifications to the joystick mount that were made during the fourth and fifth weeks of having the new wheelchair.
In this installmenpurposet we will cover the third week of working on the new wheelchair. We work on 3-D printing parts for the joystick and waiting on word from the wheelchair people about my programming glitch.
S.S.D.W.
I called this installment “Groundhog Week” after the movie “Groundhog Day” in which Bill Murray repeats the same day over and over again. I sort of feel like this week is a repeat of the previous week. Better cliché title for this week is the abbreviation “S.S.D.W.” There is a common saying that people often abbreviate using the letters SSDD. It stands for “Same Shit, Different Day” and is used as a way to say one’s life is boring and monotonous and not particularly satisfying. When I went to write the opening paragraph for this installment of the blog I started by editing the intro from the previous installment. I realized that all I needed to do to make it accurate was to edit the words “second week” so it would read “third week”. So the title of this segment is “Same Shit, Different Week”.
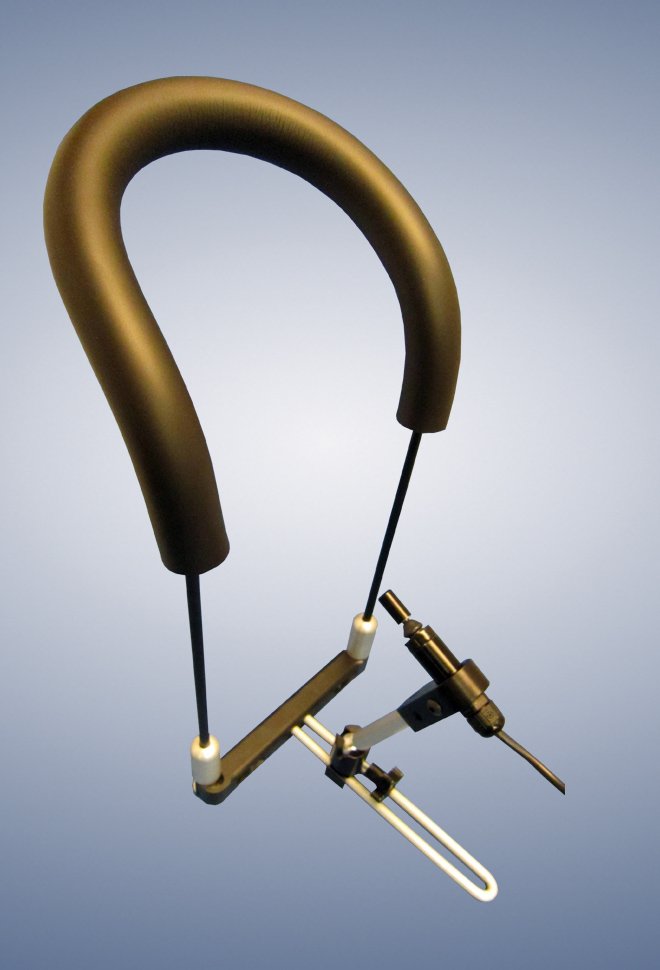
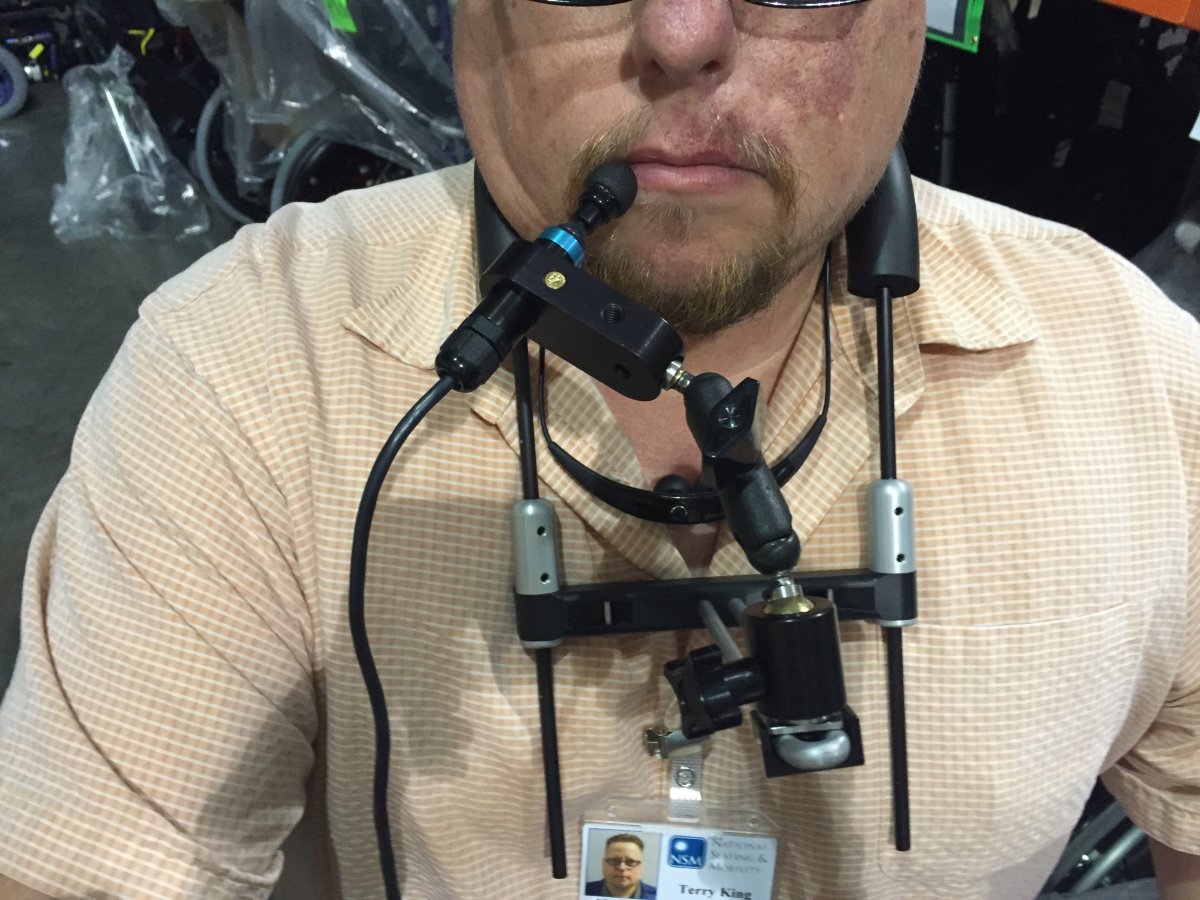
To recap where we left off, the wheelchair is stuck in the state where only the attendant controls will work. Also I cannot get it into programming mode to undo whatever I did wrong. Meanwhile I’m redesigning the joystick mount because the one that the vendor provided will not stay steady enough around my neck. I had already designed a swing away crossbar that would go across the front of the U-shaped rod that hangs around my neck. Now I need to design something that will fastened to that and will hold the upright piece to which the joystick is mounted. I spent all day Sunday April 10th watching NASCAR and designing and printing parts.
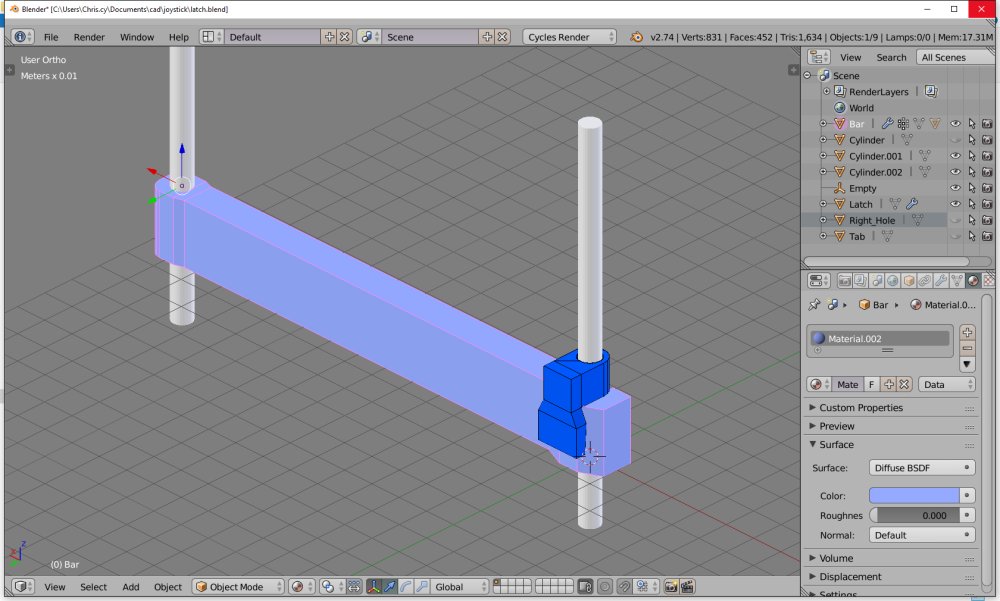
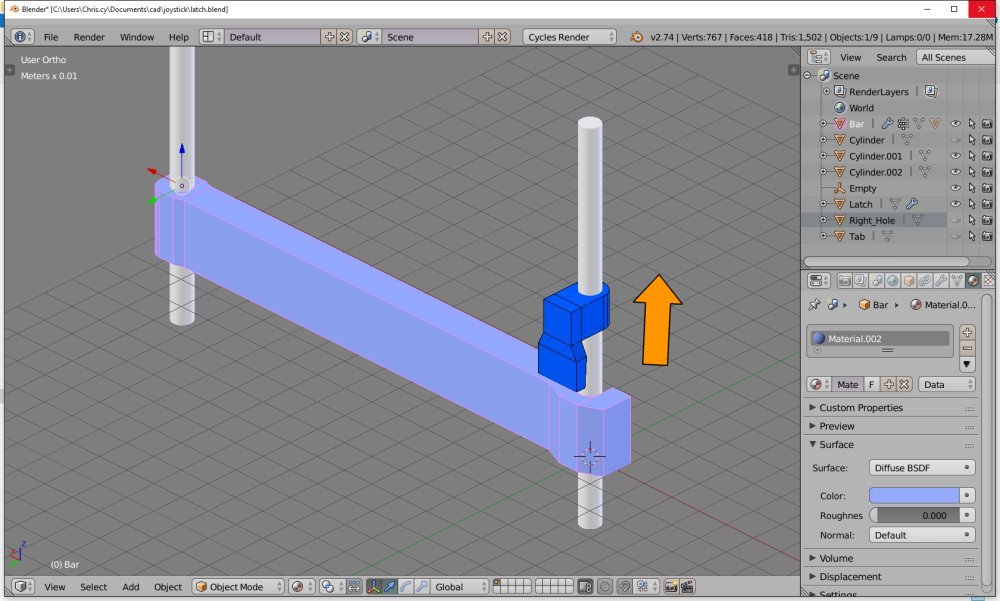
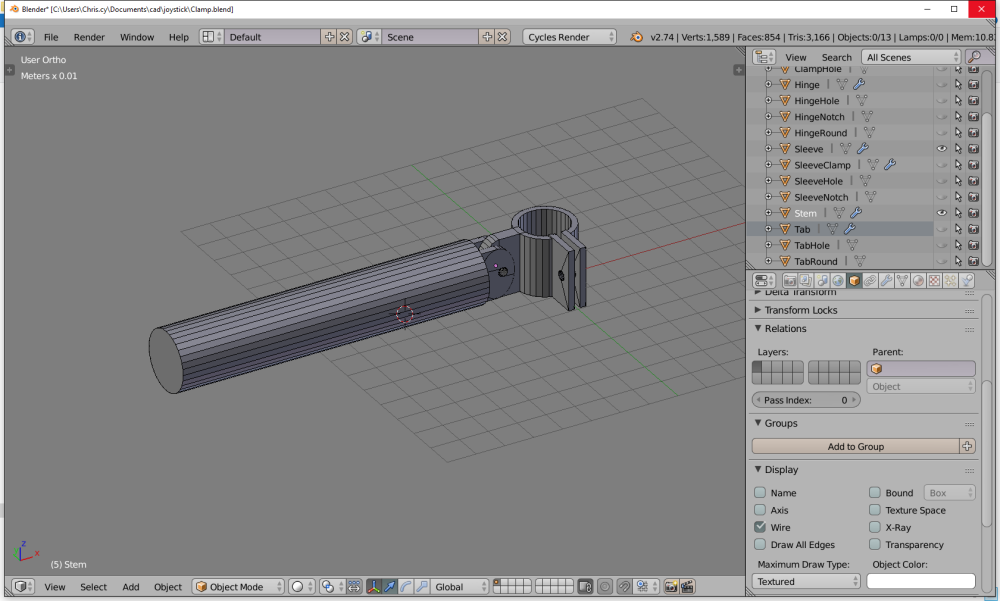
In the image below the long cylindrical piece and clamp on the right were pieces I had already designed. The clamp on the right holds the actual joystick. The piece I worked on Sunday was the clamp on the left which will attach the entire assembly to the crossbar. It turned out I could just copy the clamp on the right and resize it. As always you can click any of the images here to see a larger version.
On Monday April 11 we were supposed to take the wheelchair into the shop to have them reprogram it. Unfortunately my caregiver had to cancel and dad had to get me dressed. She has had a lot of things going on in her life lately. She has a young daughter with recurring ear infections, the transmission went out on her car so she has to borrow a friend’s car or get a friend to actually drive her to my house. She had been working for me for about three weeks and still had not worked the entire week without missing at least one day. She does absolutely wonderful job when she’s here. Fortunately she seems to have since gotten things worked out and has not missed a day since then.
I had had second thoughts about taking the wheelchair in for repair in the first place. I kind of wanted to be there while they were working on it so I decided to not take it in but to have them come to me. They had told me they can send someone on Thursday the 13th. I had tried to get them to hold that appointment for me in case I couldn’t make it on Monday because I knew my caregiver girl was a little bit unreliable lately. They had said I could just call and reschedule. They would not hold the date for me. When I called them back they said the Thursday appointment had been filled. The soonest they can get here would be Monday the 18th. Like I said… S.S.D.W. I spent the rest of Monday working on an installment of this blog.
All Printed up and Nowhere to Go
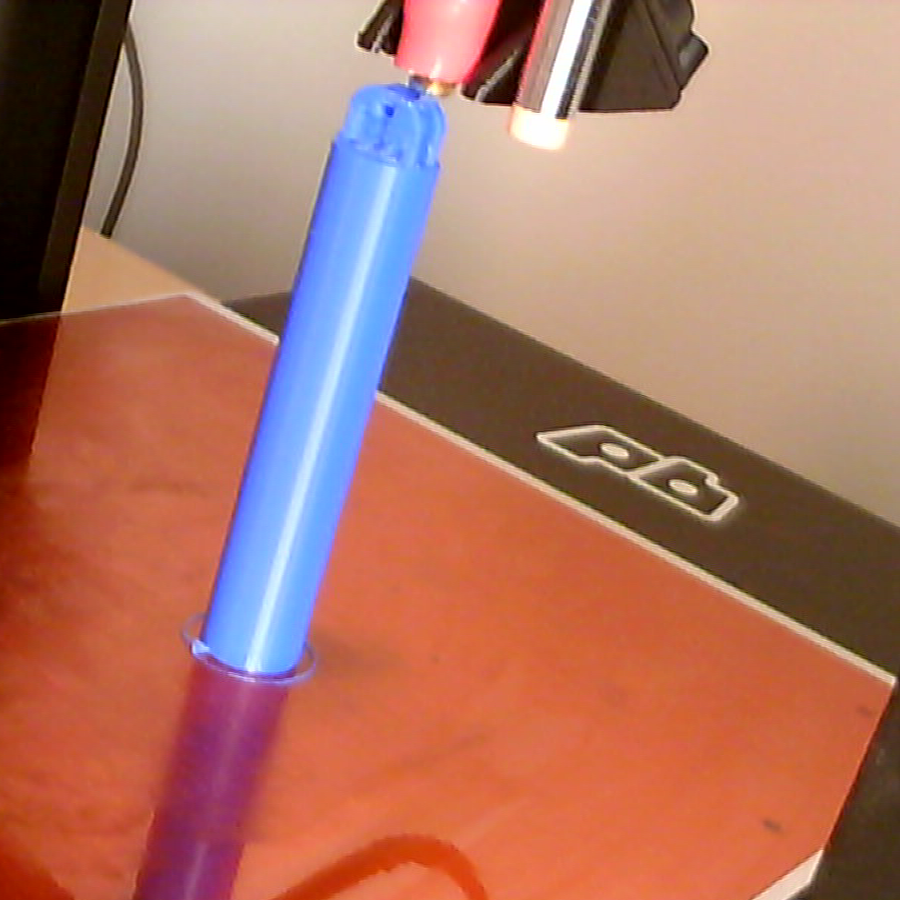
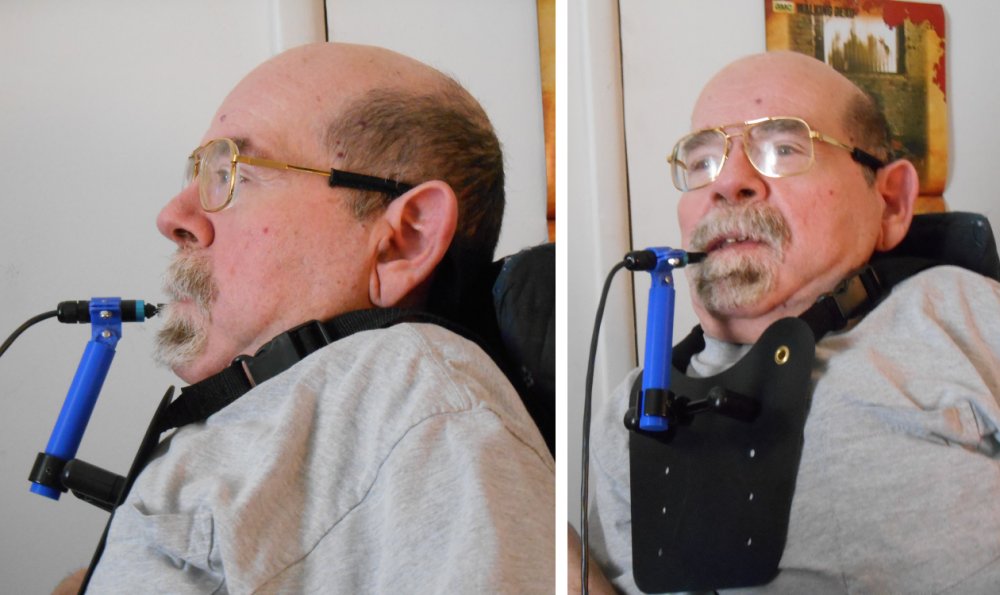
On Tuesday I finally finished all of my 3-D printing parts and we assembled the joystick mount. Here are some photos of the completed project.
This shows the latching mechanism and how it swings open so that you can fit the device around my neck.
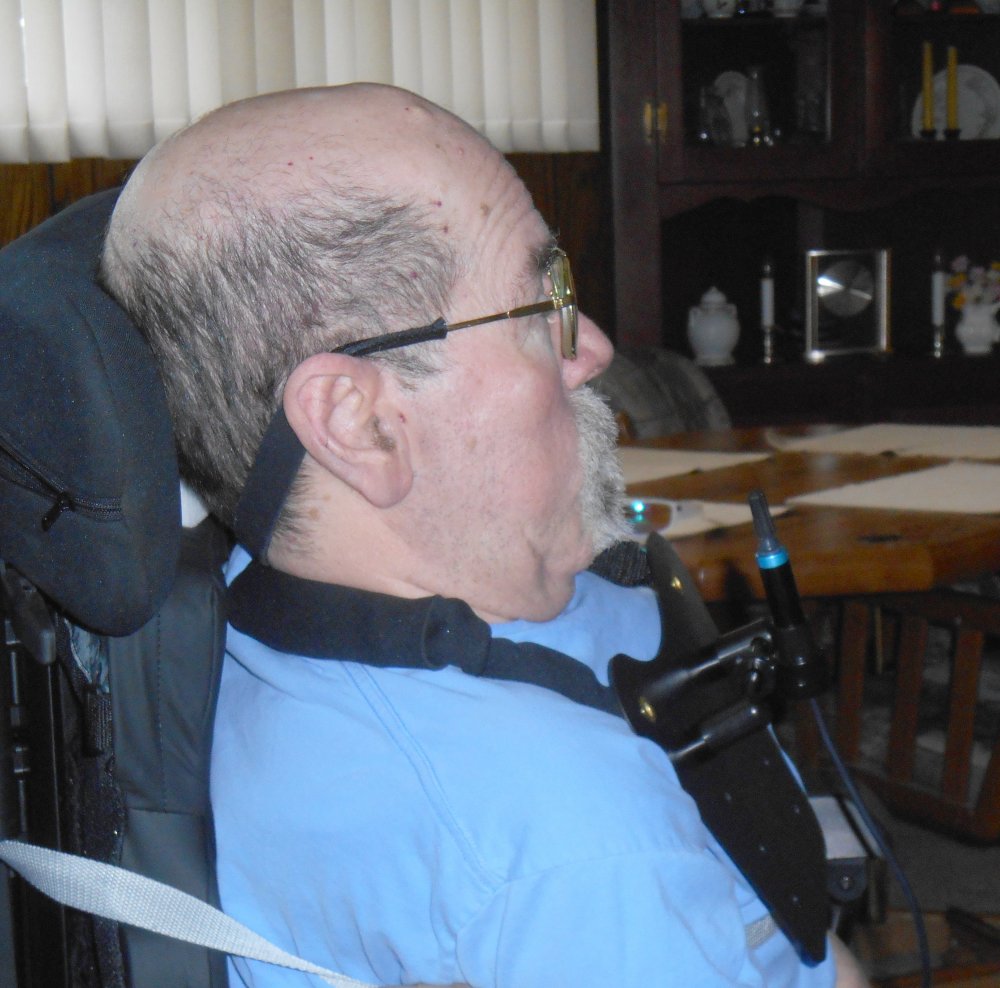
Here’s what the device looks like when I wear it. Note in the background the calendar behind my head and it looks like Michonne from The Walking Dead is trying to chop off the top of my head.
The only problem I have now was the wheelchair would only work using the attendant controls because the software was glitched. I was all dressed up… or rather all 3-D printed up… and nowhere to go.
Also on Tuesday I had my monthly visit from the nurse from my home health agency. They send someone out once a month just to take my blood pressure, temperature, and see how things are doing in general. Also on the same day by coincidence I had my quarterly visit from my caseworker from CICOA (Central Indiana Council On Aging). She helps me wade through all of my Medicaid issues and she does my case management to get Medicaid to pay for the home health aide. I was able to show them the new wheelchair but I couldn’t really show off driving it which was a disappointment. I spent the rest of the day doing some Internet research to try to better understand what might be going wrong with the programming and other issues.
Going on Tilt
When playing poker and you get a bad beat, it rattles you emotionally and sometimes you start playing badly. In poker parlance this is called being “on tilt”. With all the ups and downs I’ve had in trying to get the wheelchair to work right I felt like I was permanently “on tilt”. Alternative title for this section could’ve been “Tilting at Windmills” considering we seem to be on a hopeless quixotic quest and getting a working wheelchair was an “impossible dream”.
Clever clichés aside, the next topic actually did have to do with tilting. Most wheelchairs have some sort of little “wheelie bar” out the back of the chair to keep it from tipping over backwards. My old chair had a bar on each side with a tiny wheel perhaps the size of a skateboard wheel. The bars were easily removable and that was one of the first things that I did when I got the old chair. By removing them, it is possible to have someone tilt my chair backwards to go up a small step or a curb.
Only twice in my life do I ever recall coming close to tipping over backwards in the chair. There was one particular ramp at Market Square Arena that was way steeper than the others. Trying to go up it one time I was a little bit worried the front end of my chair was getting a little bit light. There was another time my mom was driving me up a small wooden ramp up a step at a retreat center in Culver Indiana. Halfway up the ramp she accidentally jerked the joystick a tiny bit and my front wheels raised. Fortunately she stopped quickly before I tipped over backwards. The only time I actually tipped over backwards was the day that my van lift fell and I tipped over and landed on top of my friend Judy. That’s a story for another day.
I do know that even on level ground it is technically possible to get my old wheelchair to tip over. You would have to put it in high-speed, drive it backwards at full speed, and then slam it into forward at full speed. You could get it to tip backwards that way. But even when I had much better use of my hands, I was never driving it that way to begin with. Once my arms started giving out it was physically impossible for me to make such an abrupt maneuver.
A popular design for new wheelchairs these days is what they call “mid wheel drive”. The chair essentially has drive wheels that are fat tires perhaps 10 or 12 inches in diameter in the middle of the chair and then it has caster wheels in both the front and the rear. The photo on the right is a Quickie Series 7 chair (mine is a 6). Essentially the chair has six wheels. It has a strange suspension system that keeps all six wheels on the ground as you go over rough terrain. And if you have a rounded curb or an obstacle like a speedbump it will climb up or down that very easily. But to go up a square step have someone attempt to tip your wheelchair backwards for you, there’s no way to do it. That’s why I didn’t get the Series 7 and got the rearwheel drive Series 6.
Although my new chair has rear wheels behind the drive wheels, they normally sit about a half inch off the ground. They are only to be used as an anti-tip mechanism. They have a strange retraction mechanism that appears to be spring-loaded. There is a cable running from each of the rear wheel assemblies to some sort of motor or actuator in the front of the chair underneath the seat. When we had the demo chair we couldn’t figure out how it worked but we figured we would be removing these anti-tip wheels anyway. Sadly the wheelchair salesman wasn’t sure how they worked either.
We did have some concern that if I was reclined, the chair I buy back might be at risk of tipping over backwards and we might need to keep them in place. We were going to have to do some experimenting before we actually removed them. As you can see in the side-by-side images below, the center of the rear wheels of my old chair were probably six or 8 inches backwards from the position of my back. But in the new chair because the wheels are smaller diameter and the way it is constructed, the center of the rear wheels is almost directly below the point where my back hits. While this new chair is heavier and the weight of the equipment is further forward under the seat than my old chair, the actual tipping point is a little more dangerous.
The other issue that concerns us about these rear wheels is that the chair might not fit on the wheelchair lift on my van. When we had the demo chair, I did not ride it on to my wheelchair lift but dad did try rolling it up on the lift without me. He thought that the chair would not fit with those anti-tip wheels sticking out the back. There is a metal flap that folds up behind the rear wheels to keep me from rolling off. Dad thought that the only way to get that chair to fit would be to put the flap in the space between the anti-tip wheels and the drive wheels. That would definitely be awkward and yet another reason why to remove these unnecessary wheels. The photo below shows my wheelchair sitting on the lift platform with the anti-tip wheels in front of the flap. It turned out that when we actually put me on the lift with me sitting in the chair and did some experimenting that I would fit with the anti-tip wheels in front of the flap. Unfortunately to get into that position we had to roll me so far forward that my feet would hit the bumper of the car. I actually had to slide my feet backwards on the foot rests. When sitting in my old chair I was that lower and thus my foot rest was lower and my feet would fit under the bumper when I rolled forward. Anyway even though I would fit on the lift, it was going to be a complicated process.
One of the things we couldn’t figure out was why there was such a complicated mechanism on these wheels. It looks as though there some sort of spring-loaded suspension system and then there was this cable that runs to the front of the chair and some sort of actuator. But we couldn’t figure out what activated it. We couldn’t find anything of the user manual that explained it in the dealer had not been able to explain it.
>So I got online to my new favorite go to place for all things wheelchairs, an online discussion forum at wheelchairdriver.com. I asked them if they thought it was safe to remove these wheels and what was the complicated mechanism all about. You can click here to read the thread but the gist of it is that they didn’t think I should remove them. Of course these are people who are a lot more active than I am riding their chairs around on rough ground. If I have this chair when I was in my teens it was a bit of a different story. It was also interesting that the members of the forum got into a heated debate on whether or not the Quickie Series 6 was actually “rearwheel drive”. One guy said it’s a compromise between a mid wheel and a rearwheel with all of the disadvantages of both. I guess he wasn’t a fan.
The bottom line is that these wheels are supposed to be able to flex upwards so that you can go up and down curbs and ramps. However if you recline the wheelchair, that mechanism gets locked in the down position keep you from tipping while reclined. Some people said that their anti-tip wheels were constantly touching the ground while most people said that like mine they were slightly off the ground. One guy said that his dealer made a modification with a wedge-shaped part that would adjust the height of the down position. A few days later going through some paperwork we found an addendum that explained this little extra block could be inserted but it didn’t make it very clear what that little block would do for you.
Need Knowledge… Do an Experiment
When the experts can’t agree and the instruction manual doesn’t instruct there’s only one thing to do… actually experiment. Over Wednesday and Thursday of that week we tried a number of different things. We got me on and off the van lift and I rode up and down and actually got in the van. More on that later. We drove me out to my front curb. Our curb is about 6 inches tall and is very rounded however when I was younger and rode around the neighborhood a lot I used to have trouble getting up and down it so dad poured a small concrete ramp in the center. We drove me down the ramp okay and then we tried driving up the rounded part of the curb. It had the power to get the front wheels climb up the slope but because the rear anti-tip wheels would not retract it was lifting the drive wheels off the ground. When we went back to drive up the ramp we almost couldn’t get me to go. The chair would roll down the ramp okay whether the drive wheels were touching or not. When we tried to drive up again, we realized that the drive wheels were barely coming off the ground. It was just enough to lose traction. We had to get a bit of a running start to get me up curb even with the ramp. We had hoped that once the full weight of the chair was on the anti-tip wheels that they would retract a tiny bit. Unfortunately they did not. Something weird was going on because they should retract as long as I wasn’t reclined any.
it was clearer than ever that the wheels were going to be in the way and severely limit my ability to go up and down even small ramps if they were sufficiently steep. We still didn’t know just how tippy this chair would be because anytime we tried to tip it, the wheels would hit. It wasn’t until the next day that I came up with another idea. We went back outside and parked the wheelchair on the front porch which is up about a 4 or 5 inch step from the driveway. We parked me with the anti-tip wheels hanging off of the edge of the porch into the driveway. This would allow dad to try to tip the wheelchair in a controlled manner. He tried tipping the chair back with me sitting at my normal seating position as if he were trying to take me up a curb. It seemed to him the chair was no more or less tippy than my old chair was.
Then we gave it a real test. We reclined and tilted the wheelchair all the way back and he tried to see if it would tip. He could put a lot of weight on the rear of the chair and make it tip but it didn’t seem like there was any way it was going to tip by itself. Keep in mind I would not be driving the chair anywhere or be driven anywhere while in that reclined position. I wouldn’t do it on uneven ground.
“Never Start 2 New Foods at Once”
The above quote is a proverb that my mom always used. She always said that when you are trying to get a baby to eat solid food or different kinds of baby food that you should only try one thing at a time. If you try 2 new foods at once and the baby has a bad reaction to it, you don’t know which one was responsible. It’s been a philosophy that has served me well in dozens of situations whether it was building gadgets or troubleshooting software. If you make 2 changes at once and something goes wrong then you are clueless. So even though we had come to the conclusion that it was safe to remove the rear wheels, we were not going to do it right away. I was concerned that messing with it might trigger some sort of safety mechanism and shut the chair down completely. We had already gotten in trouble when I messed with the programming. I wanted to wait until we solved the programming problems before we made any new changes to the chair. Unfortunately a few days later we did not heed the “2 new foods” rule and it got us into more trouble. But that’s another story.
More Comfort Issues
Other activities of this week included padding and reupholstering the armrests. The armrests that came with the chair were very hard rubber with little or no cushioning in them. They also had a concave shape on the top surface which would be great to keep your arm in place if you lay your arm absolutely parallel with the length of the armrests. However I like to keep my arm sometimes at somewhat of an angle and so the edges of the concave shape dig into your arms. I had been referring to them as “an armrest only a quadriplegic could love”. We had been putting a pillow under my arm but then as an experiment we cut a piece of foam and put it on the armrest with duct tape. After a few days I decided that was the right height for a permanent solution. Dad went out to the fabric store in Avon and purchased a few square yards of dark blue Naugahyde upholstery material and made covers for the foam.
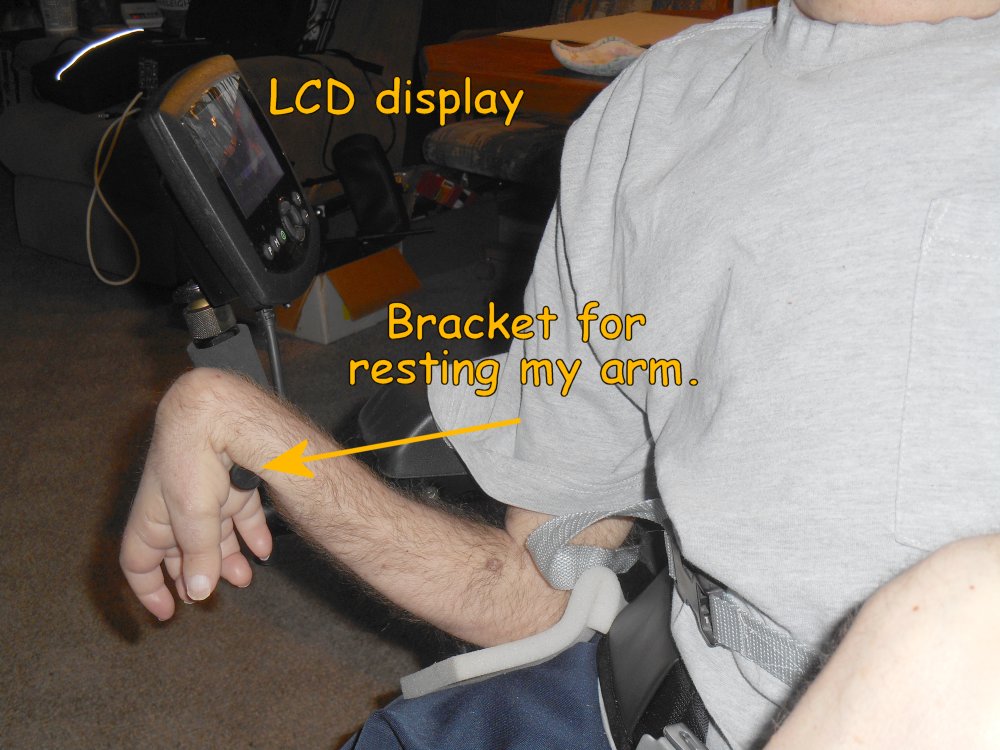
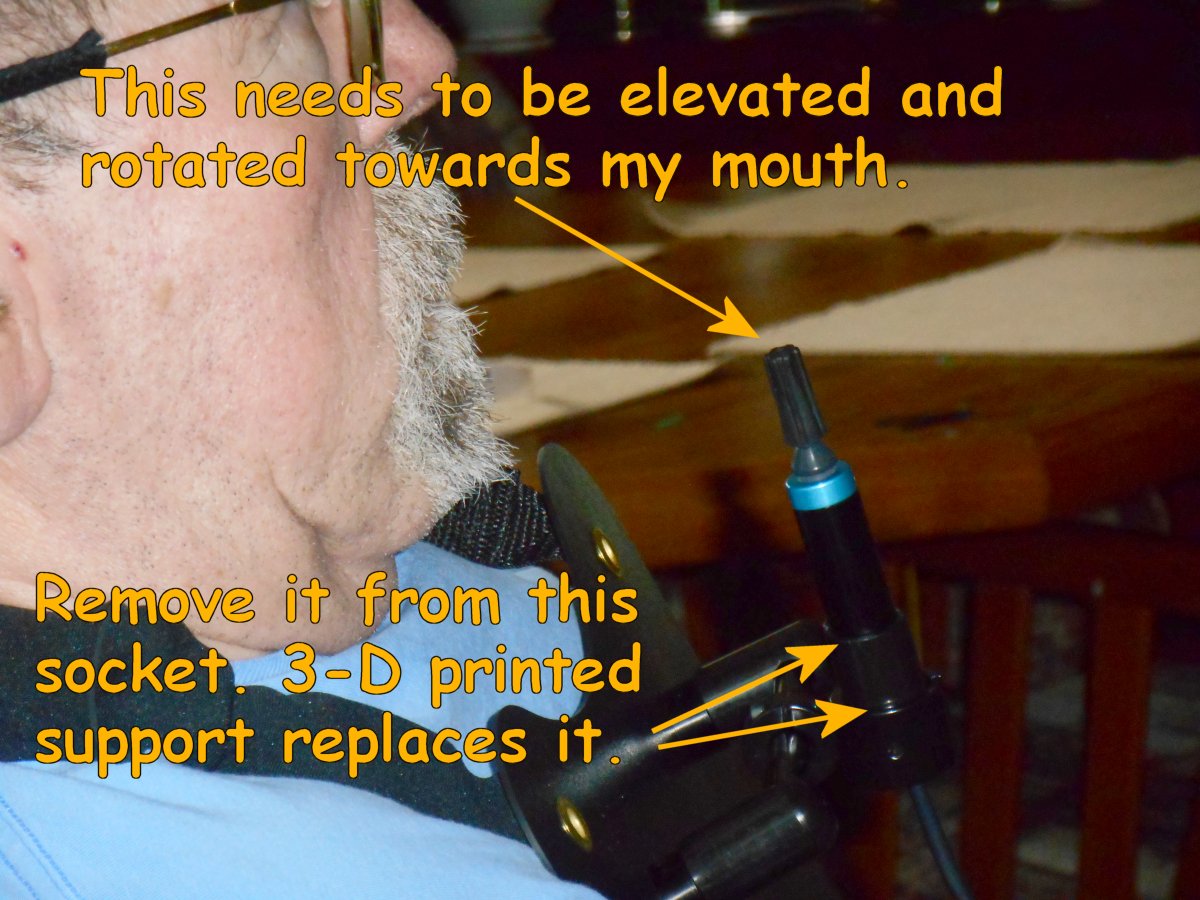
We also came up with a temporary solution for had to mount my ultimate remote control and my iPhone. I used to have a gadget that was an aluminum bar that would fastened to the upright portion of my armrest. We had two of them in fact. One of them held an easel on which I can put books or papers. I would use it if I was giving a speech somewhere and didn’t have a table in front of me. I had used it at Enneagram seminars and some RCIA classes. I also had a similar manner for my video camera when I used to hang out at the Speedway and shoot video in the garage area. I no longer had used for either of these so we repurposed the swingarm part of it by cutting a slot in the end that would hold my iPhone bracket from the other chair. The upright pipe on the armrest is a different diameter so dad had to do some cutting and grinding but we got it to work. The iPhone bracket itself will probably get redesigned into a simpler form that will probably hold the iPhone a tiny bit higher but for now it’s good enough. We are thinking about possibly moving the LCD display from the right arm rest of the wheelchair onto this adapted swingarm. The display currently is not in a very useful position and I can’t really see it where it’s at. Anyway it was great to be able to use my TV remote and my iPhone again.
After being so frustrated with the wheelchair, I needed to take a break so I took a day off from working on it to play with a raspberry pi. I mentioned in a previous post that I was replacing an old raspberry pi model 1 B with a newer model 2 and giving the old one to my friend Buz who lives in Michigan. Fortunately getting the old one running for him went much smoother than setting up the new one for me. After getting it ready here, I mailed it to him and the following week we got together on Skype and I talked him through how to set it up. It was a lot of fun connecting with an old friend. We will probably do more Skype in the near future.
Saturday I planned to go to church and as we had not yet gotten a hold down straps installed in the van I had to sit in the old wheelchair. I couldn’t believe how uncomfortable I was all day long. The new chair really had me spoiled.
On Sunday the 17th I spent the day watching NASCAR and IndyCar and working on the blog. Hopefully next week would be a both better week. The repair man was scheduled to come on Monday. That would also be my dad’s 81st birthday. Hopefully it would be a really good day.
There is one other incident during the week on Thursday April 14 that I need to blog about but it doesn’t really have anything to do with the wheelchair. It was something of a more personal nature which belongs on my personal blog rather than my technology blog (even though technology is very personal for me). You can read the story on my personal blog here. So that wraps up the third week after my new wheelchair arrived.
In this installment we will cover the second week of working on the new wheelchair. We work on 3-D printing parts for the joystick and waiting on word from the wheelchair people about my programming glitch.
That’s Why They Call It Immediate Care
After taking off for the weekend and not working on the wheelchair I was anxious to get back to work on it first thing Monday April 4. I was also hopeful I would hear from my wheelchair technician about my technical problems. Unfortunately my body had different plans. I woke up about 3 AM Monday morning with a very nasty earache. While I had been eating my bedtime snack Sunday night consisting of chewy chocolate chip cookies and a bottle of chocolate Ensure, I think I swallowed funny and some of the liquid went up the tubes that connect the back of your throat to your inner ear. I normally have tinnitus which is a ringing in your ear and it is normally equal in both ears and at a level that doesn’t really bother me. But when I woke up my left ear was ringing very loudly and hurt terribly. It was like there was a lot of pressure built up. I tried swallowing and yawning to clear the pressure and it felt like the tube was clicking open but it also felt very irritated and it didn’t relieve the pressure. I called dad and had him roll me over in bed and took some liquid Tylenol. I told him that we would call the ear doctor first thing in the morning and try to get me an appointment. If I wasn’t successful I warned him I might have to go to the ER. It was definitely the worst earache I’d ever had.
Dad came back in about 8:30 AM to see if I still wanted to call the doctor. The pain had subsided considerably and although there was still ringing more than usual it wasn’t excessive. I told him we would wait and see how I was when I got dressed. My caregiver arrived as usual about 10 AM and began giving me my bed bath. When she washed my ears there was blood in my right ear. That was strange because I had no symptoms in the right ear… only left one. When she washed the left one there was some white gunk coming out of that one.
I decided I needed to see a doctor after all even though the pain and pressure was much less. My ear, nose, and throat doctor has the strange name of Dr. Youkillus and is pronounced you-kill-us just like it’s spelled. Every time I say his name I think of the ventriloquist Jeff Dunham and his character “Achmed the Dead Terrorist” whose catchphrase is “I kill you!”. Fortunately the doctor is a really nice guy and I feel safe with him. Anyway he was off duty that day and all of his partners were busy. The soonest I could get into see someone would be Tuesday afternoon. After I got up and dressed I decided I didn’t want to wait that long to have someone look at the ear and get me started on antibiotic. I made the decision we would go to either the ER or an immediate care center.
Dad said there was a new immediate care center on Main Street in Speedway so I decided we would try it out. Because we didn’t have tiedowns for the van I would have to use the old chair for the day. We got in and out of the immediate care fairly quickly. I saw a nurse practitioner who said I definitely had something going on in the left ear but it didn’t look like I had broken my eardrum and the wax wasn’t too bad. I never did figure out what was wrong with the right ear. She gave me a prescription for an antibiotic.
When I checked my email on Monday I did have a reply from Patrick the wheelchair guy saying that he would be in touch with his technical support people and try to get a solution for my inoperative joystick. About the only other event of the day was I ended up losing the bid on eBay for the wheelchair programmer I had been bidding on all weekend.
Finding Tolerance
On Tuesday I began working on 3-D printing parts for the joystick mount.
When designing shapes for 3-D printing, many times you really don’t care the precise measurements of an object. But when parts have to fit together especially with non-3-D printed objects you need to take careful measurements and create your parts to fit precisely. Even though in 3-D printer might be accurate to within a few hundredths of a millimeter, by the time the plastic squeezes out of the nozzle and hardens into position the objects tend to be slightly larger than the advertised size. That also means that any hole in a 3-D printed object is going to be smaller than you intended it because the plastic intrudes into the hole. The tolerances on each kind of 3-D printer, the plastic you are using, the temperature of the nozzle, and even the print speed can affect the tolerances of the finished product. Because I was going to be making parts that needed to slide up and down on the stainless steel rods, I needed to print some test parts to see what diameter hole would give me a snug fit.
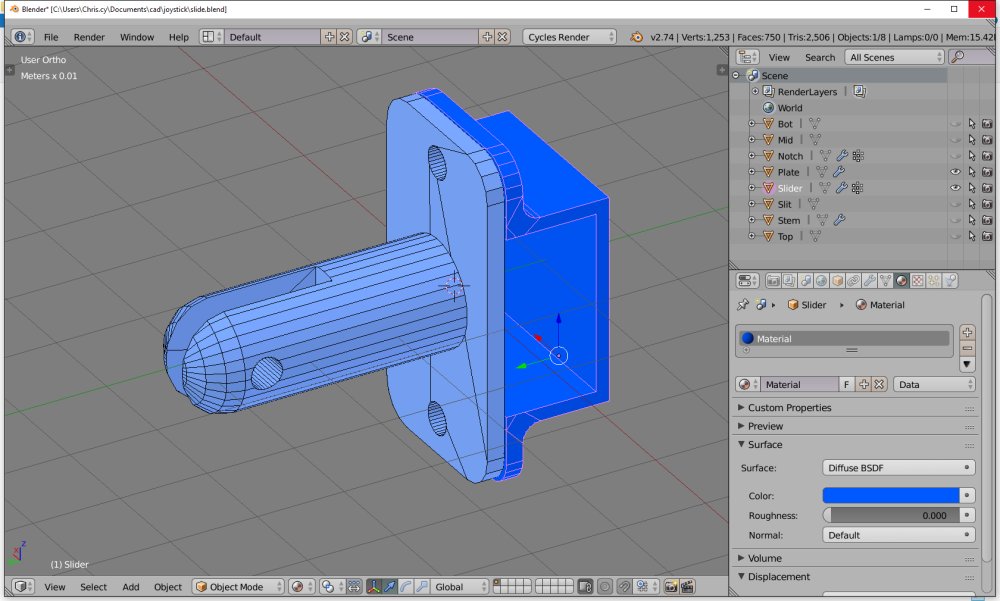
The CAD programs that you use for designing pieces to be 3-D printed have the option to do measurements in inches or millimeters. Because most 3-D printers work in millimeters we set things up in metric mode. Each layer of plastic is about 0.2 mm thick. The nozzle that extrudes the plastic is 0.4 mm wide. The stainless steel rod that we were going to hang around my neck to hold the joystick is precisely 1/4 inch in diameter. Converted to metric that is 6.35 mm. The image below shows the CAD drawing of my test piece.
The hole in the left is exactly 6.35 mm and each hole extending to the right is a few tenths of a millimeter larger. I put a tapered section like a counter sink on each hole so that it would be easier to get the rod started going thru the hole. After printing the piece we determined that the one on the far right which was 6.8 mm in diameter was a nice snug fit. This is a pretty typical fudge factor in my experience at least on my printer. I sort of wonder if it has to do with the fact that my nozzle is 0.4 mm in diameter. Perhaps the software is measuring from the center of the nozzle on one side of the part to the center of the nozzle on the other side of the part. But the actual part comes at 0.2 mm bigger on each side because of the radius of the nozzle. I would think the slicing software could compensate for this. Maybe it has nothing at all to do with the nozzle diameter. Maybe it’s just the way the plastic oozes out.
Dad and I spent some more time bending the stainless steel rod to get it to fit better around my neck. He also worked on some final adjustments to lower my right foot rest. On Tuesday I also got another email from Patrick saying that he was working on my problem but still hadn’t heard back from his people. At least he was staying in touch day by day. Many times while corresponding with him about ordering the equipment he wasn’t at all prompt about answering his emails.
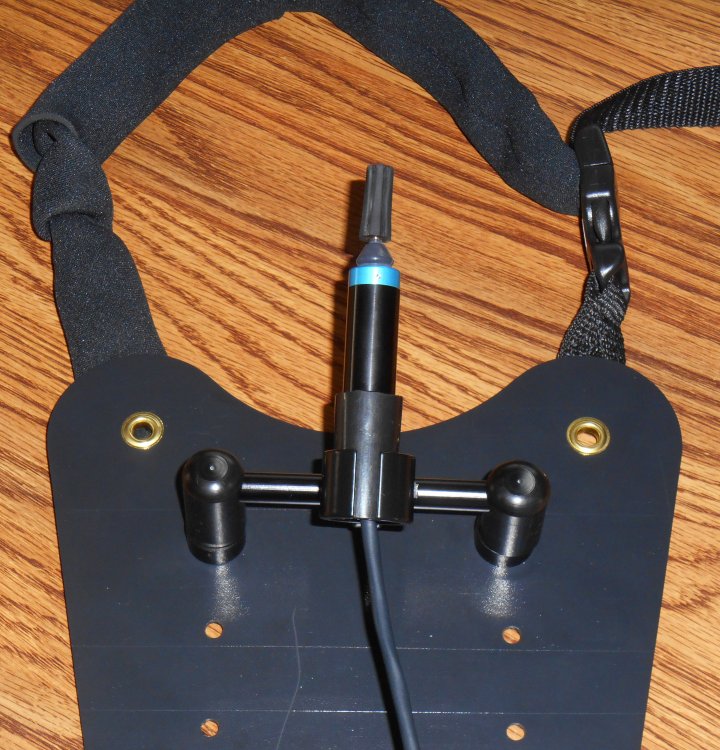
Inventing the Slider
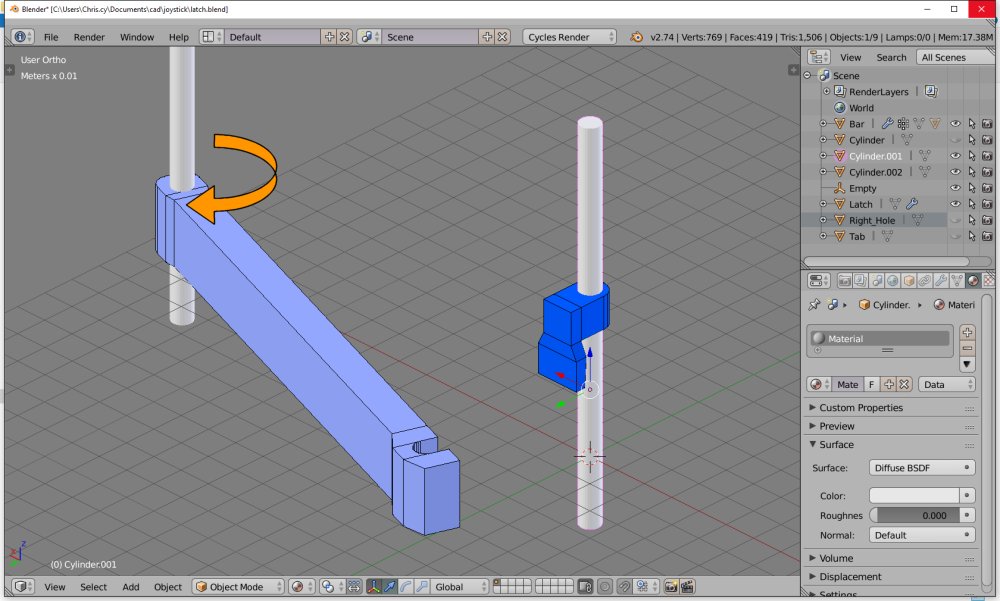
On Wednesday the 6th I continued designing 3-D parts. The metal rod of the bib is an upside down U-shaped rod that hangs around my neck. We needed to create 3-D printed parts that would connect the two ends of the “U” with a crossbar to which we will eventually mount the rest of the joystick holder. That crossbar will pivot on the right side and we need a latch to fasten it on the left side. A small sliding piece will latch it into place as you can see in these CAD drawings. The first one shows the crossbar in the closed position. You can click on images for larger versions.
This one shows the sliding latch in the raised position.
In the final image you can see the crossbar rotated out of the way. This allows me to easily take the bib off and on my neck.
It took two or three attempts to design that little sliding piece. Printing tiny pieces on a 3-D printer is in many ways more challenging than printing large ones. To successfully print a piece, it needs to stick to the build plate firmly. Small pieces don’t have much surface area on the bottom. Also the plastic from one layer needs to cool down before the next layer is extruded onto it. For most reasonably sized pieces by the time it finishes printing one layer the first part of that layer has cooled sufficiently that you could put another one down. But because small pieces print so quickly the plastic needs time to cool. If the previous layer has not cooled, the entire object tends to sag or bulge. Fortunately the printing software has a parameter that you can set the minimum amount of time for a layer to print. It will slow down the printing or even retract the printhead and pause for several seconds if necessary to wait for the plastic to cool.
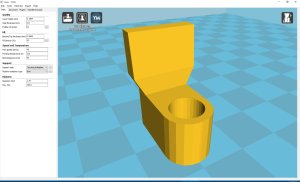
You also have to orient the part on the build plate so there is a flat surface at the bottom. The sliding piece as shown in the CAD diagrams has a pointy tab at the bottom so you have to turn the piece upside down to get it to print on a flat surface. When I loaded the part into the printer software and rotated it to the proper position, much to my surprise my little tab slider looks like a toilet. I suppose it’s appropriate that a piece called a “slider” should remind you of a toilet since if you eat too many White Castle sliders that’s where you end up.
On Thursday, I worked on the piece that would mount on to the crossbar that would hold the remainder of the joystick mount. I also wanted it to be able to slide left or right along the length of the crossbar because I wasn’t exactly sure where it would go. I wanted it to be a tight fit but still able to move if I wanted it to. If it came out too loose I had plans to put a set screw in it that could be loosened or tightened to reposition it. The two pieces shown in the image below will wraparound crossbar and fastened together with a couple of #4-40 machine screws.
This is the final version after making some minor tweaks to an original design. We managed to get the fit just right and I had to make some extra room on the flange for the screws to fit. The original was a little tight.
“Who You Gonna Call?”
I didn’t hear anything back from the wheelchair guy on Wednesday so I sent him another email on Thursday. He replied and said he had been out of the office Wednesday on some personal matters but would be at his desk all day and would definitely be able to get in touch with his supplier’s tech people. When I checked my email on Friday April 8, I had three emails from him with attachments. I couldn’t wait to see what he had sent me.
It was three pages full of information that someday I would find very useful. One was a procedure for resetting things to the factory defaults. The people on the wheelchair support group that I was reading online had said a factory reset was not advisable but this technical note from the manufacturer said it was specifically for people who wanted to undo something that they had inadvertently changed. The tone was that it was safe to use. The other two pages consisted of a map of all of the menu options in programming mode. It told you which features were in which submenu. That would make it easy to figure out where you needed to go when changing the settings. When I was playing with it before, I had to keep browsing around to find what I was looking for. So this would be very useful information… someday.
But today it was totally useless. Everything he had sent me told me what to do once I was in programming mode. It totally ignored the fact that my major problem was I could no longer get into programming mode. I had waited an entire week for a response only to see that despite the fact I had described in detail my problems including the fact that I could not initiate programming mode, his reply indicated he was totally clueless as to the nature of my problem. It was like he hadn’t read the email.
To describe this situation as a pet peeve of mine is a gross understatement. I really can’t think of anything that pisses me off more than asking someone a technical question and getting an answer that proves they weren’t paying attention to the question I actually asked. It has happened to me many times in online support forums and it angers me then. This time was especially rough. I specifically had sent him email rather than just a phone message so that he would have my questions right in front of him and could reread them. The timestamp on the email was 12:45 AM. Whatever work and personal issues he’s been going through that forced him to take a day off Wednesday and having making up work in the middle of the night then he has my sympathy but not my patience.
I left him a very harshly worded email and phone message. But that didn’t get it out of my system. It was obvious he was calling someone at Sunrise Medical who makes the Quickie Brand wheelchairs. I looked up the number for their technical support and I called them directly. The guy I spoke to was intelligent and courteous and obviously was listening to what I was saying. When I explained to him that I cannot get into programming mode he was right up front with me saying that there wasn’t anything he could tell me that was going to resolve that. I would indeed need a dealer’s handheld programmer or some kind of device to get it unstuck. I explained to him that the dealer I’ve been working with was unable to help me. I asked him what other dealers were available in the Indianapolis area. They recommended a place called NuMotion http://www.numotion.com/ They are located near 79th and Moeller Road. I thanked him and put in a call to NuMotion.
When I called them I got through to the repair department and I explained to the guy my problem. I told him I’d been working with a different dealer and that they were unable to help me. I explained I know that since I purchased the wheelchair from the other company it was their responsibility to fix it but I was fed up with their incompetence. I asked him if Medicare/Medicaid would pay for such repairs. He explained that even though I had not purchased the chair through them, unless I needed replacement parts there would be no cost. I couldn’t believe they were so nice about the whole thing. Unfortunately they seem to be a busy place because the soonest Wednesday April 13th. They took some personal information about me and I thanked them. He asked me who the other company was that I had been working with. I was reluctant to badmouth them but I told him anyway. The bottom line was I would have to wait again to get service.
About an hour later NuMotion called me back. Apparently they felt bad about stealing a customer away from National Seating and Mobility. I felt bad about firing these people as well even though it is not been a very satisfying customer experience. Anyway they had called the other place and probably said something along the lines of “Hey friend… if you don’t take better care of your customers they’re going to keep coming to us”. At any rate they said that National Seating would be calling me within the hour and if I didn’t hear from them I should call National Seating. I can understand that they didn’t want to step on anyone’s toes. And I didn’t want them to have to. I just wanted the damn thing fixed as quickly as possible.
Shortly after that phone call I got an email from my guy saying “I got your message”. I don’t know if he meant the nasty email, the nasty voicemail, or the message that was figuratively sent when I called his competition :-). At any rate he said he would try to get me someone who had the right kind of programming gadget.
Shortly after the email from my usual guy, I did get a phone call from someone at the National Seating and Mobility office. I didn’t catch his name but I later learned he was the office manager. After explaining the problem he said something to the effect of “When can you bring the chair in for us to look at?” I almost hung up on him right there. Everything that I had been told by the other technicians when I asked about repairs was that they always come to the client. You never need to bring anything in. The bottom line was this was Friday. I could bring the chair to him Monday morning and he said he would have people at the office who could work on it. If I wanted them to come to me I would have to wait until Thursday April 14th. I explained I wasn’t sure if I could come on Monday. I wanted to go ahead and schedule the Thursday afternoon appointment for them to come to me and then if I could come on Monday we would cancel it. He said if you can’t come on Monday, just call us and we will schedule something at that time. He didn’t want to hold open the Thursday appointment for me. That turned out to be a mistake.
Another Break in the Action
I had been on such an emotional roller coaster on Friday that I couldn’t wrap my head around working on the joystick mount or anything else related to the wheelchair. I needed a different project to distract me.
I had a raspberry pi model 2 sitting in its box unopened. I had been swapping some emails with my friend Buz about using the raspberry pi as a media player. I was going to replace the model 1 that I had connected to it the TV on my kitchen counter. I would get the new model 2 and I would give Buz my old hand-me-down model 1. He did not have an HDTV and the model 1 works better with old analog TVs then the new model 2. So I spent the rest of the day Friday trying to load OSMC media player software onto the new raspberry pi. Apparently the Wi-Fi dongle that I was using wasn’t fully compatible with the newer model. It took me all afternoon to get the Wi-Fi working. I had hoped that playing with my other toys would reduce my frustration level but it turned out to just replace one frustration with a different one.
I finally got rid of all my stress on Saturday by spending the day with my friends Rich and Kathy Logan to go see “Batman vs. Superman” in IMAX 3-D. Even that wasn’t without its frustrations. We normally go to the IMAX on 86th and I-465 at Traders Point. Unfortunately they have weird schedules when it comes to IMAX 3-D. The 12 noon, 6 PM, and 9 PM showings were all IMAX 3-D but the 3 PM showing that we wanted to attend was in ordinary IMAX not 3-D. We had to drive all the way to the south side to the other IMAX to see it in 3-D at a reasonable time of day. I loved the movie a lot. Better than the most recent Superman movie. Rich and I are both huge comic book fans. We were both embarrassed that we had never realized that both Clark Kent and Bruce Wayne had a mother named Martha. That was a particularly important plot point in the movie. I told Rich “If I was a cartoon character, my head would’ve literally exploded.”
That wraps up the entire second week of working on my new wheelchair. While of the comfort adjustments had been finally completed and I was very much enjoying sitting in it, I still wasn’t able to drive it. Sorry for the spoiler but yet another week after this would pass and I still couldn’t drive it. That’s a story for the next installment.
In this installment we will cover the remainder of the first week of working on the new wheelchair. We work on getting the more comfortable and trying to diagnose what went wrong with the programming that has disabled my new joystick.
Are You Comfortable?
There is an old vaudeville joke where a nurse is working with a patient and she says “Are you comfortable?” The patient replies “Ehhh… I earn a living… But not really comfortable”. I’ve used that joke in my life more times than I can count. I guess it’s an indication that friends and family often look at me and are concerned about my comfort. I probably look uncomfortable 99% of the time. My scoliosis has left me with two 90 degree bends in my spine. My joints all have severe contractures. My normal driving position in my wheelchair leaves my head tilted sideways a good 45 degrees. My arm was always propped up in an awkward position. Most of all I’m fortunate enough to have a lot of people who care whether or not I am comfortable. So when these kind people inquire about my comfort, I always pull the joke and say “I earn a living”.
Somewhere along the way I quit using the joke. Either it just got old, or I got tired of it, or perhaps subconsciously the inaccuracy of it began to bother me. My only income is from Social Security Disability payments. So the statement “I earn a living” isn’t particularly accurate. The sentiment of the joke that “I get by okay even though I’m not plush financially” is accurate. The real question is “Why can’t I answer the question directly?” Why can’t I respond yes or no to “Are you comfortable?” I was blessed to have my friend Rick Ruiz as my home health aide for three years. Somewhere along the way I started answering his “Are you comfortable?” inquiries honestly by saying “I’m not comfortable… But I’m okay”. This wasn’t a financial joke. I explained to Rick on a number of occasions that I never really am comfortable regardless of what position I am currently sitting. When he asks if I’m comfortable and I am as comfortable as I get I can say “I’m okay” but I can’t honestly say “I’m comfortable”. It was a stark realization and admission that I never really was physically comfortable in my normal position. But my comfort really didn’t matter because it was the only position in which I could sit and still be able to operate my wheelchair.
Ever since my arms finally gave out some time last summer and I could no longer drive my wheelchair, I began to adjust my normal sitting position. Rather than prop my right elbow on top of the control box, I begin tucking it in behind the box. My wrist would hang off to the right side against the armrest and it left my fingers free to hold my little pushbuttons for my ultimate remote. That left my body in a much more upright position. I began putting my head against the headrest which I normally did not do. The headrest was mostly used while riding in my van. In fact that was the original reason for adding a headrest to my wheelchair many, many years ago. Eventually I began leaving the headrest in given what I was not riding in the van because I did occasionally lean back against it. The problem was that the headrest was not in the proper “sitting around the house position”. It was only useful when I was sitting with my chest strap extremely tight in my “riding in the van” sitting position. I eventually found a way to sort of balance my head on the corner of my headrest for my normal sitting position. The discomfort of the corner of the headrest digging into the back of my skull was considerably less than the discomfort of having my head tilted sideways at a 45 degree angle all of the time. So with the elbow tucked in, and my head balanced on the corner of the headrest, for the first time in a very, very long time I was (choking on the words more comfortable) less uncomfortable.
Unfortunately there were consequences to sitting in this new position. My wrist began getting sore where it leaned against the armrest. We compensated by getting a little piece of curved cardboard that fit my forearm perfectly. We tried gluing it on to the armrest but my arm would change pay position from time to time and the glue would not stick anyway. We finally just got to the point where we would stuff it underneath my arm as needed. That worked well for several months. Then I started having problems with my armpit and chest area right above my nipple. With my elbow always tucked in instead of high up atop the control box, my back brace was digging into my chest differently than it had for God knows how many years. I’ve made minor adjustments in the way I put the brace on and I’ve taken to applying some analgesic cream to the area each morning. I am managing that situation reasonably well but there have been many days where I’ve had to put my arm up and down sometimes every 15 or 20 minutes. I tried putting a pillow under the elbow but that threw everything off and made my wrist go numb.
Another consequence of the loss of the use of my arms has a potential effect on my normal attire. For over 30 years I’ve not worn long sleeve shirts. Even if they were lightweight, the sleeve would impact my arm sufficiently enough that I could not drive. I’m not been able to drive with a coat or jacket on for many, many years. But a few months ago I was visiting my sister’s house and they tend to keep the place considerably cooler than I normally like. Dad knows to wear a sweatshirt whenever we go there. So one day I was sitting there freezing my ass off and it occurred to me there was nothing to keep me from wearing long sleeves anymore. And the way that I intended to drive the new wheelchair was not going to be impeded by long sleeves. I need to go shopping for sweaters, sweatshirts, and perhaps a long sleeve dress shirt. I don’t own any and haven’t for years. Even my good shirt that I wear on the rare occasions I dressed in a suit and tie is a short sleeve shirt.
That was the state-of-the-art from sometime in late summer last year up until the new wheelchair arrived. One of the things that had made me reluctant to get a new chair for many years was the idea that I was going to have trouble adjusting to it and getting at least as comfortable as I was in the old chair. All of the constraints to my comfort such as needing to be able to drive were now gone. In the months waiting for the new chair, there were things I might have done to the old one to make it more comfortable such as redesigning the headrest. However that would’ve been wasted effort on a chair that I was destined to put in mothballs sometime soon. Dad and I often talked about the fact that once the wheelchair came, it might be a very long time until we got me “comfortable” or at least “okay”. I’ve been sitting in the same position in the same chair for so many years that any changes that have consequences. This was proven by the fact that sitting in my old chair in a different position had had consequences. But at least with the new chair we could start to address the problems and not have them wasted effort.
Mushy Butt
A key element of my comfort is something called a Roho seat cushion seen on the right. It is an inflatable seat cushion with rows and columns of blob shaped chambers. When you sit on it, the air flows from one chamber to another until the pressure equalizes. Over the years I had tried a variety of foam cushions, gel-filled cushions and I forget what other options but the Roho was the only thing that really worked consistently. I use of problems with them springing a leak every few months but when we replaced the cushion completely one time, we ordered it with a nylon cover. Either they started making the cushions more durable or the cover really protected it well because the last cushion I had lasted for more years that I can remember.
When I did my test drives in the other wheelchairs we put my old Roho into the new chair. It wasn’t very comfortable at all. I normally keep the cushion barely inflated. I found that if I fill it up too much that it was too mushy. I felt sort of round bottomed as if I was going to tip over. But sitting in the demo wheelchair I was definitely not mushy enough. Because my existing Roho cushion is very old, we told them to order a new one. When the new chair arrived, what was supposed to be a “low-profile” version of the cushion looks a lot taller than the one that I was using. Even given the fact that I normally underinflated mine, it definitely is taller. The new model is called a Quadro version. The various cells are divided into four groups and there is a valve that you can close internally so that pressure cannot go from one group to the other. That was a feature I really didn’t need but it didn’t hurt anything. Well no that’s not exactly true. I later discovered that the valve which closes the four chambers from one another was poking me in the back of the leg. We just turned the cushion around so it’s at the back and there was no problem.
Theoretically my normal underinflated cushion should have felt the same between my old chair and the demo chair. In the old chair there is a piece of Masonite pegboard under the cushion. That all sits on the curved Naugahyde seat of the wheelchair. Over the years the pegboard has warped considerably as you can see in the photo below. Both sides of the pegboard are about an inch and a half higher than the center. But in the new chairs, the seat is a solid piece of aluminum which is completely flat. Dad and I had already made plans that we might have to put some sort of curved surface between the flat metal seat and the new Roho. When the chair arrived we tried using the new Roho directly on the metal seat. It felt really good because we had it inflated much more than usual. I always start out with the seat overinflated and then gradually let air out until it’s where I want it. The first time I sat in the wheelchair the day they delivered it, it was surprisingly comfortable. I still felt very round bottomed and mushy butt but again the way I sit these days with my head in a fixed position and my chest strap and lap belt very tight, having a mushy butt sort of felt good.
After a day and a half of sitting in the new chair I decided that the seat was going to need a bit of adjustment to compensate for that curve that I was used to. When sitting in the old chair, I did not sit in the middle of the seat. I would sit far off to the right side. That puts my right hip on the high part of the curve in my left hip in the middle of the dip. I concluded that I needed that little boost on the right side to compensate for the strange twist in my pelvis and lower spine. Dad cut a piece of plywood and made a wedge just for the right side. Here are some photos of the wedge and the new Roho sitting on top of it.
I mentioned that my Uncle Keith came by on Thursday and brought a bunch of parts from my cousin Nancy’s old wheelchairs. Dad installed one of the headrest that he brought and added a couple of extra pieces of foam to it in strategic places. He installed the wedge under the Roho cushion. Friday which was the fifth day of the new wheelchair was my first day of sitting in the new chair with the wedge under the cushion. It worked exactly as I had hoped. The new headrest was a keeper as well. On Saturday I sat in the old chair because I was planning on going to church Saturday night. We do not yet have the proper tiedown equipment for the new chair in the van. As it turned out the weather was nasty Saturday and I did not go to mass after all. But sitting in the old chair gave me quite a surprise. I can actually say that I was more comfortable in the new chair that in the old one.
Disaster Recovery
When I left off my previous installment of the blog we had just accidentally disabled the joystick and left the chair permanently stuck in attendant drive mode. Dad could drive me around the house using the joystick on the back of the chair which you can see below. But I couldn’t do anything with the chair myself. Furthermore it was stuck in such a condition that I could no longer get into the programming menus.
My mother was a great troubleshooter. She like to take a multi prong approach to problems. For example in an emergency she would call 911 and then would call our parish prayer chain. Learning from her example I tried multiple approaches as well. I sent an email to both Patrick and Aaron who were the wheelchair technicians who delivered the chair. I explained that we had been getting joystick error messages. I had tried to correct it by going into programming mode. Somehow we got locked out of programming mode and the joystick no longer works at all. We are stuck in attendant drive mode. I could’ve called them but I wanted to weigh out all the issues in writing so I was sure they would understand everything that was going on. I then started doing Google searches to see if I can find out something on my own.
I came across a wonderful website called wheelchairdriver.com. It is run by a guy in England who seems to know what awful lot about power wheelchairs. He has built several of his own and he has an online forum full of other people just like me. I posted a message describing my problem. They also have a section of the discussion forum for introductions so I wrote a brief bio of myself and posted links to my blog. They said literally “you’ll find this place full of people a lot like you”. As far as my technical question, it only took a couple of hours and I had several replies. They didn’t know what was causing the joystick error although they had some ideas. But they definitely knew what was wrong that I could no longer get into programming mode. They reassured me that I should not feel like an idiot. I was not the first nor would I be the last user to enter that forum having accidentally locked up their programming. That made me feel a little better.
It turns out that there are different levels and methods of programming a PG Drive Technology R-Net Onni wheelchair control system. I had been using the least capable (and one would think safest) level which is called onboard programming or OBP for short. The second level is called “dealer programming”. It uses a gadget called a “dongle” that dealers have which authorizes them to get into more things. Dealers also have a handheld device called a programmer that allows them to do various programming tasks. I think that may be for wheelchairs that did not have the LCD display that mine has but still needs some sort of programming or calibration. I’m not really clear on what the dongle does as opposed to the handheld programmer. The third level of programming is called OEM programming. It is for the people such as Sunrise Medical who manufacturer the Quickie wheelchairs but purchase the controller equipment from PG Drive Technology. The people in the forum weren’t exactly certain whether or not a dealer programmer would be sufficient to get me unstuck or whether I would need OEM programming.
One of the ways that you could reprogram the device is using a special USB cable and connecting it to a PC and using special software. So I began investigating the possibility. Naturally anything I could do by plugging something into a computer and doing it with software was going to appeal to me. I’m not capable of pushing the menu buttons on the LCD display but if we could plug my chair into my PC then I can use my voice control to operate any software. Google searches for such devices led me to a pricelist from some dealer saying that the devices cost about $400 or more. There were also a couple of units on sale on eBay for similar prices but one of them was up for bids at $180 with three days to go in the auction. Over the weekend I continued to bid against someone up to $225 but when it reached $250 and I wasn’t really sure if it would fix my problem I decide to drop out. It ended up going for about $300.
Also on that Friday my foam tubing arrived from Amazon. There were two pieces each of red, yellow, and blue foam of different diameters. Each piece was about a foot long. It turned out that the red foam was the proper diameter and a 1 foot piece was a little bit short. We plan to put two of them end to end perhaps gluing them together and then trimming the extra long piece to the proper length. We spent some time bending the bars and trying on the foam padded device. It looks as though it was going to work as well is the one we had use on the successful test drive. I didn’t really like using the bright red piece. I was hoping the blue one would work since TARDIS blue is my chair’s color scheme.
I spent the rest of the day working on the blog and catching up on TV. The week had gone by so quickly I have forgotten that I had tentative plans for the weekend to go see Batman vs. Superman with my friends Rich and Kathy. We had never finalized plans and there was some miscommunication about which weekend we were going. But I was so preoccupied dealing with the new wheelchair that I had totally forgotten about the movie. I sent an email to Rich and we made firm plans for the following weekend.
“Evening came and morning followed — the fifth day” Genesis 1:23
“It’s Good to Be King” – Not!!!
You might presume that I would tell you what happened on the sixth day and then I would quote Genesis 1:31 which is followed up by the explanation that on the seventh day God rested. Much to my disappointment I’m not God so I rested on the sixth and seventh day both. I monitored my losing eBay bids, swapped some more messages at the wheelchair support forum but mostly I just goofed off watching racing on TV and playing an online computer game.
For about nine years I’ve been playing a browser on the game called Travian. It is a strategy and tactics simulation where you build little villages, produce resources, train troops, form alliances, and attack your enemies. It takes about four months to play an entire round of the game. You log into the website several times a day and tell it what to build, who to attack etc. I first started playing the game when my mom had cancer. It was a little bit of fantasy escape to get my mind off of worrying about her. I made some good online friends and have lots of fun over the years. I haven’t played it continuously but I play it quite a bit. The new version called Travian Kingdoms is organized a bit differently in that you have some players who are called Kings and the remaining players are their governors. An alliance can have up to three Kings and an unlimited number of governors under them. I’ve always played an ordinary governor but in the current round we’ve had three Kings who have given up and left the game. Because I’m such an experienced player I had built more villages with larger population than anyone left in our group. Despite my best efforts to get someone else to volunteer, I got appointed to be the new King.
One of my favorite lines from Mel Brooks’s “History of the World Part 1” is when he says “It’s good to be King” with a cheesy grin on his face as his servants are waiting on him. Apparently Mr. Brooks never played Travian Kingdoms. Being King is a pain in the ass. You have got all of the responsibility of managing everything and it makes you a bigger target for people to attack. The guys and gals who were playing with me all told me I was doing a great job but I think they were more interested in the fact that they didn’t have to do it themselves. I had never played the King position before in the game and really didn’t know how to work the controls or what the requirements were. So I was learning by doing in a hurry. I would like to try being a King at the beginning of the game where I could plan for the strategy from the beginning. Taking over in the late stages of the game was a lot of work. But it did what Travian has always done for me. It took my mind off my troubles. In this case the trouble was I’m sitting in a $40,000 brand-new wheelchair that I had waited 10 months to get and somehow I managed to break the damn thing and the quickest I might get a solution would be Monday. So I blew the weekend being a King.
In this installment we will cover the third and fourth days of working on the new wheelchair. We start to work on the new bib mount and continue to make other adjustments.
If the Shoe Doesn’t Fit…
We are now up to Wednesday which was the third day of the new wheelchair. We started out the day by sitting me in the new chair. Dad had previously shortened the foot rests so we were anxious to see how they fit. Somewhere along the way we miscalculated because both of the rest were still too low. For the time being we would put a pillow under my feet and dad would have to go back and get out the sawzall and shorten them even further.
The headrest wasn’t exactly like I wanted it but it was good enough to get me through the day. We would do more tinkering with that later. When the wheelchair technicians were here they had raised my left arm rest as high as it would go. It still wasn’t high enough but as a temporary measure we put a pillow under my left arm.
Getting In the Mode
There is an LCD display mounted on the right arm rest. The chair has various modes that you can put it in for driving indoors or outdoors or for using the attendant controls. It also displays an image of the seat when you are in seat adjustment mode so you know which part of the seat you’re adjusting. For example when you push the mode button it would say one of the following “recline”, “tilt”, “recline and foot rest”, “both foot rests”, “left foot rest”, “right foot rest”. If you moves the joystick forwards or backwards it moves that item. If you tap the joystick left or right it moves to the next seat item such as going from recline to tilt and so on. Of course until I get a mode change button, I wasn’t going to be able to operate any of this.
The LCD display was mounted pretty far forward sticking out in front of the armrest. It actually made the chair a little bit difficult to drive it through a narrow passage because it was sticking outside and so far forward. We would later adjust it so that it was not sticking outside or the front so far. When we got that adjusted, the little bar where the display is mounted actually is in a very good position where I can rest my right arm and still be able to hold the micro switches for my ultimate remote control.
I forgot to mention in an earlier post that I solved the mystery from the first day. When Patrick and tried to plug in the user control button for changing modes, it would turn the power off and on but would not change modes. That first night after I was in bed I got on my laptop and did some Google searches and found a PDF downloadable version of the technical manual. It turns out there are 3 places that you can plug in such a pushbutton. One of them is the user button for joystick port 1, the other is user button for joystick port 2, and the third one is for an extra power switch. He had been plugging the button into the wrong hole. That call to technical support was really unnecessary. I sent him an email the next day to tell him I had solved our mystery.
Anyway with a little adjustment we had managed to get me really comfortable. This would be my first full day sitting in the new chair and it turned out pretty good.
“For my yoke is easy”–Matt 11:30
According to Matthew, Jesus says his yoke is easy but building a yoke around my neck to hold my new joystick was going to be quite a challenge. I had done a test drive using a bib mount from a company called “Switch It”. We are still using their joystick. However the bib was too tight around my neck and that’s why Patrick had replaced it with a different model that used straps instead of a solid bar. Unfortunately the straps would not hold the device steady enough. We could’ve told the wheelchair people to go ahead and order the original device from Switch It and we could’ve possibly bent it to fit. I had already thought about the possibility of building one from scratch after I saw the original test unit. Given the delays we had faced in getting any equipment at all the obvious choice was to build one ourselves. On the right is a photo of the gadget we were trying to re-create from scratch.
The main structure of the original one was a 1/4 inch or perhaps 3/8 inch aluminum rod bent in a U-shape. Dad found some one quarter inch stainless steel rod in the garage. It was left over from when he made some stainless steel weenie roast and marshmallow roast sticks that we used to use at the lake. He had no trouble bending it into the appropriate shape. The next job was to find some sort of foam tubing to slide over the bar to pad the device so that would not hurt my neck. I did lots of Google searches for foam rubber tubing and I found a place that would sell us exactly what we wanted and the cost was only $2 per foot. Unfortunately the minimum order was a 60 foot roll.
One of the great things about being a “maker” these days is that there are lots of makers out there was a wide variety of experience. There is a local maker space called “Club Cyberia” on the east side of Indianapolis that has a great bunch of people building all sorts of amazing projects. I visited their facility early last year to get some insight before buying my 3-D printer. I continue to follow all their activity on Facebook and I contribute to their discussions whenever I can. I asked them on Facebook if they knew of a place to buy foam tubing. They suggested the local industrial supply place called Grangers. We have had a Grangers catalog in this house for as long as I can remember. Dad buys all sorts of stuff from them for work or for his own projects. I felt kind of silly not thinking of them. Unfortunately they didn’t have anything small enough to meet my needs.
Meanwhile further Google searches found the following item on Amazon.com. It is a package of for long pieces of foam padding of various sizes and colors made by a company called “Ableware”. It is specifically intended for people who have physical disabilities and have trouble grasping ordinary objects like spoons, forks, toothbrushes etc. as you can see in the photo below. I immediately ordered a package on Amazon prime and it would arrive by Friday.
Now we turn to the mechanical portions of the mount. The two halves of the U-shaped bar are joined by a plastic bar that goes across them. I would have no trouble 3-D printing that. It’s just a straight bar with a hole on each end for the rod to go through. On the original Switch It bib mount they had a complicated set of ball and socket joints that allowed you to twist, bend, or pose the position of the joystick. I wasn’t sure that 3-D printer plastic was sturdy enough to create ball and socket joints with set screws to hold them in position. Also I wanted it to be as small and lightweight as possible but it is very difficult to print extremely small parts on a 3-D printer.
I did know where I could get parts that might do the trick. It was another instance of what I previously described as “just-in-time technology”. That is my term for the rather creepy experience I have had that whenever I need new technology to solve a particular adaptive equipment need, either by amazing luck or more likely divine providence that technology suddenly becomes available. Shortly after I did the first test drive with the bib mount and was thinking about what it would take to re-create one from scratch, my favorite electronics supplier Adafruit.com started selling some camera mounting hardware. I was especially interested in this ball and socket tilt and swivel camera mountshown on the right. It may seem strange that electronics company is selling camera mount equipment but they have all sorts of maker products. The camera mounts are featured that product in a tutorial on how to build your own computer controlled, motorized sliding camera mount useful for nice professional looking videos and time-lapse photos. Here’s a link to the tutorial. Here is a YouTube video showing how they created the mount.
They also added a couple of other camera mounting products like 1/4 inch screw adapters and set screws as used on camera mounts. So I went to the Adafruit store online and ordered a variety of parts which would arrive on Monday.
Each Wednesday night Adafruit hosts a live video chat using Google hangouts. If you have a WebCam you can join the discussion and show off your maker projects. I’ve done it a number of times before. Most people hold up their projects to the WebCam to demonstrate what they built but that’s a little bit difficult for me. I got in the habit of just having dad take photos of my gadgets. I use the same photos here on the blog or for showing off at the weekly Show-and-Tell. I spent the rest of the day on Wednesday preparing some photos of the 3-D printing parts I had already made for the joystick mount and to preview the fact that I was going to be using Adafruit parts and the rest of the design. Here is the video of my presentation on that particular evening. My section of the program starts at the 18 minute mark. The guy who presented just before me was so long-winded they couldn’t get him to shut up.
“Evening came and morning followed — the third day” — Genesis 1:13
A Minor Disaster
On Thursday, the fourth day of the new wheelchair, I decided not to sit in it so that dad could do more adjustment on the foot rest. That morning we got a phone call from my uncle Keith who said he wanted to stop by and visit that afternoon. His daughter, my cousin Nancy, recently passed away. She had spent her life in a wheelchair because she was born with spina bifida. Keith brought us a big box of leftover parts from some of her old wheelchairs. They were mostly headrests, brackets, and foam padding pieces. We figured there was something in there that we might be able to use. As it turned out they headrest that I ended up using was one that he brought us. Other pieces of foam padding also turned out useful for placing between my right side ribs in the armrest of the wheelchair and is a temporary pillow for the left arm rest until we can come up with something. We spent the entire afternoon visiting with him and talking about all of the troubles that Nancy had been through fighting her illness. I also had the opportunity to show him my 3-D printer. I made a souvenir for him. A 3-D printed thing to hang on your keychain. It had his name on it in raised letters.
That evening we did some tinkering with the new chair. Dad had noticed that when he tried to operate it using the mouse controlled joystick that the display unit would show “joystick error”. I had him push the buttons to get it into programming mode to see if I could figure out what was configured improperly. The process for pulling up the programming mode is to hold down the “Profile” button which is used to switch the chair from different driving profiles such as indoor, outdoor, attendant. While holding that button down, press and hold the power button. Then you release the profile button and wait for a beep. Then you release the power button. An icon of an hourglass appears on the LCD screen briefly and then you get into a series of menus. I had been studying the technical manuals and was pretty familiar with what was available in these menus. We tried swapping the joystick between port 1 and part 2 and doing other adjustments but we kept getting the joystick error message. I later learned that one of the things that can cause this problem is that the joystick was not properly calibrated in the programming menu. I began to speculate that this particular setup step had not been done given my discovery that the wheelchair technicians seemed unfamiliar with the contents of the technical manuals.
At some point something went wrong. The joystick stopped working altogether. You could still operate the attendant joystick in the back of the chair but nothing else seem to work. It was stuck in the attendant profile. I figured that was no problem. I would just go back in and undo whatever setting I had previously done. Unfortunately pushing the buttons in the proper sequence as I described above would no longer get me into the programming menus. We tried using 2 different joysticks plugged in either port. We tried pushing the buttons slower or quicker. Nothing that we did could get us back into the programming menus.
It was only the fourth day that I owned the new wheelchair and I had broken it already.
“Evening came and morning followed — the fourth day” Genesis 1:19
In my previous installment I described the events leading up to the delivery of my new wheelchair and the arrival itself. In this installment we will talk about what happened over the next day or two as I try to adapt everything to my needs.
Finally I NEED a 3-D Printer
When the prices of 3-D printers began to get reasonable, I began lusting for one almost uncontrollably. The only thing that held me back with the concept that no matter how much I wanted one I didn’t really have any use for one. I think that’s the dilemma most 3-D printer owners face. They are cool gadgets that you just want to own. You can do lots of neat things with them. But do you really “need” one? Finally my wants outweighed my lack of needs and I indulged myself as a 60th birthday present and bought one. While I have made some useful plastic boxes for my electronics projects and made some fun toys and Christmas ornaments, I still really didn’t “need” a 3-D printer until right now.
In the previous post I showed that the bib mount for the joystick was designed for chin use and not mouth use like I had planned. No amount of adjusting it was going to get the joystick up to my mouth. I was going to need to build a new bracket to reposition it. The 3-D printer with the perfect solution to this task.
After the wheelchair technicians left, we had supper and then I went straight to my office to begin designing the new bracket. As you can see in the image below, the joystick is sitting in a round socket. It is held there by a small set screw. I can remove the joystick from the socket, build a new support that fits there. Then I can mount the joystick in a new socket on top of the bracket. I also need it to be able to tilt up or down to adjust the position and angle of the joystick.
Here is what the part looks like in my CAD design program called Blender 3-D. The bracket is in two pieces. There is a long cylinder object that will fit into the socket where the joystick used to be. On top of that is a new socket to hold the joystick. It can pivot forwards and backwards and will be held to the long piece with a screw. The new socket can be tightened with a screw as well so it will grip the joystick.
I got the design pretty much done the evening of the day the chair arrived but I didn’t have time to print it. I ate my usual snack and went to bed. But it was nearly impossible to sleep thinking about all the modifications we needed to do on the chair.
“Evening came and morning followed. The first day.” Genesis 1:5
Dad and I Do Our Thing
It’s now Tuesday March 29 and Dad and I sort of got into our “Liam Neeson in Taken” mode. To paraphrase the movie “we are men with a particular set of skills”. For my part that means putting the final touches on the CAD design for my new bracket. For dad it means getting out his power sawzall and power drill and getting to work shortening my foot rests. Because he was going to be working on the chair and we still didn’t completely have the headrest and other comfort items adjusted properly, I spent the day in my old wheelchair.
When printing objects on a 3-D printer. It’s best if you have a flat surface on the bottom. So the cylindrical parts of the bracket couldn’t lie down on their side or they would have a flat side and they would not come out very cleanly. So the tall part of the bracket has to stick straight up in the air. It’s about four and half inches long. I had never printed a tall skinny piece like this before. I was worried it would come unstuck and fall over. Fortunately it printed just fine as you can see here.
When I completed it, dad took a break and assembled my creation. Like always, you occasionally have to do a little filing or scraping objects to get them to fit together precisely but it wasn’t too hard to assemble. I had made a small test piece to get the tolerances right. Here is a photo of the device assembled just like I had planned it. And below that are photos of the device sitting around my neck.
It was everything I intended to be. There was just one problem… It didn’t work. Oh my bracket worked just fine. But every time I tried to move the joystick with my mouth, the entire device would wobble around. You recall from the earlier post that I had done a test drive with a bib mount that was made of a stiff metal rod that bent around my neck. It would hold the joystick very steady. This gadget was just hanging from a couple of straps. It even though we had not yet molded it to fit my funny shaped chest, I didn’t have any confidence that that would stabilize it. I had seen a photo on the vendor’s website that showed optional additional straps on the lower corners that went around your back. That might have stabilized it a little bit better but I really didn’t like that idea and I wasn’t sure it would work. So it was completely back to the drawing board. Because the metal bar device which we had tried did not come in a larger version, we would have to fabricate one from scratch. And given that we both have “a particular set of skills”, that would be entirely possible.
Dad completed the work on the foot rests and we spent the rest of the evening catching up on TV.
“Evening came and morning followed. The second day” Genesis 1:8
My new wheelchair has finally arrived! Before I tell you about the day that it arrived and what we have done with it so far, I want to briefly recap the journey thus far.
A Very Long Journey
On Wednesday May 27, 2015 I had my first meeting with a man named Patrick Phillips from a company named National Seating and Mobility to see about getting a new wheelchair. In both this technology blog and my personal blog I’ve chronicled some of the reasons why I need a new wheelchair even beyond the fact that the one I’m using is nearly 30 years old. Here is a link to a collection of blog posts about why I needed new wheelchair and some of my history of previous wheelchairs. It is been a very long and difficult process to find the kinds of specialized wheelchair controls that will allow me to continue to drive my chair myself perhaps even better than I’ve been able to do recently. We have had 2 different loaner wheelchairs and a variety of different specialized controls over the past 9 months. We waited for months at a time to get this demo equipment. And then there were months of paperwork, doctor’s visits, therapist evaluations, and Medicare and Medicaid approvals.
When we started in May of last year I knew it was probably an impossible dream that I might have the chair in time for my 60th birthday party in July. When I saw how long everything was going to take I reset my sites on Christmas. That was just as impossible. Around Christmas and New Year’s I told people that I wasn’t hoping for Valentine’s Day but perhaps by St. Patrick’s Day. Bit by bit I started getting notices that the insurance was approved and at one point they told me the equipment had been ordered. I sent him an email on March 9 and they said that the equipment had actually arrived the day before and all they had to do was assemble the chair before delivering it to me. Patrick suggested it might be ready by that Friday. The next week another email said again by Friday.
My Holy Week Meltdown
One of the things that prompted me to finally get the new wheelchair was an incident at the Easter vigil mass a year ago. That is the night before Easter celebration where the people that I’ve been teaching in RCIA get baptized and receive the sacraments for the first time. The ceremony is 3 hours long so it runs late into the evening which is when my arm is the weakest and I have the most difficulty driving my chair. I have asked one of the ushers to check in with me a couple of times during the ceremony to see if I needed anything. I should’ve had him specifically check with me when it was time for the baptisms. Our baptismal fountain at Saint Gabriel is at the back of the church and I would have to turn around to see what was going on. When I tried to do so, my arm just would not cooperate. Fortunately none of the people in the English-speaking RCIA class that I teach were being baptized. They were being confirmed, receiving First Communion, and making a profession of faith all of which took place at the front of the church. The baptisms were for children or people attending the Spanish language RCIA classes. I still would’ve liked to have been able to see the ceremony. I think this was the final straw that broke the camel’s back and made me decide that I really needed the new chair. As it turned out somewhere in August or September I quit driving my wheelchair and all. Even when my arm was in good shape I could not get it propped up into position to drive. Dad would have to position my hand for me before I could move. Even then sometimes I couldn’t drive once I was in position. So it was easier to just have dad push me around the house. Had I known this whole process was going to take nearly a year I might have started everything much sooner.
So when Holy Week rolled around and I realized that I still did not yet have my wheelchair, I got very emotional. I wrote Patrick an extremely nasty email saying that I realized that much of the delay was not his fault. But the fact that my wheelchair had been sitting in his office collecting dust for two weeks and my emotions about Easter coming and still no wheelchair. It was just too much. Fortunately I somehow got the courage to delete the email before I sent it. Instead I want one titled “I’m out of patience” and I started out by telling him that I had written a nasty email and then deleting it. The one that I did send was only marginally civil. But I told him “If you think this is terse you should’ve seen the one I didn’t send :-)”
The next day we received a phone call saying that the chair would be delivered on Monday March 28 which was the day after Easter. I probably wasn’t going to go to the Easter vigil anyway because I’ve had problems with a sore shoulder that makes it difficult for me to sit in one position for a long time. And I have retired from teaching RCIA (another emotional issue complicating matters). On Good Friday I received an email from Patrick saying that he would check with the office to see when it would be delivered. Apparently he was unaware that I had received a phone call. He was apologetic and explained that the office is in transition. I wasn’t sure what that meant. Transition into bankruptcy perhaps? Transition such as Bruce Jenner? At one point I was angry enough to transition someone by cutting their parts off :-). I later learned that the recent delays have surrounded the fact that National Seating and Mobility is apparently consolidating 2 Indianapolis offices into one location. I just got caught in the chaos of that move. Anyway over the Easter weekend I told people I would believe the wheelchair when I saw it.
IT’S FINALLY HERE!!
TARDIS from the sci-fi series Doctor Who
Early Monday afternoon March 28 it finally arrived.
A technician named Aaron arrived with the chair and said that Patrick was not far behind. He arrived a few minutes later. The first thing that I noticed when it came through the door was that it was all black. That was okay. I had asked for it to be blue. If you’ve been following my Facebook posts you notice someone asked me if I was going to have a wheelchair that was a TARDIS. That’s a big blue box that sci-fi character Doctor Who uses as a time machine/spaceship. My reply was no, but it was going to be TARDIS blue in color. Although I had told Patrick that I wanted blue, I had not made a big deal about it and I was worried he had forgotten. When I saw black come through the door that was okay. Then on closer inspection I realized that the lower frame was indeed blue and I recalled that looking at it on the website when it showed color selections it was only that lower frame that was painted a different color. So I did get my TARDIS blue after all.
The next thing that I noticed was the foot rests. The first demo wheelchair that I had tried included power elevated foot rests. I wanted the entire chair to be able to power tilt and recline but I was a little bit afraid of having some machine move my legs because my knees are very sensitive and my legs do not straighten out but a few degrees beyond the normal sitting position. The second demo chair that I saw did tilt and recline but did not have power leg rests. That’s what I thought I was getting. My new chair has power leg rests. I will just have to be careful with it and make sure that I don’t accidentally move them. And there may in fact be times when raising or lowering the foot rest a few degrees might make my legs more comfortable. If it gets to be a problem we can always disconnect or disable them. It kind of pissed me off that Medicare/Medicaid was paying thousands of dollars for a feature I didn’t particularly need or want. I had seen a parts list before it was ordered but it wasn’t immediately apparent from the description that it was going to have power leg rests. I should’ve gone over the list with Patrick in more detail. My bad. Sorry taxpayers.
Patrick explained that when he orders a chair, he sends them all of my measurements and they are supposed to have it pre-adjusted to those dimensions. For the most part it was pre-adjusted to the right size. However one item that definitely needed some attention was the foot rests themselves. They were definitely too long and my feet would not have reached no matter what the angle was. Patrick and Aaron went to work with a variety of wrenches to shorten the adjustable leg rests. There was also a side pad where your leg goes and a back pad where your calf rests when the chair reclines. Those had to be loosened and pushed up and then push up on the foot rest to shorten it. Each of them had three or four bolts that needed undone and redone. Even when they had adjusted everything, it was still too short. For the time being we decided to put a pillow under my feet. In addition to the foot rests we also adjusted the armrest height for the left arm because I like to keep it much higher than most people would use. Again it was not able to be adjusted as high as I wanted it. We’re going to get some padding to put on top of the armrest to raise it up. It also needs padding because it is a very hard surface.
Taking My Seat for the First Time
It was finally time for me to sit in my new wheelchair. Dad bought out the Hoyer lift and picked me up and set me in the new chair. I looked at the clock to memorialize the moment. My butt hit the seat at 3:12 PM, March 28 2016.
We strapped me in with the new lap belts that came with the chair. I also use a chest strap to keep it steady. We had a spare chest strap ready to go and we got that fitted around me.
We then turned our attention to the headrest. They had about three different kinds available and we finally found one that would work on a temporary basis. Dad and I are probably going to have to redesign something different at some point. The headrest I currently use was something that we built ourselves years ago. I think we will be able to take the parts they gave us and make something more permanent that will do everything I needed to do but for the time being we had my head propped up in a good enough position on a temporary basis.
No Joy for the Joystick
We now turn to the joystick controls. I had tried a variety of different control systems. We waited for months to get a demo of one that turned out to be totally useless. The one that we finally decided on is something called a bib mount. It hangs around your neck like a bib and holds the joystick in front of your face. I then move the end of the stick by pushing it around with my lip. Some people use the same kind of mount to move the stick with their chin. These are typically spinal cord injury quadriplegics who still have movement in their neck muscles but my neck doesn’t move because the muscles are too weak to even hold my head up. The photo below shows the device that I tried. This is not me in the photo.
You can see a video of me test driving the demo wheelchair in this blog post. This system worked really well however it was too narrow to fit around my neck. The bar going across the bottom that actually holds the joystick can unsnap from one side and you spread the bar apart to lift it over your head. But when I tried to put it around my fat neck it wouldn’t fit. We had to force it together to get the clamp to hold. Patrick told me he thought that the device came in 2 sizes and that he would order the larger size. So I was expecting to see a larger version of the same device when he arrived. Unfortunately he said that it doesn’t come in a larger size after all. Instead he ordered a similar device shown here.
This one consists of a hard plastic plate that hangs around your neck with an adjustable strap. Because my chest has a weird shape to it because of my back brace, we were going to have to bend the plate to fit the contour of my chest better. The instructions say that you can heated up with a heat gun or even a high-powered hairdryer and mold it to whatever shape we needed. However when I tried it on, it was obvious that there was no way I can adjust it to reach my mouth. See the image below. As I explained earlier, many people use a bib to move the joystick with their chin. I would have to design a new bracket and create it with my 3-D printer. I was confident that I could do that. More on that later.
When “NO” Doesn’t Mean “No”
In order to operate the recline and tilt features of the wheelchair you have to shift it out of driving mode into seat adjustment mode. You can also cycle through various driving profiles with labels such as Indoor or Outdoor. These different profiles adjust the sensitivity of the joystick and sort of modifies the power curve for whether you are a working with a smooth flat surface or running over rough ground. So in addition to the joystick you need a button called a “user button”. We haven’t quite figured out how I’m going to do that yet because I already have three pushbuttons in my right hand that I use to control my ultimate universal remote. I described that remote in this previous blog post. Basically it can control every TV, cable box, DVD player, computer mouse and keyboard via infrared remote and additionally has a Bluetooth connection to my iPhone to control it without having to use the touchscreen. Patrick brought with him a couple of different pushbuttons that I was going to try. There’s a slim possibility that I can hold it in my left hand. When he tried to plug it in, it would turn the power off and on but would not change the mode.
We figured out how to get the display panel into “program mode” but we couldn’t figure out what we needed to change to get it to recognize the button. There are 2 ports that you can plug things into. We tried switching from port 1 to port 2. There was a setting that said the mode button was set to “NO” which we figured meant “no switch”. When we tried to change it to “YES” instead of saying “YES” it said “NC” which they interpreted to mean “not connected”. We ended up calling tech support from the place that actually manufactures and sells the wheelchairs. They talked us through how to get the proper settings. It turns out that “NO” and “NC” means “normally open” and “normally closed” describing what type of pushbutton you have. Some buttons which are normally open when you push them it closes the circuit. You might want to use a normally closed button because the wheelchair can then detect if the button has accidentally been pulled loose from its socket. It would see any brief disconnection as the normal pushing of the button but a very long open circuit would mean that something that had gone wrong. Anyway we got the button to work but I didn’t play with it at that time. I just wanted to make sure it would work for me to play with it later.
Don’t Forget the Paperwork
I now it was about 4:30 PM. Aaron had another client he needed to see briefly before the end of the day so the guys had to hit the road. Patrick said that he would bring me some adjustable blocks to put on the foot rest so that they would fit my feet. He is also supposed to bring me some armrest padding to try out. There was one more thing we needed to do. Sign the paperwork. We told them a funny story about the first power wheelchair that I purchased when I was a senior in high school. I had been given a power wheelchair when I was in fifth grade but it belonged to Roberts School and they just let me use it as long as I maintained it in good shape. When I was a senior in high school and was about to graduate, we needed a new wheelchair. We purchased it from a company called Baker Brothers. When it arrived, dad and I went to their showroom to pick it up. The guy brought the chair out and then he went on dealing with another customer and doing things in the back room. Dad decided to go ahead and blow the wheelchair into the van while we waited on him come back. We waited maybe 20 minutes after that and finally dad said “To hell with this let’s go.” I agreed and we left. We had just gotten back in the door at home when the phone rang and they said “You had some paperwork you were supposed to sign”. We told them that they should have not made us stand around all day. They brought the paperwork to us and we signed it. Things certainly have changed in the 43 years since then. This time dad signed the paperwork using a stylus on an iPad and they emailed us a copy afterwards. These days the paperwork is paperless.
After the guys left, we took a couple of photos of me sitting in the chair and I posted them to Facebook. Those first photos are the ones shown earlier in this post. In the next installment of this blog I will describe what we did that evening and the next day to work out some of the issues that still needed to be resolved.
 When I first got my Printrbot Metal Plus 3D printer I had lots of difficulty getting the prints to stick to the build plate. I didn’t want to use blue painter’s tape because I already had Kapton tape on the plate and I wasn’t sure if perhaps I would someday be needing to print ABS which requires the heated bed. I didn’t think that would work very well with painter’s tape.
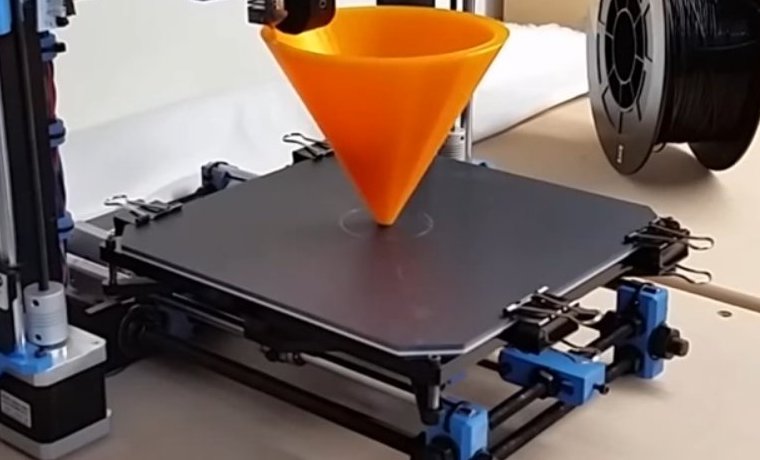

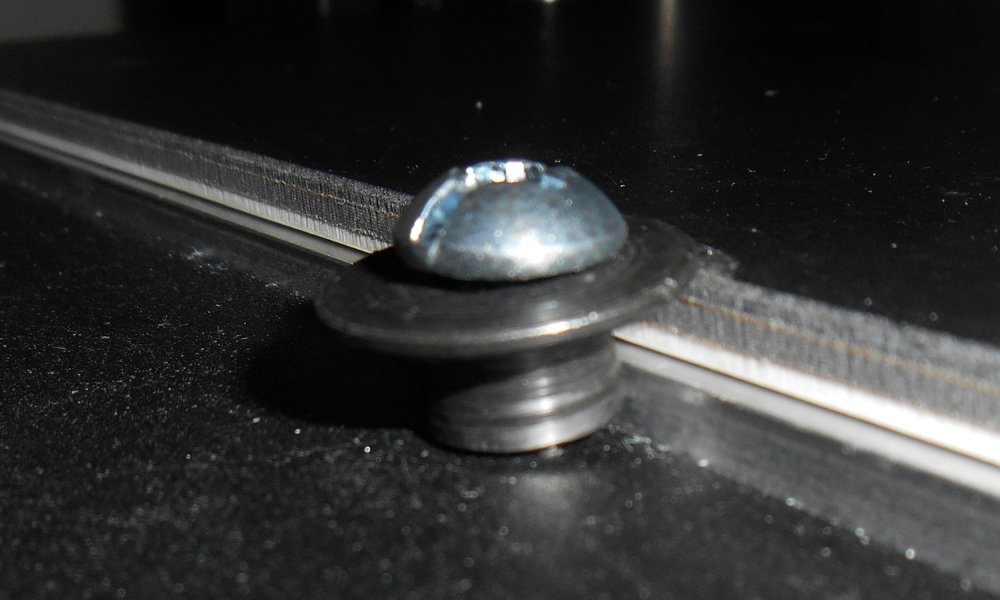 We accidentally drilled the rear holes too close to the build plate so that the spacer would not fit. We had to grind a flat side on the spacer to get it to go in. If you drill your holes out a tiny bit from the build plate and use a slightly larger washer you can avoid that problem.
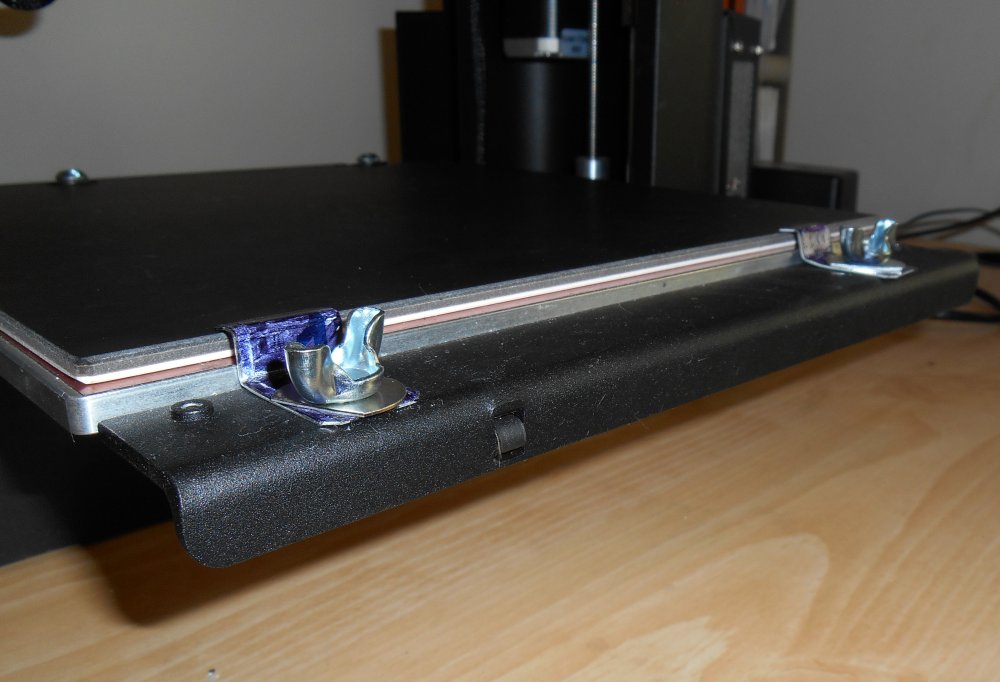
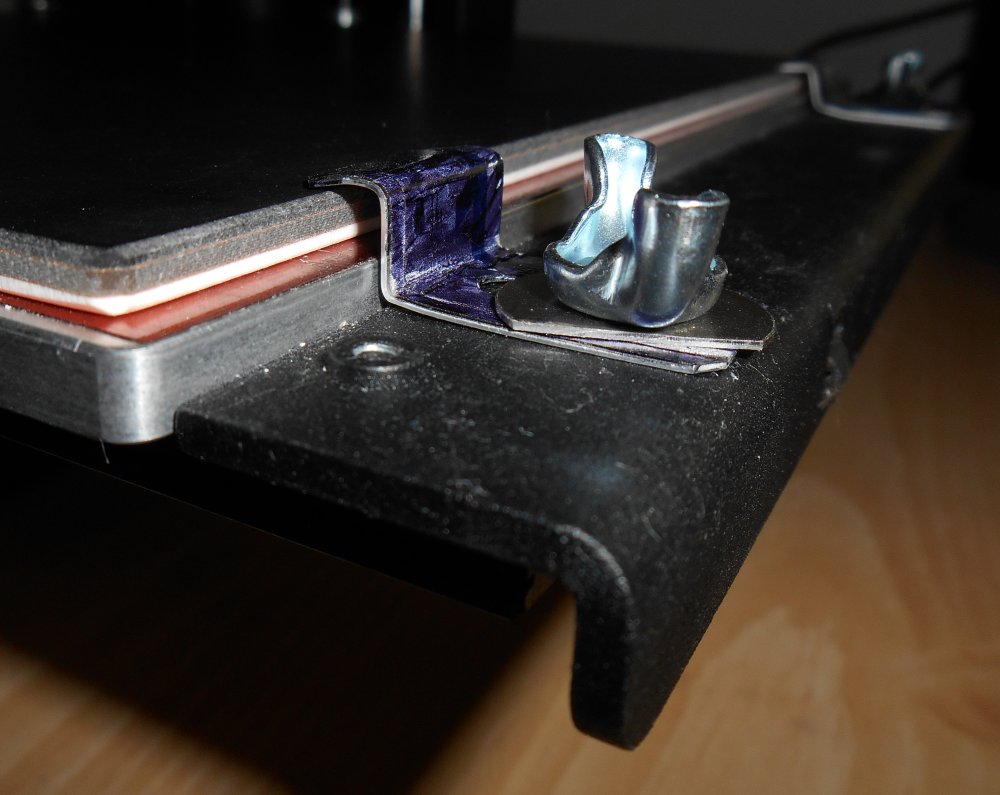
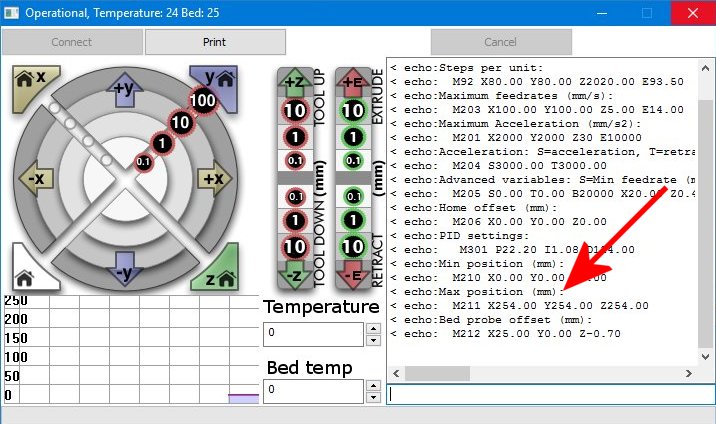
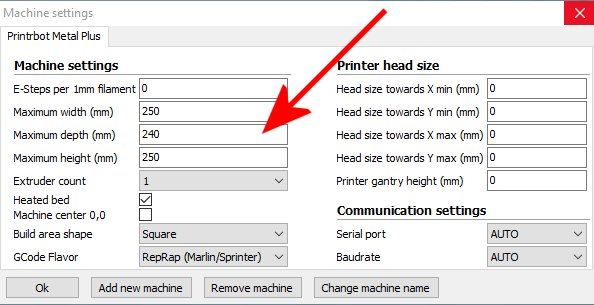
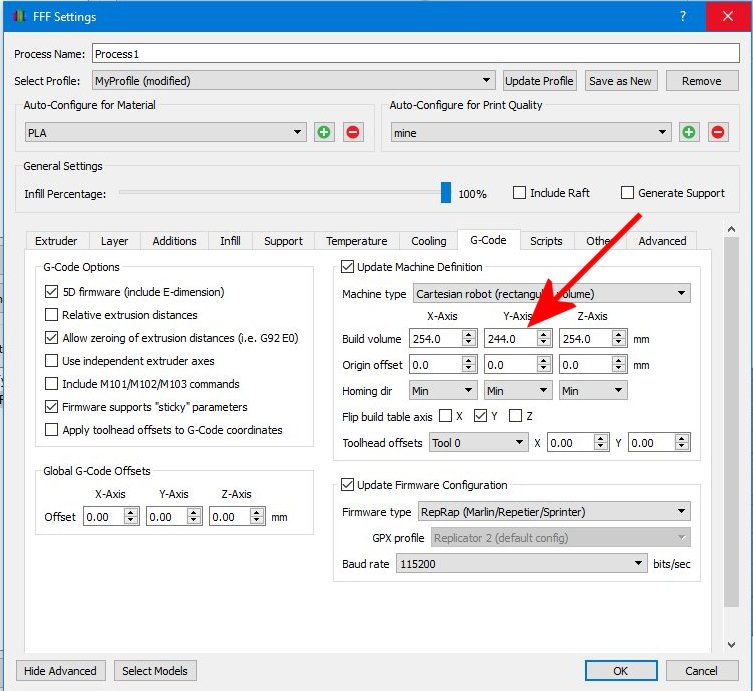

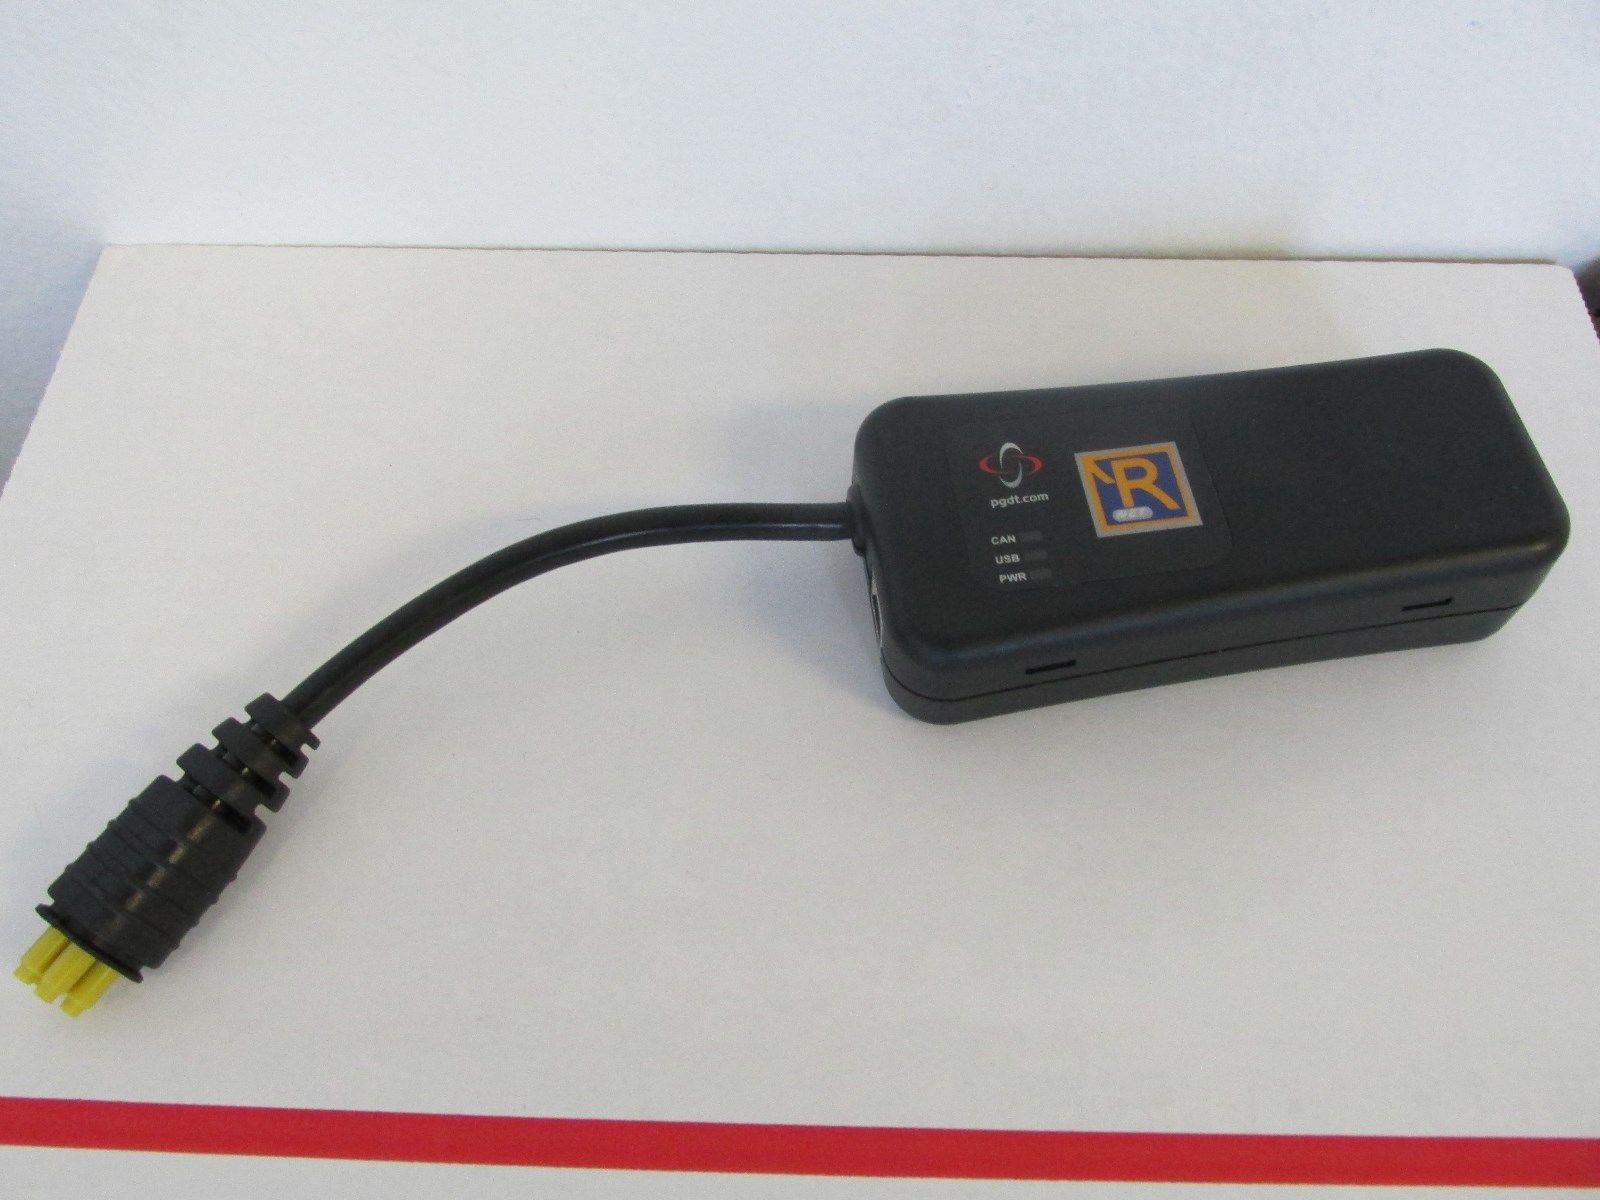


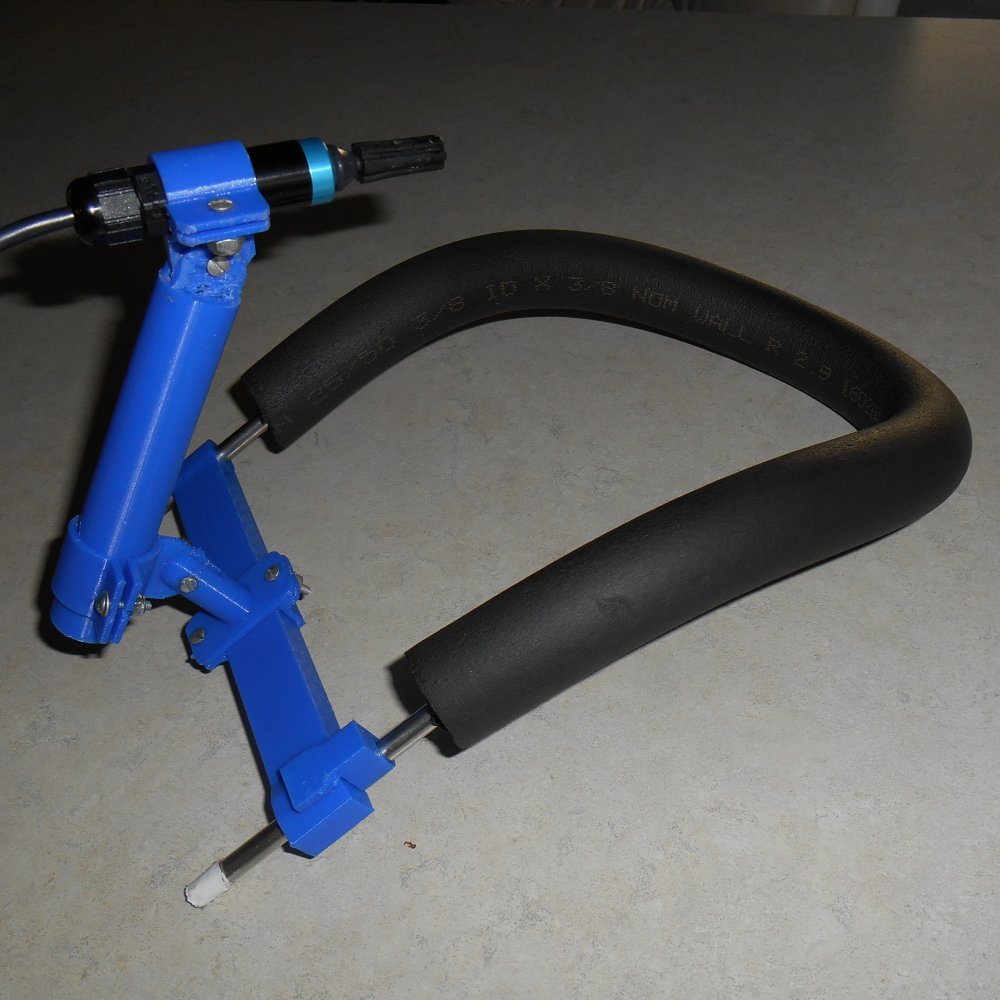
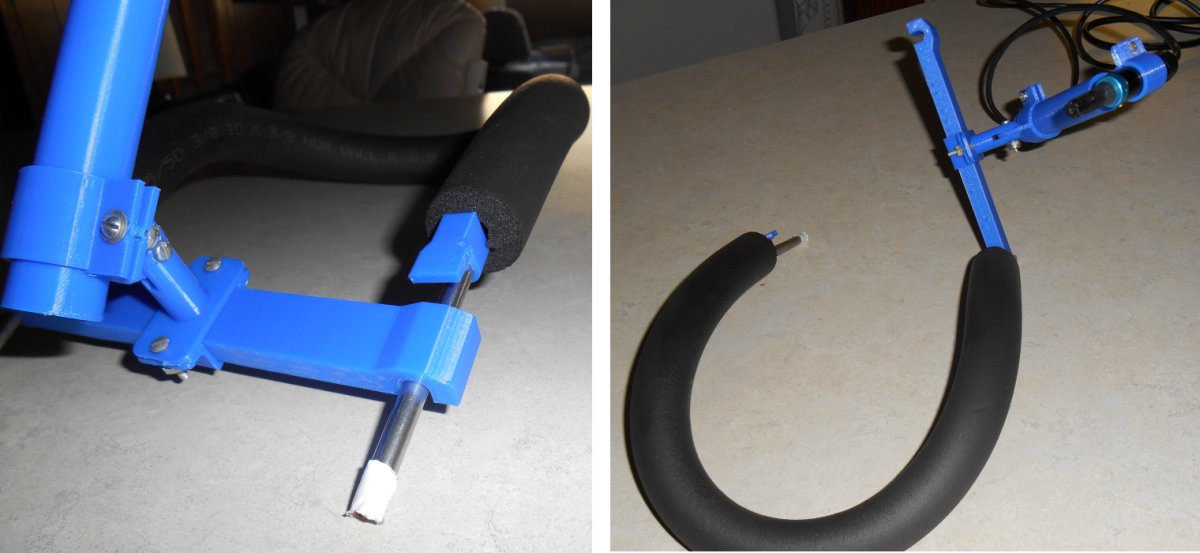


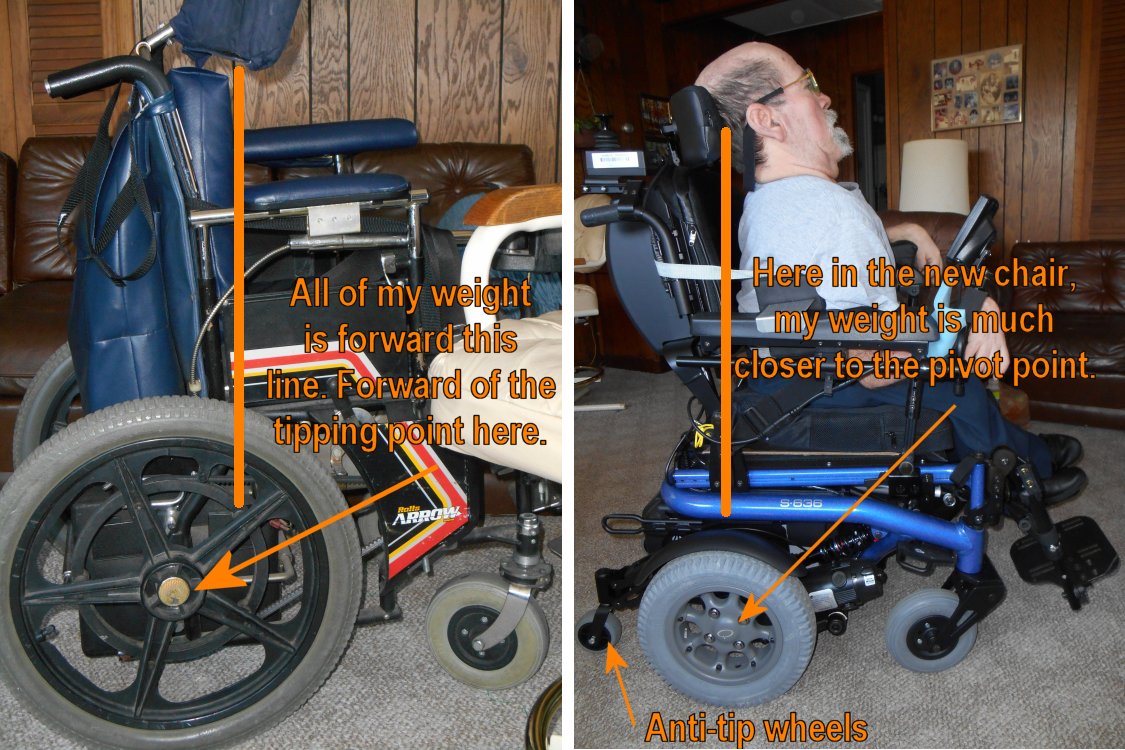
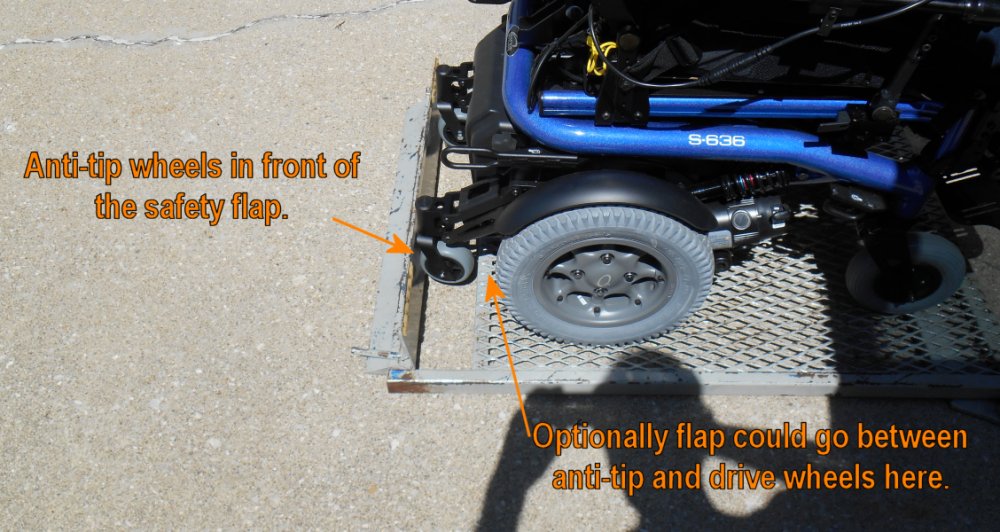
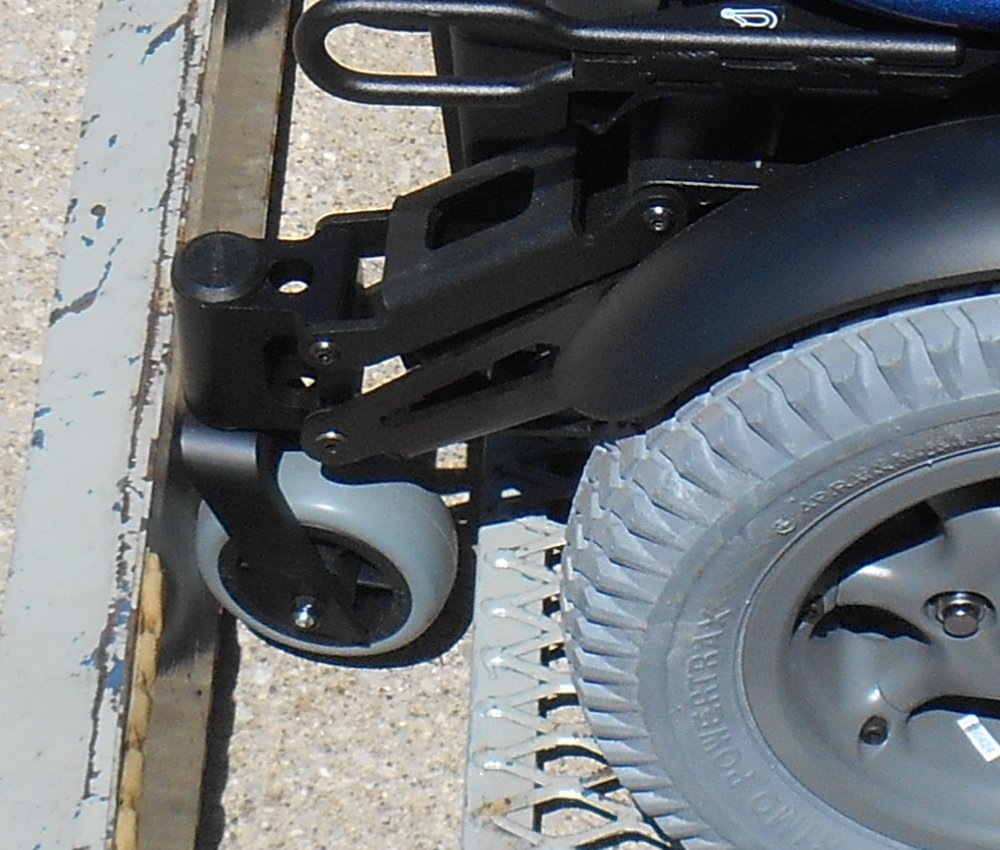 >So I got online to my new favorite go to place for all things wheelchairs, an online discussion forum at wheelchairdriver.com. I asked them if they thought it was safe to remove these wheels and what was the complicated mechanism all about.