Here the show-and-tell with Adafruit industries where I showed off a little circuit board I designed and some ray traced renderings of what the board will look like when it’s complete.

Adafruit Show-and-Tell sticker I earned for this presentation.
Here the show-and-tell with Adafruit industries where I showed off a little circuit board I designed and some ray traced renderings of what the board will look like when it’s complete.
Adafruit Show-and-Tell sticker I earned for this presentation.
Here is a video about my latest electronic project. It’s a mouse and keyboard emulator that I use when my voice control program doesn’t do certain functions or gets hung up. You just plug it into a USB port, load a driver and use a TV remote to control the mouse, arrow keys or keyboard.
Adafruit Show-and-Tell sticker I earned for this presentation.
One of the strangest yet coolest electronic gadgets I’ve seen is an add-on for the Arduino microcontroller called “makey-makey” which allows you to turn ordinary household objects into touch sensor inputs to the microcontroller. From there you interface it to a music synthesizer (or other gadgets) to make them touch sensitive. Of all the uses of makey-makey that I’ve seen this video is probably the coolest. A guy uses a synthesizer/loop sequencer to create a cool version of the theme from the TV show “House”. Actually the name of the song is “Teardrop” by a group called “Massive Attack” but it’s better known as the theme from house.
For inputs he uses ordinary vegetables as touch sensors. Thus the title of this blog post. Enjoy!
In April 2012 I begin work on a project to create an infrared remote control using an Arduino Uno. I downloaded a library of code called IRremote which was published by Ken Shirriff in his blog post here.
http://www.righto.com/2009/08/multi-protocol-infrared-remote-library.html
His library is available on github.com at https://github.com/shirriff/Arduino-IRremote
It’s a remarkable piece of work that makes it incredibly easy to receive, decode, and transmit IR signals such as are used for TVs and other consumer electronics. It supported NEC, Sony, RC5 and RC6 protocols as well as a raw data mode and he later added a 32-bit hash code version. Note: so I don’t have to remember constantly have to spell “Shirriff” I’m going to refer to his original library as the KS library.
However I needed to add some additional protocols of my own. It took a lot of research from a variety of sites but I eventually found a pair of websites that will especially useful in helping me to understand the various protocols available.
One especially useful site is this one which I believe KS cites in his blog http://www.sbprojects.com/knowledge/ir/index.php
However the one that had the most information is this one http://www.hifi-remote.com/johnsfine/DecodeIR.html
It uses a notation called IRP notation that is insanely difficult to understand but once you do it is a very concise way of describing an IR protocol. I used that reference to determine that my Bright House cable boxes which are either Scientific-Atlanta or Cisco user protocol called “Panasonic old”. It also helped me identify NECx and Samsung36 protocols which I needed to implement for various devices I have.
After after adding several of these protocols to the original KS library I realize there was a lot of redundant code being created. Also the way it was written you either had to use all of the protocols at once or you had to create your own custom version in which you deleted or commented out the protocols you didn’t need. Although the code was written in C++ it really didn’t take advantage of object-oriented programming practices for which this application was especially suited. What we really needed was a variety of decoder objects based upon a base object that could be extended by additional protocols without having to modify or recompile the original library.
Also found it a bit difficult to understand what part of the code was hardware related dealing with timers and interrupts and PWM signals versus the encoding and decoding of protocols. Once you understand the protocols you really don’t need to know the hardware specifics. In many ways that’s the whole purpose of a library is to make things as “black box” as possible. The user doesn’t need to know the internal details, only the program interface.
For my own deeper understanding of the code and as a programming exercise I embarked upon a almost complete rewrite of the entire library using the principles of object-oriented programming. I am now ready to release my rewritten library on github for others to use. I did not created as a fork of the original KS library because the rewrite is so extensive that it really doesn’t work as a patch to the original code. I’ve also renamed it because it isn’t really very backward-compatible with the previous code at least from a software standpoint. If you have hardware configured for the previous library it should work out of the box with this library.
I also want to acknowledge the work of TKJ Electronics who have created a fork of the KS code. I use their version to obtain additional information about use of the library with other types of Arduino boards other than the standard Arduino Uno. This was especially helpful to me when I needed to point the code to the Arduino Leonardo especially since the Leonardo does not timer 2 and the pinouts are different. The timer and more detection information from this fork has been included in my rewritten library.
Because my library is such a major rewrite and is not backwards compatible I have given it a different name and have not created it as a fork of either of these two predecessor libraries. I have to acknowledge that this is my first publication of code using github and I really don’t know what the proper protocol is for creating a work based on someone else’s material. If I violated some custom or rule in the open source community please feel free to contact me and I will adjust the linkage of my github pages appropriately.
While much of the code is well documented and includes a variety of example sketches, my intent is to create a series of blog posts here which gives further explanation of how to use the library and explains in more detail some of the example sketches. I also hope to write a post explaining how to use the IRP notation. But for now I just want to get the code out there so that people can give me feedback and perhaps start using it themselves.
Here’s the link to my new library which I call “IRLib”
https://github.com/cyborg5/IRLib/
Here is a page where I link to all of my blog posts related to this library.
http://tech.cyborg5.com/irlib/
I welcome your feedback.
As most of you know I operate my iPod touch using a wooden stick in my mouth. I had to put a metal tip on it to get it to activate the touchscreen but other than that it works really well. The only thing I haven’t been able to do is multi-finger gestures such as the pinch to zoom feature. There are other apps that have special features that require two or three finger swipes that I’ve never been able to do. For example there are some levels of Angry Birds that can only be solved by zooming out.
While doing some Google searches about accessible software I discovered that there has been a feature in the iOS operating system ever since version 5 (we’re now on version 6) called “Assistive Touch”. It puts a little floating icon on your screen that is there all the time. If you tap on it it allows you to do all sorts of different things such as rotate your screen, lock your screen, it’s the home key without using the physical button (which is very useful) and especially it allows you to do pinch to zoom and other multi-finger gestures! Here’s a video explaining the new improved features in iOS 6 regarding Assistive Touch. Here I didn’t even know it was in iOS 5! (Kind of embarrassing for technology geek like me).
That’s all for now… I’m off to finish up those levels of Angry Birds Space that I couldn’t do before.
Those of you who know me know that not only have I built a variety of gadgets both mechanical and electronic to help me deal with my disability, but that I also many years ago helped a friend of mine named Christopher Lee who had very severe cerebral palsy get access to a computer using software I wrote. With new inexpensive controllers like the Arduino and the new Raspberry Pi credit card size computer running Linux, the opportunities for making adaptive equipment for the disabled are going to go through a new resurgence not seen since the days in the late 70s early 80s when the only way to have a personal computer was to buy a bag of parts and fire them together yourself.
But an interesting phenomena is occurring. There seems to be a great disparity in the cost of these devices. On one hand we have the open source DIY maker community designing gadgets and giving away schematics and software for free. On the other hand we have people commercializing these projects and building businesses around them.
I’m all for people getting paid for their inventions even if the invention is designed with altruistic motives such as helping the disabled, teaching underprivileged children, or leveraging technology in undeveloped countries. I appreciate that some of these devices are in such small demand that the overhead to produce and sell them is great because they are built by hand and sold in small quantities. On the other hand some amazing work is being done in the DIY maker community that shares its designs and software for free and allows people to adapt it and further innovate it to meet their needs. It tends to make one wonder if the standard business model is really the best way to get products in the hands of people who need them.
Here are couple of examples… In previous installments of this blog I showed you how I showed off my IR remote control for my TV that was built with an Arduino microcontroller. My venue was Adafruit Industries weekly Show-and-Tell video chat via Google+ hangouts. This week’s hangout included a demonstration from a guy named Dino Tinitigan who had showed off some of his robotic projects in the past. But this time he showed a power wheelchair that can be controlled by tilting your head while wearing a helmet. Although he’s invested a lot of his own design work into it, it pretty much is built from off-the-shelf products the kind of which one could buy at Adafruit or other maker supply houses. He’s demonstrating that anyone with a little bit of maker ability and some time to spare can create incredibly useful technology. I don’t know if he is really creating this stuff as open-source hardware and software or if he intends to commercialize it but in either event he’s creating something and sharing it as a demonstration of what is capable and does not seem to be working out of a corporate model. Click here to see the Show-and-Tell video that demonstrates this.
At the opposite end of the spectrum is another device I stumbled onto today. It is called a Tecla device. Click here for details. It allows you to use pushbuttons or joystick or other adaptive devices to control touchscreen devices such as android and iOS phones and tablets. This is an amazing accomplishment even though it doesn’t allow 100% full access it does allow some use of such gadgets. It is Arduino-based so I understand the underlying technology. However it is only available as a commercial product and the cost is $289 Canadian. My initial reaction was Holy $#!+ That’s outrageous! On further review it probably is a reasonable price for a commercially built product with all of the capability it includes. It has a variety of interfaces that are designed to work with pushbuttons and input controls that meet an industry standard for adaptive devices. It includes the capability to use one’s wheelchair joystick as an input device. Given that it has to be designed to work with a wide variety of devices and it is a commercial enterprise I can understand the price. At the point when I can no longer use my iPod touch, I will probably be buying one of these at whatever price they want to charge for it. I’m sure the people behind it are decent people. They describe themselves as not just for profit. And I certainly have no trouble with doing well while doing good as it were. On the other hand… If I knew what I was doing I could build something similar for about $75 worth of parts.
There has to be a happy medium in here somewhere. Perhaps an open source design that demonstrates the basic functionality and would allow others to adapted as needed combined with a fully developed commercial product with all the bells and whistles for those who don’t have a friend who is a DIY maker aficionado to put it together for them.
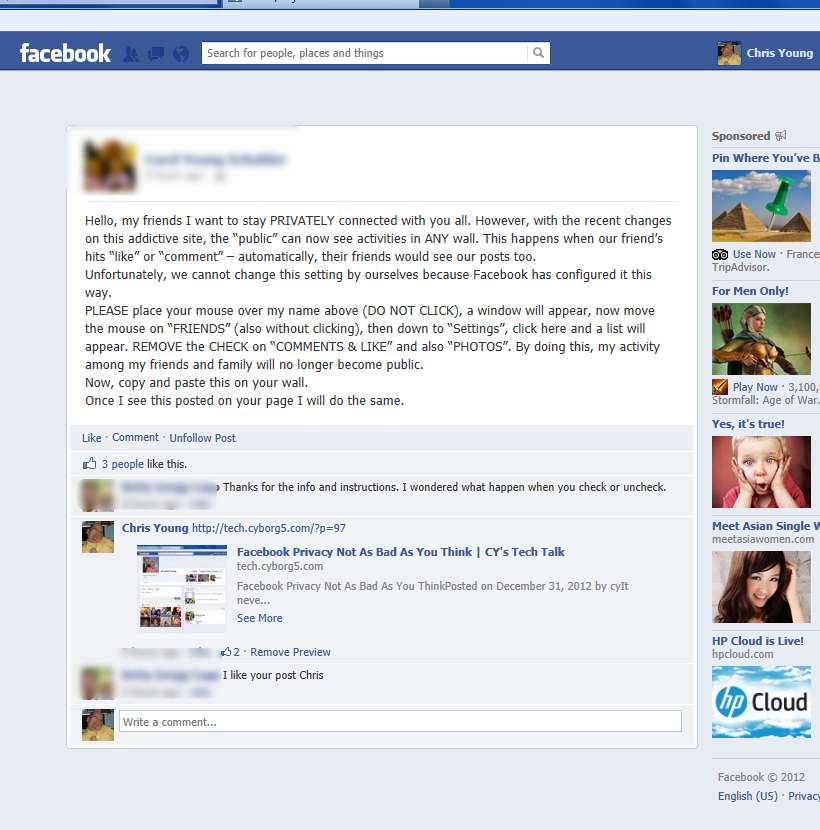
In my previous post in this blog I gave a lengthy demonstration in an attempt to disprove a recent message that has been making the rounds on Facebook regarding privacy when using the like and comment features. Facebook message says that you ask your friends and family to go through lengthy procedures to secure your own privacy. At the end of the explanation I challenged people to prove me wrong. Much to my surprise at least two people inadvertently did prove me wrong. At least partially wrong.
While everything that I said in the original post was true, there was one other privacy issue that I was unaware of and did not test. Here’s what happened… I posted a link to the blog as a comment on a couple of different people who posted the original Facebook message. People who I did not know commented on my comment and liked my comment. I was able to see their comments and likes. Here’s an image that shows what I’m talking about. The image below shows the original message that I first showed at the beginning of the previous blog. Below that there was a comment from someone I didn’t know but I could see their name and the comment. Then you see where I posted the link to my blog as a comment. Then the person who had commented before both liked and commented again. You can click on the image to enlarge it as always.
Comments and likes from stranger
Anyone who uses Facebook on a regular basis has seen this behavior but I’ve never really thought about it in terms of privacy. One question that came to mind… Did this person who liked my comment and who commented upon my comment have their profile set to “public” or to “friends”? To verify this I had the BS account go back in like and comment upon the test message from my dad. Here’s what that looks like. Note this is as seen from the BS account in his privacy setting is still “friends”.
Mr. Shagnasty likes and comments my dad’s post.
So my original post implied that the only thing you need to do to keep your own information private was to set your privacy settings to “friends”. That is not 100% true. Regardless of what your privacy settings are, anytime you like or comment on someone else’s wall (or presumably images etc. as well) your comments and likes will probably be visible to anyone.
Now I logged into my own personal account. Remember that I’m not friends with Mr. Shagnasty. When I look at my dad’s page I can see his public post titled “test message” and I can see that Boliver Shagnasty has both liked and commented upon it. This is despite the fact that BS’s privacy settings are set to “friends”. Here is what my dad’s post looks like from my account.

My view of dad’s wall with BS comments
So if you post on your timeline “To celebrate New Year’s Eve I’m going to rob a bank” then only your friends will see it. However if one of your friends writes “What are you doing on New Year’s Eve?” and you comment in reply “I’m going to rob a bank” then it will be public. Or at least as public as your friends post was. This “loophole” that I’ve discovered doesn’t really have anything to do with the wording of that original Facebook warning. The original warning said “… with the recent changes in FB, the “public” can now see activities in ANY wall. This happens when our friend hits “like” or “comment” ~ automatically, their friends would see our posts too.” I still believe that I have proved that statement is incorrect and challenge anyone again to prove me not slightly wrong but completely wrong.
What am I doing for New Year’s Eve? Sitting home updating my blog and watching NCIS on my DVR. At least that’s all I’m saying in public 🙂
It never ceases to amaze me how misinformation defies the laws of physics and seems to travel faster than the speed of light. This especially seems to be true when the message contained something scary. And there is nothing more scary it seems than losing one’s privacy. The most recent scare tactic comes in a message that you’ve probably seen it looks like this.

Recent Facebook Privacy Warning
My usual source for debunking myths is Snopes.com. However this post from them which they described as “mixed” true and false was so confusing to even me that I wasn’t sure what the real deal was. That inspired me to conduct some experiments of my own.
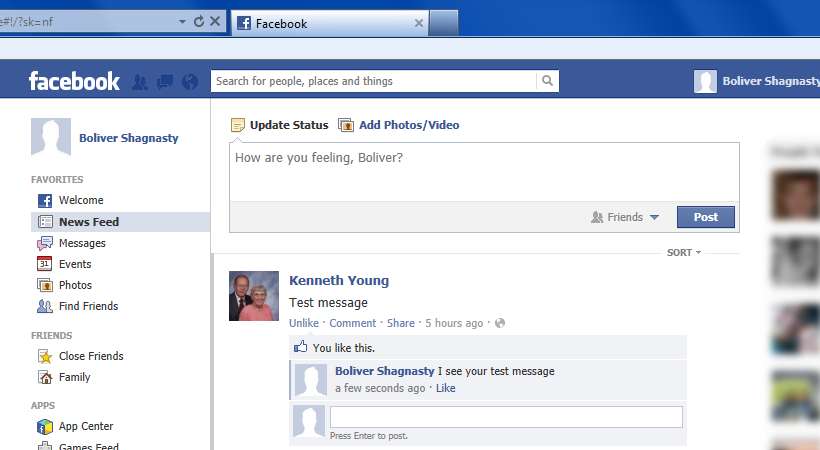
I created a fake profile on Facebook with the name “Boliver Shagnasty”. That was the name of a character that the late great comedian Red Skelton used to play. Legend has it that my father wanted to name me this when I was born. It was a brand-new account with whatever the default privacy settings were going to be. I posted two posts on his own wall. I sent a friend request to my dad’s Facebook account and then logged in under my dad’s account and accepted the friend request. I then had my dad “like” one of the posts and “comment” on the second post. Here is a screen capture of the Boliver Shagnasty Facebook page logged in as himself. You can see that he is logged in under his own account because his name is in the upper right corner. You can click on this image to see it full size. I know it’s unreadable as is.
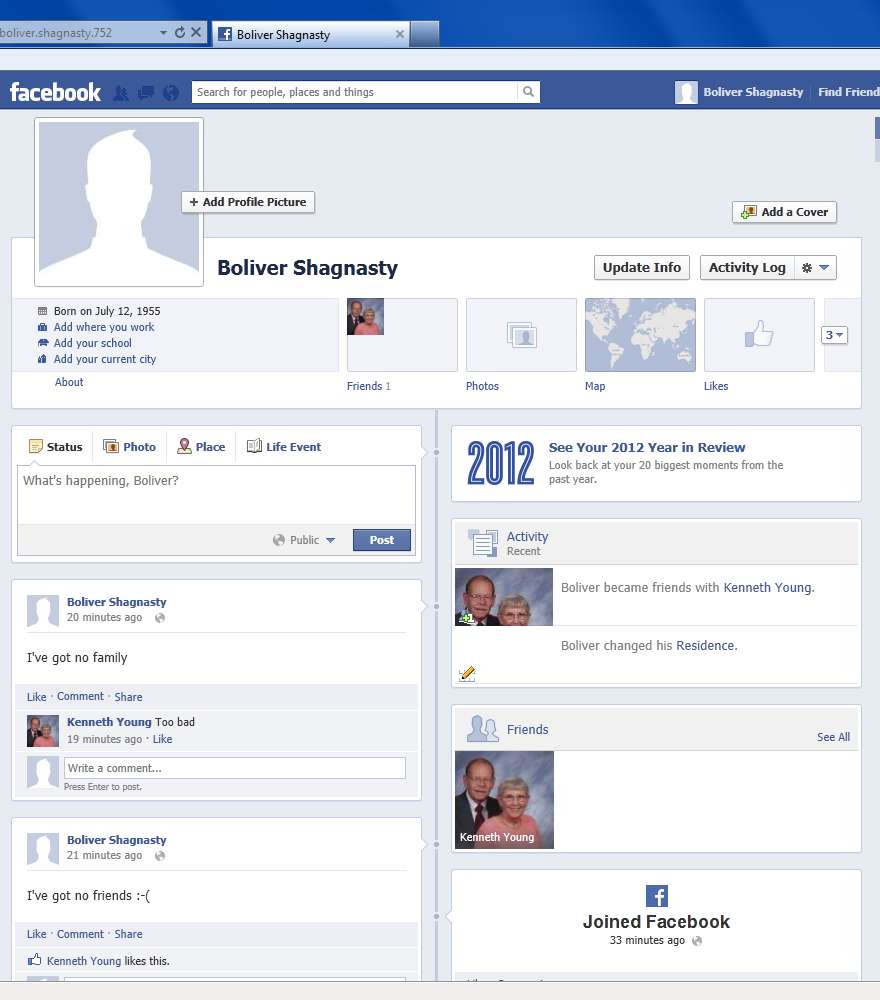
BS Facebook Page as BS sees it.
Here is a view of my dad’s Facebook page showing the posts from the BS account and my dad’s likes and comments.
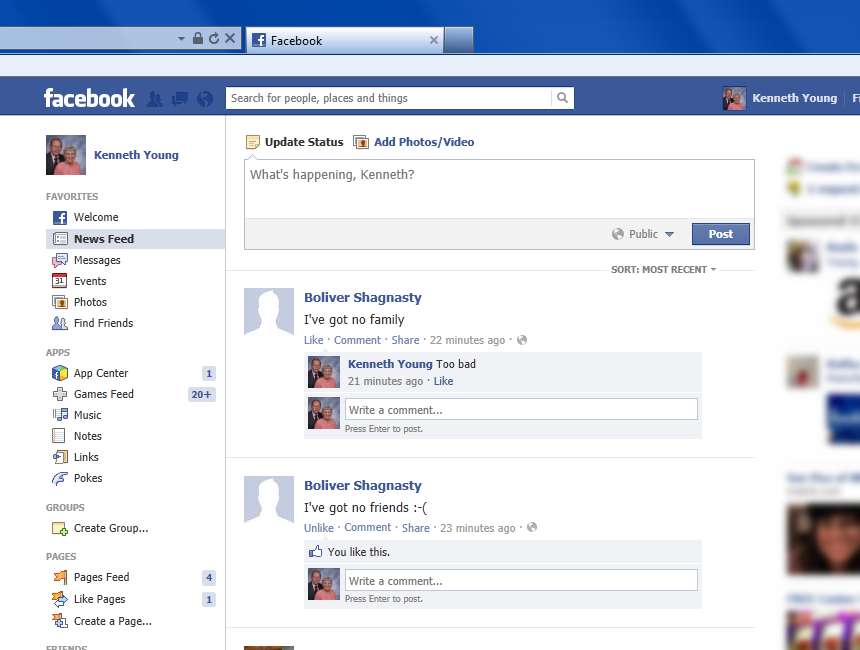
Dad’s FB Page Showing BS Posts
Let’s look at my dad’s privacy settings and you can see that his default is set to “Public”. It was that way when he liked and commented the BS posts.
Dad’s FB privacy settings “Public”
So now let’s recap this… Both my dad and BS have all of their settings set to public. If we are to believe all of the dire warnings about everyone knowing every time you like or comment something then when I log into my own Facebook account under Chris Young, I ought to be able to see all of the activity going on between my dad and BS. Note that I am not friends with the BS account only with my dad (and a bunch of other people of course). When I looked at my timeline there was no indication that my dad had done anything that was publicly viewable. Just to make sure, I viewed my dad’s page while logged in under my account. Here is the screen capture. You can note that it is logged in under my account because my name is in the upper right corner. You can see that the only activity viewable to me in this regard was that my dad had added Boliver Shagnasty as a friend. Even when I take the trouble to view my dad’s wall, I cannot see that he liked or commented on anything from Boliver. As usual you can click the image to see it full size.
Dad’s FB Wall as I see it
So even though my dad and BS both are fully public, I cannot see my dad’s activity regarding the BS posts by looking at either my wall or my dad’s wall. So then I try finding the BS account from my Facebook account and I can indeed see it. That’s no surprise because the BS account is in fact a public viewable account. The point is the only way I would know that account exists is if I would do a search on the name or I would happen to notice that my dad was friends with that person. Also since my dad is a friend, Facebook might recommend Boliver Shagnasty as a friend I might want to add. But other than that he would remain a mystery to me.
So suppose your name is Boliver Shagnasty and you don’t want Kenny Young’s friends viewing your posts. We’ve already proved that they are not going to stumble onto your posts just because Kenny likes them or comments upon them. But they could see that the two of you are friends and they could view your posts because after all you’ve made them public by default. Now let’s log into the BS account and say something nasty about Chris that we don’t want him to see. First we will change our privacy settings on the BS account to “friends” and post a message publicly on our wall. This screen grab (click to enlarge) shows us logged in under the BS account showing the BS wall. Note that in the box where you type a new post in the lower right corner is the word “friends” instead of the word “public”. That tells us that any post we make from now on will be visible only to friends. The screen grab shows a post that was made after the default setting was sent to friends. Obviously this is something that Mr. Shagnasty would not want me to see.
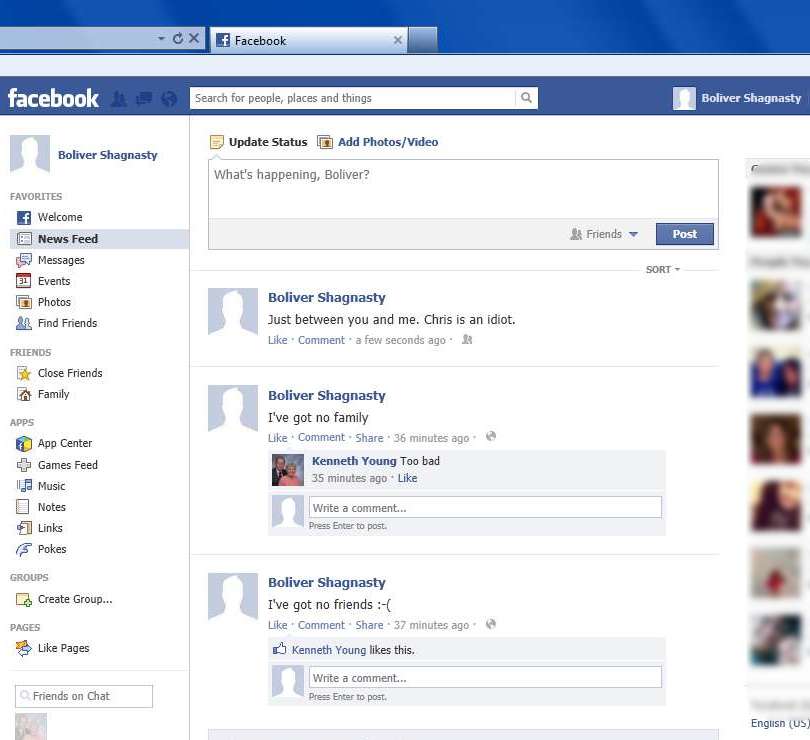
BS posts a private message
Now let’s see if Kenny can see it. The image below is logged in under Kenny’s account and the sarcastic friends only message from BS is visible. Just to make sure, Kenny likes and comments upon this message. Note that Kenny’s wall box at the top still says “Public” which theoretically means anything that he posts is visible to anyone.
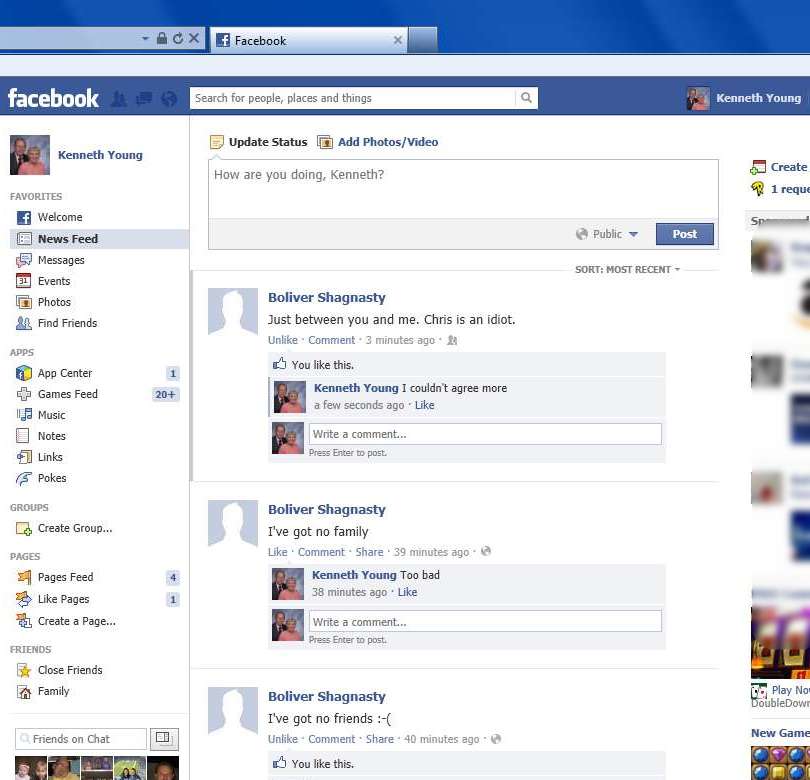
Dad views is wall seeing BS friend only posts. He likes and comments it.
Now let’s see if I can see what my dad and BS are talking about. I’m logged and under my account (notice my name in the upper right corner). I’m looking at my dad’s wall. I mentioned before that when I look at his wall I cannot see any of the BS posts. Just to prove that I can see posts between my dad and myself I have put up some test messages. One is a comment I made on my dad’s wall saying “I see you have a new friend”. Similarly my dad has posted a public “test message”. Those are visible to me by looking at his wall. I could also see his test message by looking at my wall (not shown here). The point of the image below is what you cannot see. You can see neither public nor private posts from BS. While logged into my account I can SEE NO EVIDENCE that my dad liked or commented upon anything related to BS.

My view of Dad’s wall with no BS activity
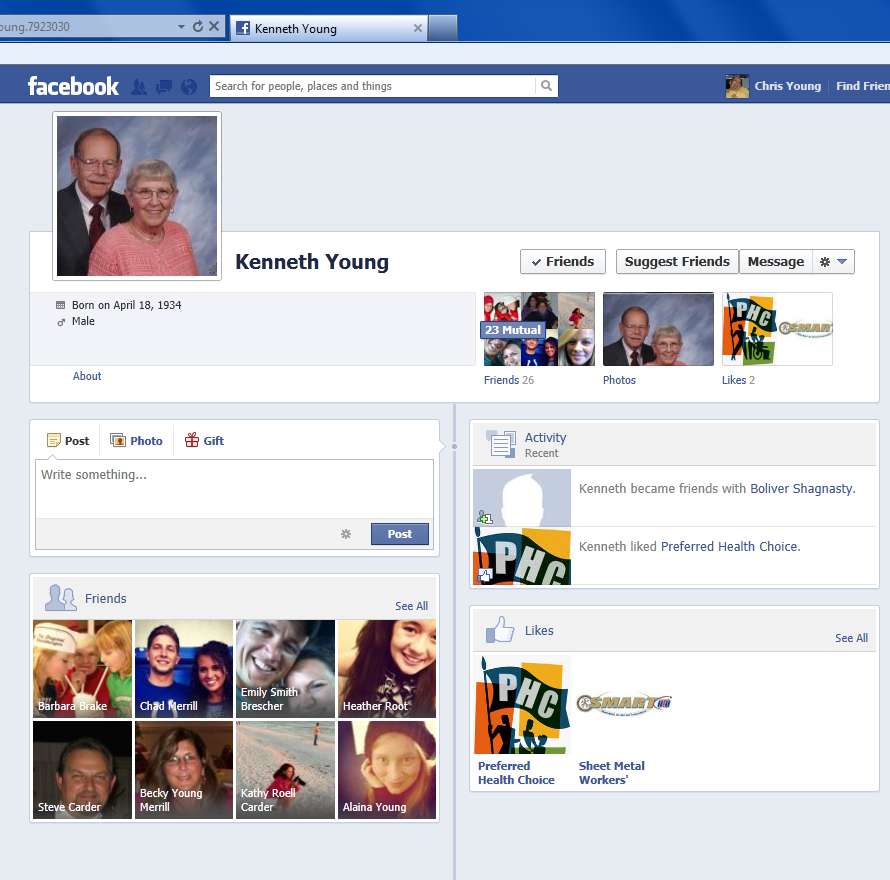
Now we get to the most important screen grab of all. I’m logged in under my own account as you can see my name in the upper right corner. This is my view of the BS account. I’m not friends with this person but I can do a search and find their name or I can note that they are friends with my dad and call up their name from there. Since they are friends with my dad then FB might also recommend them as possible friends to me but at this point I’m not friends with Boliver Shagnasty at all. The image below shows my view of his account. As expected, I can see his public posts. I can see that my dad liked them and commented upon them. What I cannot see is his private post saying that Chris is an idiot.
My view of the BS page which shows ONLY public activity.
So the bottom line is that the only thing you need to do to protect your own privacy is to make your own account “friends only”. There’s nothing that I can do to make your account private. Only you can do that. You do not need to ask all of your friends to hover over your name or click anything. If you want to make your account private then do so.
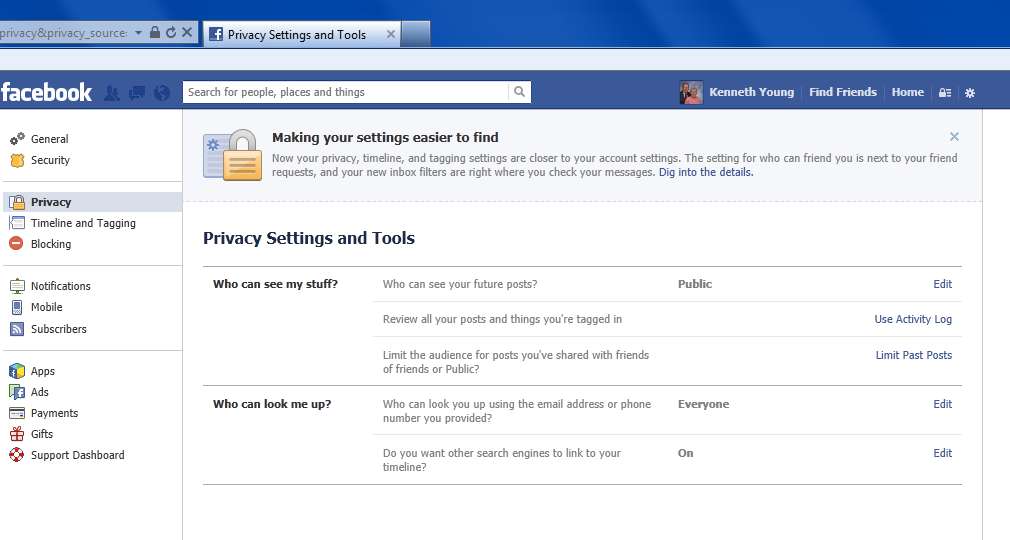
 Go in the upper right corner of your screen and there is a little gear symbol. That’s the master settings for your Facebook account. You can click on it and then click on privacy settings and it will take you to detailed menus that allow you to change all aspects of your settings. As shown here on the left.
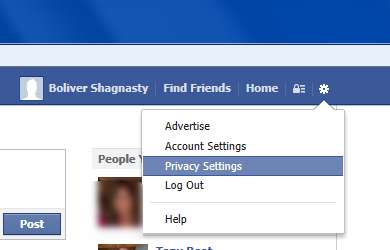
Or actually there is a new and better way to do it. Next to the gear there is a little icon that looks like a padlock. Click on it and it will take you to various shortcuts for your privacy settings. After it drops down, you should click on “Who could see my stuff?” And you’ll get a drop-down menu which looks like the image below. Note that in this case Boliver has already changed his settings from public to “friends”. If you’re says “public” then you just click on it to change it.
FB privacy shortcuts drop-down
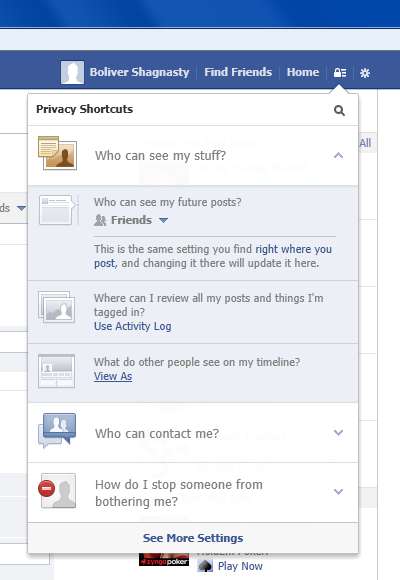
Finally if you want to double check how others see you there is an option for that as well. On the same drop-down menu the third item is “view as”. If you click on it, it will show you what your page looks like as other see it. It will show you how the public sees it or you can optionally change it to see how anyone else either individuals or friends or whatever will see your wall. Here is an example of the “view as” screen for the BS account. It compares exactly to what I can see from the Chris Young account which is not a BS friend (your opinion may vary).

The FB “view as” option.
If you go back to the original message that prompted all this it tells you to hover your mouse over your friends names (each of them one by one) and then hover over the word “friend” and then change the settings. Indeed there is one that is clicked by default called “likes and comments”. I will admit 100% that I have no idea what these options do or do not do. But that really doesn’t matter if you follow the logic of everything that I’ve posted above. It is my opinion that you only thing you need to do to protect your own privacy is to set your default setting to “friends” and only friend people with whom you wish to share your information. As long as your basic privacy setting is as such, I do not believe that if I comment upon your posts or that if I like your posts that it in any way violates your privacy with people with whom you have not already friended. I invite you to prove me wrong.
So stop asking me to do anything to protect your privacy! And feel free to share this post with anyone you like. My account remains public.
Epilogue: shortly after posting this blog, I found a tiny bit of privacy loophole. It still doesn’t invalidate my basic premise but it is something you ought to be aware of if you comment on other people’s posts. Read the complete details in the next installment of this blog by clicking here.
Adafruit Show-and-Tell sticker I earned for this presentation.
This week I took the opportunity to share my own creation which I call “A Remote Control Remote Control”. It’s a gadget I built so it’s easier for me to work a TV remote while I’m in bed. It’s based on the Arduino Uno microcontroller.
Typically during the live chat sessions participants hold up there gadgets and demonstrate them live on a WebCam but that wasn’t going to be practical for me so I decided to create a premade YouTube video to demonstrate my project. I then got on the WebCam live discuss it with the hosts.
Other projects included a educational prototyping board that a woman from Canada had created for her local school system. A guy who made a gag Christmas presents for a friend or relative. When you open the box and had blinking lights and the fish headed guy from Star Wars yelling “It’s a Trap!”. And what appeared to be about a 10 or 12-year-old kid who had an Arduino controller, the blinking LEDs, and a thermal text printer. I’m not really sure what it did but it was cool for a kid’s age. Another guy had a Arduino/Raspberry Pi controlled engraving machine that was pretty cool.
Here is the entire 30 minute online chat.
Here is the video that I showed at the beginning of the chat you want to see a better look at what I was doing then was available during the live presentation.
I will probably go back and share more of my projects including my IR remote control mouse and keyboard emulator. I’m also working on a remote that will replace the remote I use on my wheelchair. That will have to wait until after dad recovers from his pacemaker surgery. The chat is at 9:30 PM on Saturday nights and that won’t work with the guy I have coming in to put me to bed about that time.
As many of you know I’ve been tinkering lately with some new tiny computers. One of them is the Arduino programmable controller and the other one is the tiny Linux computer called Raspberry Pi. I’ve purchased these from a company called Adafruit.com. And unfortunately I’ve gotten addicted to visiting their website. They have a link called “New Products” and it seems to me like there’s something new there just about every day or at least several times a week. Their founder and CEO with the unusual name Limor Fried (aka “Ladyada”) was recently named Entrepreneur Magazine’s Entrepreneur of the Year 2012. You wouldn’t think a young female MIT grad with bright pink hair and studded jewelry would win such an award or get much attention but the do it yourself market and companies like hers are such a movement it even landed them a feature article in the Washington Post this week.
Their latest product is something called “littleBits” as seen here from their product catalog. It’s electronic building kit for kids young and old who want to build gadgets without having to do a bunch of wiring and soldering. Each component is a little circuit board with a connector on each end that snaps together using magnets. You simply lay the blocks end-to-end in a snap together. They even have the magnets polarized in such a way that it won’t let you wire together things that ought not to be wired together. Adafruit.com is just a distributor or reseller. For more information on all of the kits and parts available you can check out littleBits website at http://littlebits.cc/.

“littleBits” Electronics Kit as sold by Adafruit.com
The whole thing reminded me of electronics building kit I had when I was a kid that had similar blocks that were held together magnetically. You would sit the entire array of blocks on a metal plate that served as a ground plane for the circuit you were building. I couldn’t remember the name of it but after several Google searches found it was called Lectron and was made by Raytheon electronics. It was also marketed under the brand name “Electric Dominoes”. After browsing around that website awhile I concluded I must’ve had their series 3 kit shown here. It contained two transistors, a variety of resistors, capacitors, diodes and a radio tuner block as well as a battery pack and a speaker. You could use it to make blinking lights, and audio oscillator (buzzer) and an AM radio. It was one of the coolest toys I think I ever had.

Lectron Series 3 kit like I owned.
Apparently Raytheon did not invent the product it was some German engineering company who licensed it to them. Unfortunately Raytheon stopped selling them in 1969. The rights to the devices transferred to several different companies over the years. Kits are still available from some German company but all of the manuals are written in German and there are no plans to translate them. The complete history of this toy can be found at http://www.lectron.info/
While googling information about the Lectron kits, I stumbled across a website by some guy who had built his own homemade Lectron blocks. That led me on to a bunch of other websites in one of the other articles showed a guy who had made a homemade Dr. Who sonic screwdriver using an Arduino Pro Mini. They sell one commercially that not only makes sound effects and blinks that can be use as a TV remote. This homemade one does all of that and more. According to the website “Among the various features and functions that this device has are an EMF (electromagnetic field) meter, voltage detector, dog whistle, brown note tone generator, sound level meter, ohm meter, volt meter, and an IR universal remote. It can also serve as a laser pointer or a flashlight and of course there is several settings for making the LED pulse dramatical” Check out the article here.
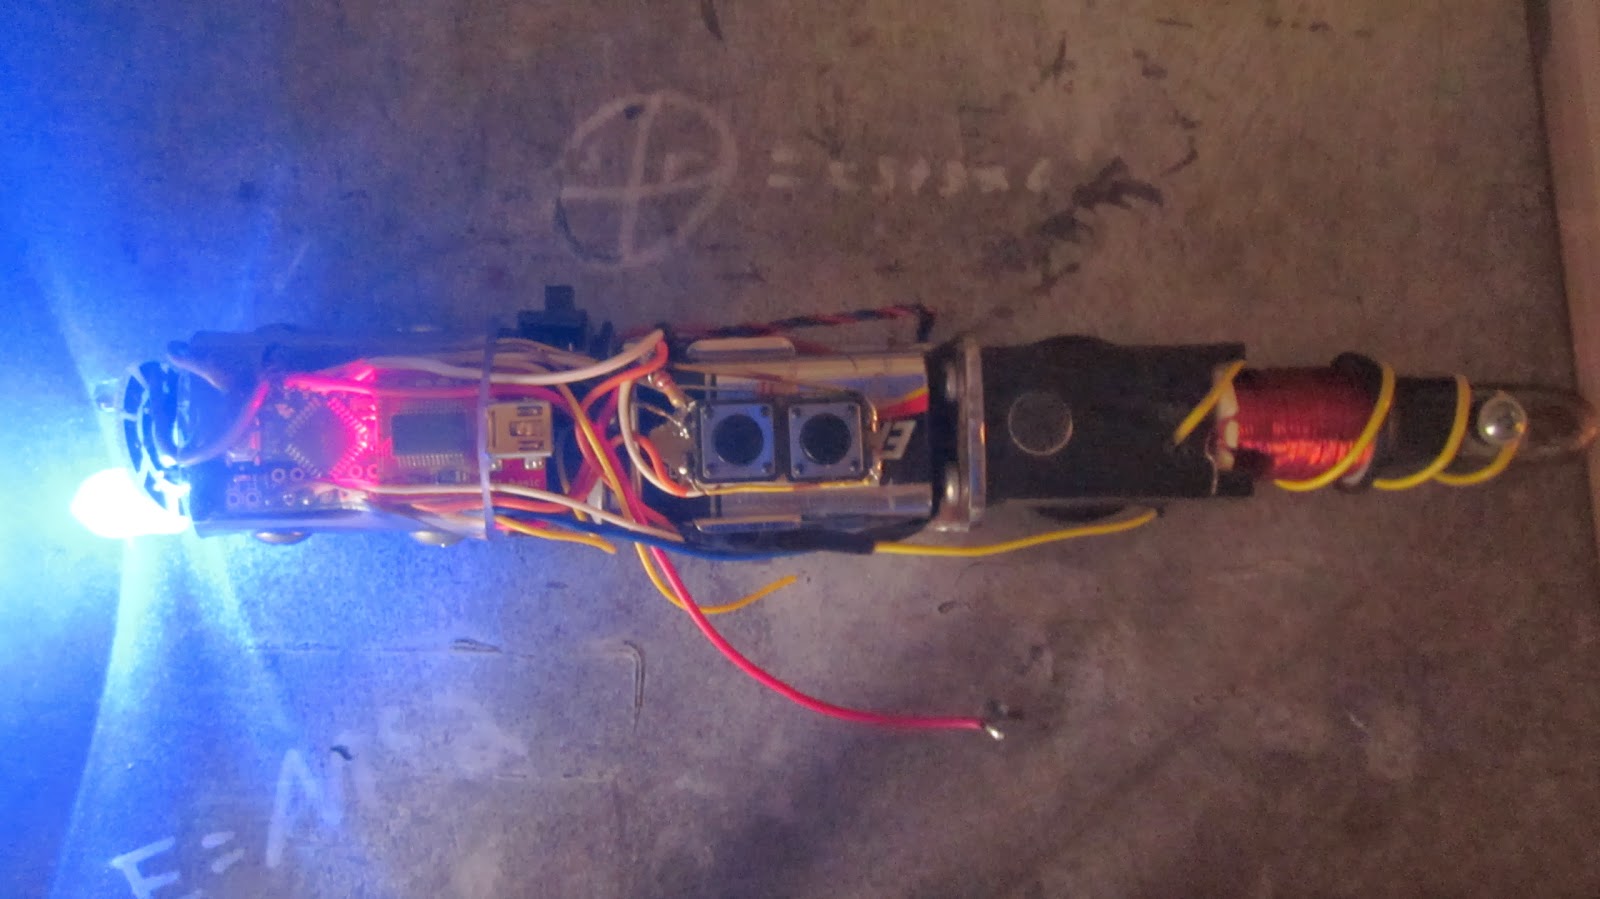
Homemade Sonic Screwdriver
Perhaps after the holidays I will have some time to write some articles here about my own Arduino projects a potential new client I have for their use.